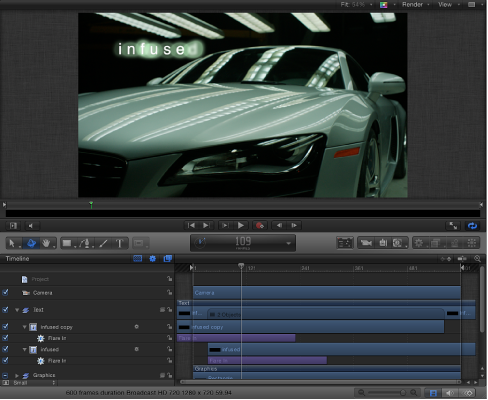
Timing Pane
The Timing pane, located at the bottom of the Motion workspace, has three components, each to control a different timing aspect of a project:
- Timeline: Provides an overview of objects in the project and how they are laid out over time.
- Keyframe Editor: Displays the animation curves for animated parameters and effects.
- Audio Timeline: Provides an overview of audio components of the project and how they are laid out over time.
The Timing pane lets you view and modify the time component of a project’s contents. Objects, keyframes, and audio tracks are shown in a time graph and can be adjusted to coordinate timing of sequence events such as visual effects and audio-video sync.
Choose Window > Show Timing Pane (or press F6).
Click one (or more) of the Show/Hide Timeline, Show/Hide Audio Timeline, or Show/Hide Keyframe Editor buttons in the lower-right corner of the Motion project window.
Choose Window > Video Timeline (Command-7), Keyframe Editor (Command-9), or Audio Timeline (Command-8).
When using a Multi-Touch device, swipe up or down with three fingers to show or hide the Timing pane.
After the Timing pane appears, drag the tool bar that contains the timing display (above the Timing pane) up to heighten the Timing pane or down to lower the pane.
Drag the boundary (the gray line) between the File Browser, Library, or Inspector and the Timing pane list to the left or right to widen or narrow the pane.
Deselect the “i” button in the lower-left corner of the Motion Project window to widen the Timing pane.
Viewing the Timing Pane on a Second Display
You can show the Timing pane on a second display. For more information, see Viewing the Canvas or Timing Pane on a Second Display.
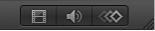
Timeline
The Timeline displays the visual elements in your project (the layers) and cameras, lights, keyframes, and effects such as masks, behaviors, and filters. The left side contains the Timeline layers list. The right side contains the Timeline track area. For more information on using the Timeline, see Using the Timeline.
Choose Window > Video Timeline (or press Command-7).
Select the Show/Hide Timeline button in the lower-right corner of the workspace.
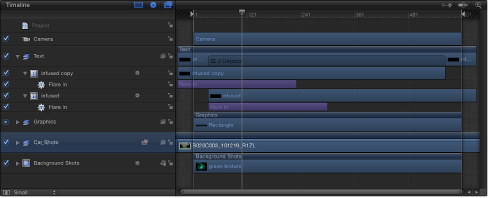
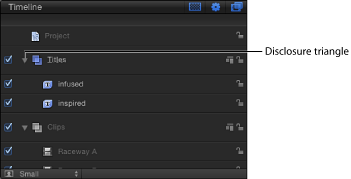
Timeline Layers List
The left side of the Timeline is the Timeline layers list. Like the Layers list in the Project pane, objects appear in the project hierarchy categorized into layers and groups. The Timeline layers list contains many of the controls as the Layers list in the Project pane:
- Isolate button: Appears for a layer, group, or camera in a project that contains a camera. The button has an active and inactive state. Clicking the Isolate button for a layer or group sets that object to its original face-forward orientation (so you can apply a mask, for example). Clicking the button again returns to the previous view. Clicking the Isolate button for a camera takes you to that camera’s view.
Note: When a group or layer is isolated, the name of the item replaces the current camera listing in the Camera menu (in the upper-left corner of the Canvas).
Timeline Track Area
The main part of the Timeline, to the right of the Timeline layers list, is called the track area. Each objects in a project is represented by a colored bar (known as a timebar). Different colors represent different types of objects. For example, behaviors and filters are purple and masks are gray. For a complete table of colors, see Timeline Tracks.
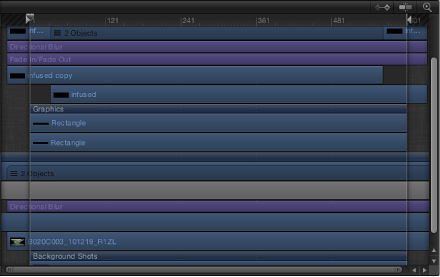
When a group containing more than one object is selected, the group track displays an indicator that identifies how many objects reside in that group. Layers, cameras, and lights are counted in that total. Effects such as masks, behaviors, and filters are not counted.
Timeline Ruler
At the top of the track area is the ruler that provides a gauge for the positions and durations of objects in your project.

The ruler can contain indicators to help mark important frames or sections of the project such as the playhead, play range indicators (also called In and Out points), and markers. The ruler can be viewed in frames or timecode.
Click the downward arrow in the timing display (above the ruler), then choose Show Frames or Show Timecode from the pop-up menu.
The playhead tracks the frame visible in the Canvas. You can drag the playhead or reposition it using the transport controls described in Canvas Buttons and Transport Controls. The playhead in the Timeline and the playhead in the mini-Timeline are linked. Moving one moves the other.
The play range indicators limit the area of the project to be played. For more information on setting and using the play range, see Defining the Play Range.
Markers can be added to your project to identify an important frame or range of frames. For more information on creating and using markers, see Adding Markers.
Working in the Timeline
The Timeline can be customized to facilitate working styles and project needs. For information on navigating frames, see Timing Display.
Adding and Removing Objects
You can add items to your project by dragging them from the Library or File Browser to the Timeline. You can also delete items from the Timeline.
Drag an object from the File Browser or Library to the Timeline track area.
As you drag in the track area, a tooltip appears at the pointer to tell you the frame number.
When you reach the frame where you want the layer to start, position the pointer over the layer you want as the background, and hold down the mouse button until the drop menu appears.
Choose an option from the drop menu:
Choose Composite to add the item to the project in the active group.
Choose Insert to push the existing track forward in time to make room for the new item.
Choose Overwrite to replace the existing object with the new object.
Choose Exchange to exchange an object using the original object’s duration. This option is only available when you exchange the same type of media (such as a QuickTime movie or image sequence).
For more information using the drop menu, see Adding Layers to the Track Area.
In the track area, select the object to remove, then choose Edit > Delete (or press Delete).
Control-click the item to remove, then choose Delete from the shortcut menu.
Moving Objects in the Timeline
When you want an object to begin and end at a different point in the project, you can move it in the Timeline. For more information about moving, trimming, slipping, or retiming objects, see Editing Objects in the Timeline.
In the track area, click a timebar and drag left or right to move it in time.
As you drag, a tooltip identifies the new In and Out points of the clip. A delta symbol (triangle) indicates the number of frames you are moving.
Select the Snapping button in the upper-right corner of the Timeline.

Press Shift as you drag the item in the Timeline.
Snap-to lines appear and the edges of the clip line up with these lines.
Turning Effects On and Off
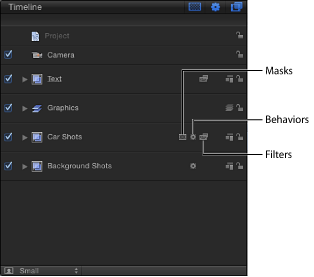
As in the Layers list of the Project pane, when you apply a mask, behavior, or filter to an image layer, an icon appears next to the layer name. Mask, behavior, and filter icons control the visibility of those effects in the Canvas.
Click the mask icon in the Timeline layers list.
A red slash appears over the icon and the effect is temporarily turned off.
Click the behavior icon (the gear) in the Timeline layers list.
A red slash appears over the icon and the effect is temporarily turned off.
Click the filter icon in the Timeline layers list.
A red slash appears over the icon and the effect is temporarily turned off.
For all these controls, clicking the icon again turns the effect back on.
Showing and Hiding Effects
Use the buttons at the top of the Timeline layers to list show or hide effects such as masks, filters, and behaviors. When effects are hidden, their timebars do not appear in the track area. Showing or hiding effects in the list does not control whether the effect appears in the Canvas.
Click the Show/Hide Masks button at the top of the Timeline layers list.
Click the Show/Hide Behaviors button at the top of the Timeline layers list.
Click the Show/Hide Filters button at the top of the Timeline layers list.
Showing and Hiding Keyframes
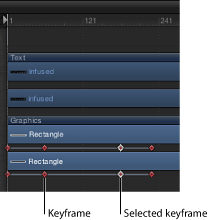
Additionally, the Timeline lets you display keyframes. When keyframes are shown, each track becomes a little taller, and the bottom section is used to show keyframes that exist for the layer.
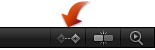
Click the Show/Hide Keyframes button in the upper-right corner of the Timeline track area.
Resizing the Timeline
You can adjust the height of the tracks in the Timeline to provide more or less vertical space. You can also change the width of the Timeline track area.
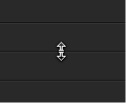
In the Timeline layers list, position the pointer over a horizontal row separator and drag up to decrease or down to increase the height of all tracks.
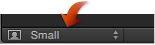
Choose Mini, Small, Medium, or Large from the pop-up menu in the bottom-left corner of the Timeline layers list.
Note: Dragging the row separators up or down sets the pop-up menu to Custom.
Position the pointer over the rightmost edge of the Timeline layers list.
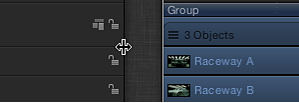
When the pointer changes to the column adjust pointer, drag right to narrow or left to widen the track area.
Collapsing and Expanding Groups and Layers
You can collapse a group or layer so tracks for objects in the group are temporarily hidden.
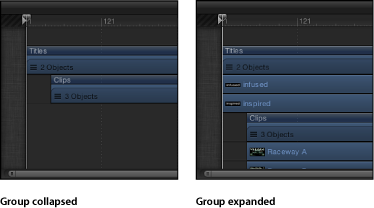
Click the disclosure triangle to the left of the group or layer name in the Timeline layers list.
Several editing tasks can be done in the Timeline, including moving, trimming, and slipping. For more information on how to perform editing in the Timeline, see Editing Objects in the Timeline.
Zooming in the Timeline
A zoom/scroll control at the bottom of the track area lets you zoom in and out to focus on detail in the Timeline. Below the zoom/scroll control is the zoom slider, which zooms in and out based on the location of the playhead.
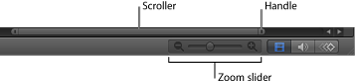
Click the handle of the control and drag it away from the center to zoom out and toward the center to zoom in.
The Timeline updates as you drag.
Drag the control left to zoom right or right to zoom left.
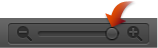
Drag the slider to the left to zoom out and to the right to zoom in.
Pinch open to zoom in, pinch closed to zoom out.
After you zoom in, use two-finger swipes to scroll left or right.
Click the Zoom Time View button in the upper-right corner of the Timeline.

Choose View > Zoom Time View > To Project.
Note: The Zoom Time View items in the View menu are dimmed until you select an object in the Timeline.
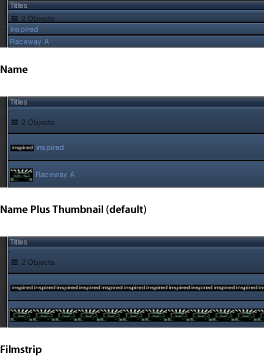
Changing the Track Display
The tracks in Motion can be displayed in a variety of ways for different working styles. You can set your tracks to be viewed as Name, Name Plus Thumbnail, and Filmstrip.
Choose Motion > Preferences (or press Command-Comma) to open Motion Preferences, then click Appearance.
In the Timeline section of the Appearance pane, choose an item from the Timebar Display pop-up menu:
- Name: Displays the name of the object on the track.
- Name Plus Thumbnail: Displays the name of the object and a single thumbnail on the track.
- Filmstrip: Displays frames of the object over the track.
Regardless of the Timebar Display setting, tracks for cameras, lights, behaviors, and filters are labeled with names only. When the Timebar Display is set to Filmstrip, your processing time is increased.
Audio Timeline
The Audio Timeline provides a view of audio elements over time. The audio tracks appear as green bars with the audio waveform on top of the bar, and can be edited like other objects in the Timeline. The Audio Timeline uses the same ruler, buttons, and other controls as the Timeline. For more information on the Timeline interface, see Timeline.
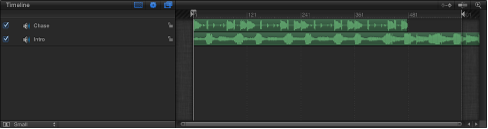
The green bar in the mini-Timeline also shows the duration of the audio file.
Audio behaviors applied to tracks appear as purple bars in the Audio Timeline and mini-Timeline.
For complete information on using audio, see Working with Audio.
Choose Window > Audio Timeline (or press Command-9).
Click the Show/Hide Audio Timeline button in the lower right corner of the workspace.
Note: If you have a Multi-Touch device, and the Audio Timeline (or Timeline and Audio Timeline) is visible, swipe up or down with three fingers to show or hide the Audio Timeline.
You can choose whether to hear the audio play when you drag the playhead in the Timing pane or the mini-Timeline. This is called audio scrubbing.
Working in the Audio Timeline
You can perform basic audio tasks in the Audio Timeline, including scrubbing, modifying the in or out point of a track, and so on. And you can display keyframes in the Audio Timeline.
Hold the Option key down while dragging the playhead right or left in the Audio Timeline (or other area of the Timing pane).
Keeping the pointer still while pressing the mouse button down continuously loops the five frames adjacent to the current frame.
Drag the audio track to the left or right to change the track’s start time.
Drag either end of the audio track.
Set an In time in the Timing controls of the audio track’s Properties Inspector.
Move the playhead to the frame you want, then choose Mark > Move Selected In Point.
Drag the audio track to the right to advance the audio, or drag to the left to rewind.
Drag either end of the audio track.
Set an Out time in the Timing controls of the audio track’s Properties Inspector.
Move the playhead to the frame you want, then choose Mark > Move Selected Out Point.
Click the Show/Hide Keyframes button in the upper-left corner of the track area.
Keyframing Audio
Audio level and pan parameters can be animated. When an audio track is selected, its keyframes can be modified in the Keyframe Editor. Keyframes appear as diamonds, and curves appear as solid lines. Areas before the first keyframe and after the last keyframe are represented with dotted lines.
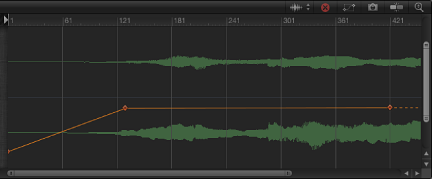
You can manipulate keyframes by dragging them in the graph. Moving a keyframe left or right changes its position in time, while dragging it up or down changes its value. Because audio keyframes work the same as keyframes for other parameters, see Keyframe Editor for more information on the Keyframe Editor interface.
Zooming in the Audio Timeline
The Audio Timeline shares the Timeline’s zooming controls. For more information, see Zooming in the Timeline.
Keyframe Editor
The Keyframe Editor is where you can view and modify the attributes of filters, behaviors, and other effects over time. Each parameter can be displayed as a curve showing how the parameter’s value changes over time. You can manipulate the points in that curve (called keyframes) to create a variety of powerful effects. For more information on using the Keyframe Editor, see Keyframes and Curves.
Choose Window > Keyframe Editor (or press Command-8).
Click the Show/Hide Keyframe Editor button in the lower-right corner of the workspace.
Click the Record button under the Canvas (or press A) to turn on keyframe recording.

Place the playhead at the starting frame, then place the object in a starting position in the Canvas.
Move the playhead forward, then drag the object to the ending position you want.
An editable animation path appears in the Canvas and keyframes appear in the Keyframe Editor for the selected object.
Click the Record button (or press A) to turn off keyframe recording.
In the Canvas, position the object to your desired starting location.
To create an initial Position keyframe, do one of the following:
Press Control-K.
Note: Pressing Control-K adds a keyframe to the last-modified parameter of the object.
In the Properties Inspector, open the Position parameter’s Animation menu (the downward arrow on the right), then choose Add Keyframe.
Note: The Animation menu (the downward arrow) and the Add/Delete keyframe buttons appear when you place the pointer over the end of the parameter row in the Inspector. You can also Control-click a parameter’s name to reveal a shortcut menu.
In the Properties Inspector, click the Position parameter’s Add/Delete Keyframe button.
A keyframe is added at the current playhead position, and the parameter appears red in the Inspector.
Move the playhead to a new time position.
Move the object to a new position in the Canvas.
A keyframe is added at the current playhead position. When you play back the project, the object moves over the interval you set.
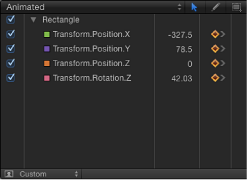
Keyframe Editor Controls
The left side of the Keyframe Editor contains a list of parameters. You can choose which parameters to display by using the Show Curve Set pop-up menu at the top of the list. This menu has an option for creating custom curve sets so you can focus on specific parameters in the Keyframe Editor. For more information on creating and viewing parameter sets, see Custom Parameter Sets.
There are a number of controls above the parameter list:
- Show Curve Set pop-up menu: Sets what is displayed in the Keyframe Editor. The pop-up menu items include:
- All: Displays all parameters for the selected object, whether or not the parameters are animated.
- Animated: Displays only animated parameters and curves for the selected object. This includes animation curves created by keyframing as well as behaviors. This is the default setting. With the Keyframe Editor active, you can also press the U key to choose Animated from the Show Curve Set pop-up menu.
When the selected object is not animated, nothing appears in the Keyframe Editor.
- Modified: Displays only curves that are modified for the selected object. This includes modifications that are not animated. For example, if you change the color of a shape (without animating the color change), the parameter appears in the Modified list because the color was changed from the default color. Animated parameters also appear in the list.
- Active: Shows only parameters being modified. When this option is selected, nothing appears in the Keyframe Editor unless you are modifying an object (in the Canvas, Inspector, or HUD). For example, when Active is selected and you are moving an object around in the Canvas, the X and Y Position parameters and curves are displayed.
- Position: Displays only the Position parameters for the selected object.
- Rotation: Displays only the Rotation parameters for the selected object.
- Scale: Displays only the Scale parameters for the selected object.
- Shear: Displays only the Shear parameters for the selected object.
- Anchor Point: Displays only the Anchor Point parameters for the selected object.
- Opacity: Displays only the Opacity parameters for the selected object.
- Retiming: Displays only the Retime Value parameter for the selected object. This parameter appears in the Keyframe Editor only when Time Remap is set to Variable Speed in the Timing controls of the Properties Inspector.
- New Curve Set: Lets you create a custom curve set.
- Manage Curve Sets: Lets you manage (delete, duplicate, and so on) custom curve sets.
Note: For more information on using curve sets, see Custom Parameter Sets.
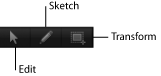
- Keyframe edit tools: There are three tools for editing keyframes and curves in the Keyframe Editor. These tools are located above the parameter list. For more information about using these tools, see Modifying Keyframes.
- Parameter list: The Keyframe Editor parameter list contains the following controls and features:
- Value: Displays the value for the playhead position for that parameter. You can drag in the value field to set keyframe values, or double-click in the field and enter a new value. For more information, see Modifying Keyframes.
- Animation menu: Provides a pop-up menu to control animation and keyframing attributes for that parameter. To open the menu, place the pointer over the column (in the row of the parameter to modify). When the downward arrow appears, click it to open the menu. The menu contains the following items:
- Enable/Disable Animation: Enables or disables keyframes for the parameter. This menu item is unavailable until keyframes are applied to the parameter. When the parameter is animated, the menu item is renamed to Disable Animation. Choosing Disable Animation hides the keyframes you have set, restoring the parameter to its default value. However, the keyframes are not discarded. Choosing Enable Animation restores the parameter to its last keyframed state.
- Reset Parameter: Removes keyframes and settings for this parameter. The parameter value is restored to its default value.
- Add Keyframe: Adds a keyframe at the current frame. If the playhead is positioned on a frame where a keyframe has been added, this menu item is unavailable. A keyframe is automatically added to the last modified parameter of the object (regardless of the status of the Record button) at the current playhead position.
- Delete Keyframe: Deletes the current keyframe. The Delete Keyframe command is only available if the playhead is positioned on a frame where a keyframe exists. You can also Control-click a keyframe and choose Delete from the shortcut menu, or select the keyframe and press Delete.
- Previous Keyframe: Moves the playhead to the previous keyframe for this parameter. The Previous Keyframe command is only available if a keyframe exists earlier in the project. You can also press Option-K to advance to the next keyframe.
- Next Keyframe: Moves the playhead to the next keyframe for this parameter. The Next Keyframe command is only available if a keyframe exists later in the project. You can also press Shift-K to advance to the next keyframe.
- Interpolation: Sets the type of curve for the parameter. See the table in Modifying Curves for examples of interpolation methods.
- Before First Keyframe: Defines the animation before the first keyframe of a parameter. This is called extrapolation. For examples of extrapolation methods, see Extrapolation.
- After Last Keyframe: Defines the animation after the last keyframe of a parameter. This is called extrapolation. For examples of extrapolation methods, see Extrapolation.
- Lock/Unlock Parameter: Locks the parameter to prevent changes. When a parameter is locked, neither keyframes nor curves are adjustable.
- Reduce Keyframes: Applies a thinning algorithm to the selected parameter to reduce the number of keyframes while attempting to maintain a similar curve shape. For more information on keyframe thinning, see Keyframe Thinning.
- Curve Snapshot: Reverts keyframe changes made in the selected curve to the most recent snapshot. This menu item is available only when the Take/Show Curve Snapshot button is enabled. For more information, see Keyframe Editor Control Buttons and Curve Snapshots.
Keyframe Editor Control Buttons
The upper-right corner of the Keyframe Editor contains six buttons that provide additional control over the Keyframe Editor window.
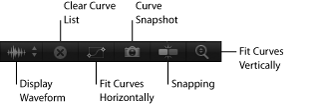
- Take/Show Curve Snapshot: Saves a “snapshot” of the current curve state for use as an overlay to compare with subsequent curve modifications. When this setting is enabled, as you move keyframes in the Keyframe Editor, the original curve—as it appeared when you took the snapshot—remains in its original color. The modified curve appears white.

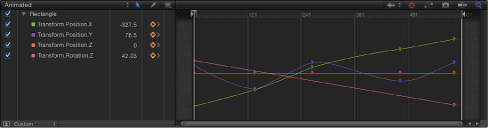
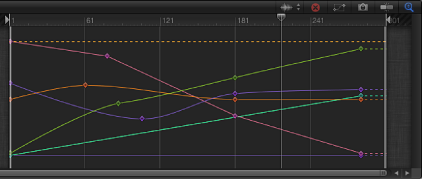
Keyframe Graph
The keyframe graph, located to the right of the parameter list, displays all curves and keyframes for selected parameters. Parameters are represented by different colors. Keyframes appear as diamonds, and curves appear as solid lines. Areas before the first keyframe and after the last keyframe are represented by dotted lines. Selected parameters and keyframes appear white.
You can manipulate keyframes by dragging them in the graph. Moving keyframes left and right changes their position in time, while dragging them up and down changes their values. You can also double-click a keyframe, enter a number into the pop-up value field, and then press Return to change its value.
Control-click a keyframe to access shortcut menu options as well as an Interpolation submenu, which allows you to change curve types. For more information on manipulating keyframes and curves in the graph, see Modifying Keyframes and Modifying Curves.
Ruler
At the top of the keyframe graph is a ruler that provides a visual gauge for positions and durations of keyframes and curves. The ruler is identical to the Timeline ruler. For more information on working with the ruler, see Timeline Ruler.
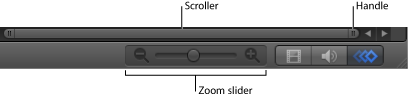
Zooming in the Keyframe Editor
The Keyframe Editor uses the same zoom/scroll control as the Timeline. Below the zoom/scroll control is the zoom slider, which zooms in and out of the graph area based on the location of the playhead.
Drag the handle of the control away from the center to zoom out and toward the center to zoom in.
Drag the control left to zoom right or right to zoom left.
The Keyframe Editor updates as you drag.
Drag the slider to the left to zoom out and to the right to zoom in.
Pinch open to zoom in and pinch closed to zoom out.
After you zoom in, use two-finger swipes to scroll left or right.