Editing Objects in the Timeline
During the process of designing and implementing a motion graphics project, you place objects in the Timeline and Canvas, move them forward or backward in time, and trim them to correspond with the timing of other objects in your project.
Motion has several features that help you modify objects in the Timeline. You can arrange your objects to begin and end at designated frames. You can also use powerful alignment and timing tools, such as snapping and markers. You can retime objects, forcing them to play at faster or slower speeds. You can also modify keyframes in the Timeline. This section describes the various ways you can perform these actions.
Motion uses the terms move, trim, and slip to describe the different ways of editing Timeline objects.
- Move: Changes the location of an object without affecting its content or duration.
- Trim: Changes the duration of an object without affecting its location or content.
- Slip: Changes the content of an object without affecting its location or duration.
Moving Objects
Move an object when you want it to begin and end at a different point in the Timeline.
In the Timeline track area, drag an object bar left or right to move it in time.
A tooltip appears, identifying the new In and Out points as you drag the bar. A delta symbol (triangle) indicates the number of frames you are moving.

Press Shift as you drag the object bar in the Timeline.
Vertical lines appear in the track, corresponding to the In and Out points of other object bars. The active object bar snaps to these lines as you drag.
Moving Object Bars to the Playhead Position
You can move an object bar to a new location in its track by using the Move Selected In Point or Move Selected Out Point command. This command shifts the position of the selected object bar to the current playhead position. You can also use this command to move and align multiple objects in one operation.
Select the object bar to move.
Shift-click to select multiple object bars, if desired.
Place the playhead at the point in the Timeline where you want to move the object.
Choose Mark > Move Selected In Point (or press Shift-Left Bracket) to align the object’s beginning to the playhead, or choose Mark > Move Selected Out Point (or press Shift-Right Bracket) to align the end of the object to the playhead position.
Moving Object Bars Shortcut
In the Timeline, you can move an object bar forward or backward in its track a specific number of frames, or to a specific frame.
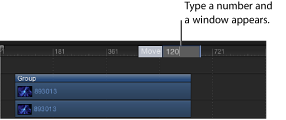
In the Timeline, select the object bar (or bars) to move, then type the number of the frame (or timecode) where you want to move the object.
A value field appears, displaying the number you typed.
Press Return.
The object bar’s In point moves to the specified frame number. If you selected more than one object bar, they all move to the specified frame number.
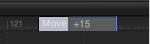
To move an object bar forward a specific number of frames, select the object, type a plus sign (+) followed by the number of the frames you want to move, then press Return.
To move an object bar backward a specific number of frames, select the object, type a minus sign (–) followed by the number of the frames you want to move, then press Return.
Trimming Objects
Trim an object bar when you want to shorten or lengthen its duration in the Timeline. You can shorten or lengthen the beginning or end of the object by dragging from the left or right edge of the object bar (the In and Out points).
You can also trim an object bar (change its In and Out points) by using menu commands and corresponding keyboard shortcuts. This allows you to trim multiple objects simultaneously, as well as make trimming changes on the fly while your project is playing back.
Note: Video and audio objects cannot be trimmed to be longer than the duration of their source media. To extend a video or audio object bar beyond the duration of its source media, you must change the object’s End Condition to Loop, Ping Pong, or Hold in the object’s Properties Inspector. This limitation does not apply to other objects, such as still images, cameras, text, and shapes, all of which you can extend without restriction. You can also change the effective duration of a clip without adding or removing frames by changing the clip’s playback speed. For more information on the Timing controls, see Retiming.
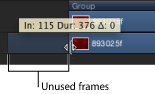
When you trim a video object in the track area, Motion provides a visual representation of how much additional footage is available in the object’s source clip: a dimmed extension on either end of the object bar indicating that unused frames exist in the source video clip. If you see no dimmed extensions when you trim an object bar, there are no unused frames in the source clip. Consequently, you cannot lengthen the object bar (unless you change the object’s End Condition in the Properties Inspector for the clip).
Move the pointer to one end of the object bar you want to trim.
The pointer changes to a trim pointer.

Drag the end of the bar until it reaches the frame where you want the object to start or end.
As you drag, a tooltip indicates the new In or Out point, and the new duration of the object.

Press Shift as you drag the edge of the object bar in the track area.
Vertical lines appear in the track, corresponding to the In and Out points of other object bars. The active object bar snaps to these lines as you drag.
Select the object bar to trim.
Place the playhead at the frame where you want the new In or Out point.
Choose Mark > Mark In (or press I) to set a new In point or choose Mark > Mark Out (or press O) to set a new Out point.
Select the object bars to trim.
Place the playhead at the In or Out position you want.
Choose Mark > Mark In (or press I) or Mark > Mark Out (or press O) to set a new In or Out point.
All selected objects are trimmed to the new point.
Note: If an object has insufficient source media to complete the trim, the bar moves as far as it can toward the new point.
Slipping Video Layers
Slip a video layer when you want to use a different section of your source clip without changing the layer’s duration or where it appears in the Timeline.
Important: Slipping is only possible after you have trimmed a video layer’s timebar.
For example, if you have a shot of a door opening that is three seconds long and you want to trim it down to only one second, you can use the Slip function to select which one-second section to use: the first second as the door leaves the jamb, the next second where it is flying open, or the last second where it bangs against the wall.

As with trimming, when you slip a video layer in the track area, Motion provides a visual representation of how much additional footage is available in the object’s source clip: a dimmed extension on either end of the object bar indicates that unused frames exist in the source video clip. You can only slip an object bar as far as the existing unused frames in the source media.
With the pointer over the video layer’s timebar, press and hold down the Option key.
The pointer turns into the slip pointer.

Drag the middle part of the bar left or right.
Dragging to the left replaces the frames with a section from later in the source material, while dragging to the right uses frames from earlier in the clip.
Splitting Tracks
Occasionally you might want to divide a single object into multiple objects, each in its own Timeline track. You might do this if you want an effect to apply to one portion of an object but not to another part. Or you might want an object to change layer order midway through, to create the effect that objects are moving in 3D space. When working in 3D, you can split camera tracks, too. Splitting tracks allows you to turn one object into multiple pieces and then manipulate each segment of the object on its own track.
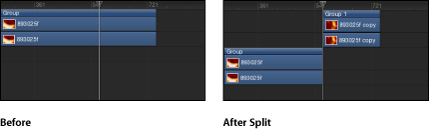
Select the object bar to split.
Place the playhead on the frame where you want the split to occur.
Choose Edit > Split.
The object bar is broken into two pieces, each positioned on its own track.
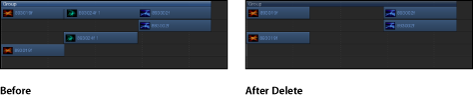
Deleting Objects
Removing objects from your project can be just as important as adding them. Motion provides three ways to remove an object from the Timeline.
- Delete: Removes the object, leaving a gap in the Timeline.
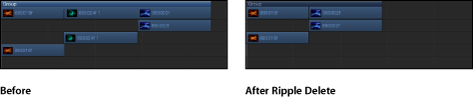
- Ripple Delete: Removes the object and closes up the gap left behind.
- Cut: Deletes the object, leaving a gap in the Timeline, and copies the object to the Clipboard for later pasting.
Select the object to delete.
Choose Edit > Delete (or press Delete).
You can also Control-click the object, then choose Delete from the shortcut menu.
Select the object to delete.
Choose Edit > Ripple Delete (or press Shift-Delete).
Select an object to delete.
Choose Edit > Cut (or press Command-X).
You can also Control-click the object, then choose Cut from the shortcut menu.
Copying and Pasting Objects
As in other applications, in Motion you can copy and paste objects. Copying leaves an object in place and copies it to the Clipboard for later pasting.
When you paste an object, it is placed at either the position of the playhead or at the beginning of the project, based on the Create Layers At setting in the Project pane of the Motion Preferences. For more information, see Project Pane. For the purposes of simplicity, the remainder of this section assumes you have set the Create Layers At to Current Frame.
The pasted object is placed in a new track at the top of the other layers in the active group. If no group is selected, the object is pasted into the group it was copied from. If it was copied from outside the current project, a new group is created.
Pasting multiple objects retains the relative object and layer order of the Clipboard contents.
Objects with filters, behaviors, keyframes, and other effects retain those effects when cut, copied, and pasted. You can also copy or cut filter and behavior objects from one media layer and then paste them into another media layer, effectively transferring the effect to a different media item.
In the Timeline layers list, select the object to copy.
Choose Edit > Copy (or press Command-C).
In the Timeline layers list, select the group you to paste the object into.
Position the playhead at the desired time position.
Choose Edit > Paste (or press Command-V).
Paste Special
In addition to ordinary pasting, Motion lets you paste as an insert, overwrite, or exchange edit. These three commands appear in the Paste Special dialog. Paste special can also be used with selected regions in the Timeline to perform a special type of paste. For more information, see Pasting into a Region Using the Paste Special Command.
- Insert into time region: Pastes the Clipboard contents into the project, pushing existing objects farther down in time.
- Overwrite into time region: Pastes the Clipboard contents into the project, deleting any existing objects at the same point in time.
- Exchange media with existing object: Replaces the selected object in the project with the Clipboard contents.
Select the group to paste the object into.
Position the playhead at the desired time position.
Choose Edit > Paste Special (or press Command-Option-V).
The Paste Special dialog appears.
Select “Insert into time region.”
Click OK to confirm your edit.
The object is inserted into the selected region, pushing any existing objects to the right.
Select the group to paste the object into.
Position the playhead at the desired time position.
Choose Edit > Paste Special (or press Command-Option-V).
The Paste Special dialog appears.
Select “Overwrite into time region.”
Click OK to confirm your edit.
The object is pasted into the selected region, overwriting any existing objects.
Select an object from the File Browser and choose Edit > Copy (or press Command-C).
Note: The “Exchange media with existing object” option is only available for an item copied from the File Browser.
Select the group to paste the object into.
Position the playhead at the desired time position.
Choose Edit > Paste Special (or press Command-Option-V).
The Paste Special dialog appears.
Select “Exchange media with existing object.”
Click OK to confirm your edit.
Displaying and Modifying Keyframes in the Timeline
You can move or delete keyframes that are displayed in the Timeline. You can also display the animation curve for a selected keyframe, using the Keyframe Editor.
In the upper-right corner of the Timeline, click the Show/Hide Keyframes button.
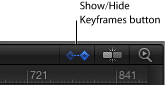
Note: Don’t confuse the Show/Hide Keyframes button with the Show/Hide Keyframe Editor button, located in the bottom-right corner of the Motion project window. The former turns the display of keyframes in the Timeline track area on and off; the latter expands and collapses the Keyframe Editor in the Timing pane.
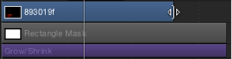
When the Show/Hide Keyframes button turns blue, keyframes appear below the object bars in the track area.
Drag the keyframe to the left or right. When selected, the keyframe appears white.
Moving the keyframe in the Timeline only modifies its position in time. To modify the value of a keyframe, do one of the following:
Control-click the keyframe, choose the property to adjust from the shortcut menu, enter a new value, then press Return.
Use the Keyframe Editor. This allows you to change the value and interpolation of the keyframe. For more information on the Keyframe Editor, see Keyframes and Curves.
Select the keyframe or keyframes to delete, then do one of the following:
Press Delete.
Control-click a selected keyframe, then choose Delete Keyframes from the shortcut menu.
Control-click a keyframe, then choose Delete All Keyframes from the shortcut menu.
Control-click a keyframe on the track, then choose Show in Keyframe Editor from the shortcut menu.
The Keyframe Editor appears underneath the Timeline, showing the animation curve and a new, untitled curve set. For more information on curve sets, see Filtering the Parameter List.
Retiming in the Timeline
You can modify the duration and playback speed of video tracks in the Timeline.
By default, a 60-frame video clip played back at 30 frames per second takes two seconds to display its 60 frames. If its In point is frame 1, its Out point is frame 60. Speed and duration are interdependent; that is, if you increase the a clip’s playback speed, its duration decreases. Playing back the same clip at 15 frames per second would take twice as long; the clip’s In point remains the same, but its Out point becomes 120.
For more detailed information about retiming, see Retiming. For more information on using the Retiming behaviors, see Retiming Behaviors.
Adjusting a Video Clip’s Speed
Motion allows you to easily change the timing of video objects in the Timeline.
With the pointer over the end of a video clip’s object bar (the Out point), press and hold down the Option key.
The pointer turns into the retime pointer.
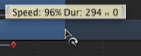
Drag the Out point of the clip’s bar to the left.
As you drag, the tooltip displays the clip’s speed and duration.
Note: To use the retime pointer, Constant Speed must be chosen from the Time Remap pop-up menu in the Properties Inspector. When Variable Speed is chosen, the retime pointer has no effect. You cannot retime images, effects, and other non-video objects.
With the pointer over the end of a video clip’s object bar (the Out point), press and hold down the Option key.
The pointer turns into the retime pointer.
Drag the Out point of the clip’s bar to the right.
As you drag, the tooltip displays the clip’s speed and duration.
Looping a Clip
Another way of extending a video clip’s duration is by looping it. When a looped clip reaches its last frame, it starts playing again from its first frame. You can easily loop a clip by adjusting it in the Timeline.
With the pointer over the end of a video clip’s object bar (the Out point), press and hold down the Option and Shift keys.
The pointer turns into the loop pointer.
Drag the Out point of the bar to the right.
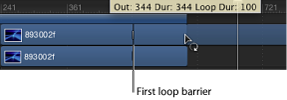
As you drag, the tooltip displays the clip’s Out point, total Duration, and Loop Duration. A looped object displays barriers to indicate where loops begin and end in the Timeline.
The first loop barrier in a clip’s bar is interactive. Moving the barrier changes the point where the clip loops.
Drag the first loop barrier left or right.
The end point of the clip’s loop moves as you drag.
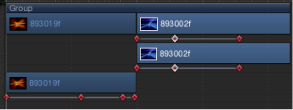
Editing in the Group Track
You can perform editing tasks in the group track, even if the track is collapsed and all objects in the group are not visible in the Timeline track area.
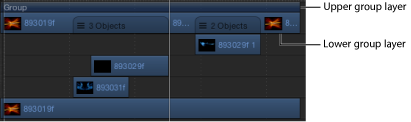
Group tracks contain two colored bars. The narrow, dark-blue upper bar edits all objects in the group as a single unit. It is labeled with the name of the group (“Group” by default). The lower group bar—taller and a lighter shade of blue—edits individual objects in the group. The lower group bar displays information about the names of individual objects in the group, as well as the number of objects that overlap in composited areas of the Timeline.
Moving Objects Via the Group Track
Motion lets you move objects in the Timeline via the group track. Depending on where you drag in the group track, you can move all objects, individual objects, or just those objects that overlap in time (composited objects).
Drag the upper group bar left or right.
All objects in the group move in time.
Click an area of the lower group bar where a single object is visible.
That object is highlighted in the group track.
Drag the section left or right to move the object in the group forward or backward in time.
The selected object moves in time.

Drag an area of the lower group bar where multiple objects overlap.
The composited objects move in time.
Trimming Objects Via the Group Track
Trimming the edges of the upper group bar trims the edges of the objects in the group. If there is only one object, trimming the upper group bar trims that object. If there is more than one object lined up with the edge of the group, trimming the group trims all of those objects.
You cannot trim overlapping objects via the group track.
Drag an end of the upper group bar right or left in the track area.
All objects in the group are trimmed.

Disconnecting a Group Bar from Its Contents
You can modify the upper group bar to be longer or shorter than the contents of the group (the lower group bar). For example, you might shorten the upper group bar to hide a section of the objects in it. Objects that extend beyond the ends of the upper group bar are not displayed in the Canvas.
Holding down the Command key, drag either end of the upper group bar left or right.
Only the upper group bar is trimmed.
Note: After you manually change the length of the upper group bar, it is no longer updated when you add or modify the objects to the group. To restore automatic updating, realign the edges of the upper group bar with the edges of the first and last clips in the group.
You can use this same technique on image and video object bars, trimming them without affecting the duration of their subobjects (masks, filters, or other applied effects objects).
Press Command while you drag the edge of the image or video object bar.
The image or video object bar is trimmed independently of its applied effects objects.
Slipping Video Layers Via the Group Track
In addition to moving and trimming, you can slip video layers in the group track. Any portion of the lower group bar that contains only one video layer can be slipped in this manner. Areas where more than one layer overlap can be slipped by Control-clicking the group bar and choosing a video layer from the shortcut menu.
Holding down the Option key, drag an area in the lower group bar where the video layer is located.
If there are overlapping (composited) layers, before performing this operation, Control-click the overlapping region, then choose the video layer from the shortcut menu.
Dragging right slips the video clip to an earlier portion of the source media. Dragging left slips the video clip to a later portion of the source media. Either way, the position of the clip in the Timeline and its duration are unchanged.
Note: You can only slip an object if there are unused frames in the source media associated with that clip. For more information on slipping, see Slipping Video Layers.