Filtering the Parameter List
Effective use of the Keyframe Editor requires controlling the list of parameters on display in the curve graph. Although you might want quick access to all parameters you animate, displaying too many parameters makes the graph difficult to read. Motion provides the ability to store sets of parameters to facilitate this management.
Working with the Show Curve Set Pop-Up Menu
The Show Curve Set pop-up menu, located at the top of the parameter list, lets you display 11 built-in parameter curve sets as well as custom sets you build yourself. The menu displays the name of the selected curve set (Animated, All, or Modified, for example).
The first option in the Show Curve Set pop-up menu lets you view all parameters associated with a selected object (or multiple selected objects).
Choose All from the Show Curve Set pop-up menu.
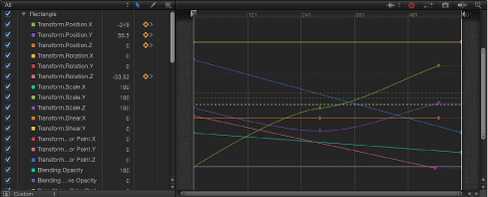
By default, only animated parameters display curves in the graph; nonanimated parameters appear as dotted lines. Deselect a parameter’s activation checkbox to hide it in the graph. You can display or hide all parameters associated with a group or object by selecting or deselecting its checkbox.
Dynamic Curve Sets
Alternatively, you can use the Show Curve Set pop-up menu to limit the display to dynamic parameters—parameters with keyframes, for example. There are three options in the Show Curve Set pop-up menu that show dynamic parameters: Animated, Modified, and Active.
Choose Animated from the Show Curve Set pop-up menu.
Parameters with keyframes are displayed.
Choose Modified from the Show Curve Set pop-up menu.
This option shows the parameters that have been modified from their default values, or are currently being modified (in the Canvas, Inspector, or HUD).
Choose Active from the Show Curve Set pop-up menu.
This option shows only parameters being modified in real time. For example, with Active selected, dragging an object in the Canvas displays its X, Y, and Z Position parameters in the Keyframe Editor.
Related Curve Sets
The next seven options in the Show Curve Set pop-up menu display specific parameters. For example, to check the position of several related objects in a project, you can use the Position curve set. Because you can display multiple related curve sets at the same time, you don’t need to switch between curve set views. Curve sets are available for the following parameters: Position, Rotation, Scale, Shear, Anchor Point, Opacity, and Retiming.
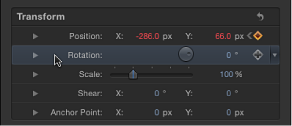
Choose a parameter type (such as Rotation) from the Show Curve Set pop-up menu.
Only parameters of the chosen type are displayed.
In the Layers list, Canvas, or Timeline layers list, Shift-select the objects that contain keyframes you want to view.
Choose a parameter type (such as Scale) from the Show Curve Set pop-up menu.
Only parameters of the chosen type are displayed for the selected objects.
Custom Parameter Sets
In addition to using the built-in curve sets, you can make and manage your own using the last two options in the Show Curve Set pop-up menu: New Curve Set and Manage Curve Sets. As you create and store custom parameter sets, they appear in the Show Curve Set pop-up menu, allowing you to switch between them. Deleting, duplicating, and modifying custom sets is done in the Manage Curve Sets dialog (accessible from the Show Curve Set pop-up menu).
Choose New Curve Set from the Show Curve Set pop-up menu.
A dialog appears.
Enter a name for the set, then click OK.
After you create a curve set, you can choose it from the Show Curve Set pop-up menu.
There are several ways to modify a custom curve set.
After you create a custom curve set, drag a parameter name from any panes in the Inspector into the Keyframe Editor parameter list.
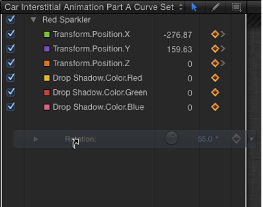
Click the Animation menu for the parameter, then choose Show in Keyframe Editor.
The parameter is added to the custom curve set.
Note: If Animated is chosen from the Show Curve Set pop-up menu when you use the Show in Keyframe Editor command from the Animation menu, an untitled curve set is created.
Drag the parameter out of the list.
Click the Clear Curve List button in the top-right corner of the Keyframe Editor.

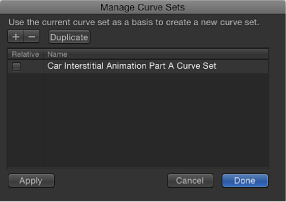
Choose Manage Curve Sets from the Show Curve Set pop-up menu.
The Manage Curve Sets dialog appears.
Select the name of the set to delete.
Click the Delete button (–) at the top of the dialog.
The set is deleted.
Click Done to close the dialog.
Choose Manage Curve Sets from the Show Curve Set pop-up menu.
The Manage Curve Sets dialog appears.
Select the name of the set to duplicate.
Click the Duplicate button at the top of the dialog.
The set is duplicated.
Double-click the set name in the list, then enter a name for the set.
Click Done to close the dialog.
The new set now appears in the Show Curve Set pop-up menu. These sets are saved with the project, so each time you reopen the project, they are available. You can store as many parameter sets as you like. After you store a set, you can change or delete that set as needed.
You can switch back and forth between custom curve sets that contain common animated parameters by using the Manage Curve Sets dialog.
For example, if you created a custom curve set for an object’s Position and Rotation parameters, and your project also contains another object with animated Position and Rotation parameters, you can switch back and forth between their curve sets in the Manage Curve Sets dialog.
Choose Manage Curve Sets from the Show Curve Set pop-up menu.
Select the Relative checkbox in the left column of the Manage Curve Sets dialog.
The curve set is displayed for the currently selected object.
Saving Animation Curves
Animation curves can be saved in a folder in the Library, such as the Favorites category. Alternatively, you can create a folder in a category. After an animation curve is placed in the Library, it can be added to an object in any project. Animation curves saved in the Library appear with a custom icon.
Note: Items saved to the Library appear in the Finder with a .molo extension (“Motion Library object”). These items cannot be opened from the Finder.
You can save multiple curves to the Library as one file or multiple files. For example, if you create an animation that uses multiple curves and you want to save the cumulative effect of the animation, you can save all curves as one item in the Library.
Although you can save animation curves into the Content category, it is generally recommended that you save items that you use frequently in the Favorites category—some Motion Library categories contain so many items that using the Favorites or Favorites Menu categories can save you search time. In the Favorites category, you can create additional folders to organize custom items.
You can also create folders in existing categories, including Favorites, Favorites Menu, or Content. Folders created in the Content category appear in the Library sidebar. Folders created in subcategories, such as Basic Motion, appear in the Library stack and not the sidebar. For more information on creating folders in the Library, see Saving and Sharing Custom Behaviors.
Animation curves saved to the Favorites Menu category can be applied to objects using the Favorites menu.
Open the Library and select the Favorites or Favorites Menu category.
Drag the name of the parameter animation curve to save from the parameter list in the Keyframe Editor into the stack at the bottom of the Library.
When you save an animation curve, it’s placed in the /Users/username/Library/Application Support/Motion/Library/Favorites/ or /Favorites Menu/ folder.
Note: If you drag an animation curve to another subcategory, such as the Glow (Filters) subcategory, the curve is placed in the Content category, which becomes active.
Open the Library and select the Content, Favorites, or Favorites Menu category.
In the parameter list of the Keyframe Editor, select the animation curves you want to save and drag them to the stack, holding the mouse button down.
When the drop menu appears, choose “All in one file” or “Multiple files.”
“All in one file” saves the animation curves together, listed as one item in the Library. “Multiple files” saves the curves as individual items in the Library.
To name the file, do one of the following:
Control-click its icon in the Library stack, choose Rename from the shortcut menu, then enter a descriptive name.
Select the icon, click its name, then enter a descriptive name.
Note: When you Control-click an animation curve icon in the Library stack, the Edit Description shortcut menu item becomes available. This is a handy tool that allows you to enter custom notes about an item saved in the Library. After you choose Edit Description, enter your notes in the text field, then click OK.