Adding Layers to the Track Area
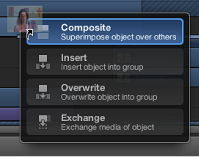
When you drag a new media item into the track area, a drop menu appears with options for how the new layer should be incorporated. Depending on where in the track area you drop the item, the menu displays different options. If you drag to a group or layer track in the track area, you can choose Composite, Insert, or Overwrite. An additional Exchange option becomes available when you exchange the same type of media (such as a QuickTime movie, an image sequence, or an image file). For example, the Exchange menu item is displayed when you drag a QuickTime movie onto another QuickTime movie’s track.
Library effects (behaviors, filters, and so on) can also be dragged into the Timeline track area. However, because effects objects are applied to media layers (images, clips, audio, and so on), they cannot be grouped by themselves.
Note: As previously discussed, you can also drag media items to the Timeline layers list. For more information, see Adding Objects to the Timeline Layers List.
When you add a media item to a project via the track area, a new layer appears in the Timeline layers list. The new layer can appear above or below an existing layer; where you release the mouse button determines placement of the new layer.
Note: Objects such as cameras and lights that are saved to the Library can also be dragged to the Timeline.
If you are dropping multiple items, you can choose Composite or Sequential from the drop menu. Composite places the new tracks one on top of the other. Sequential places the new tracks one after the other.
Note: If you release the mouse button before the drop menu appears, the default choice of Composite is applied. This means that a new track is added above the other tracks in the Timeline, and the layer appears on top of other layers in the Canvas.
Composite
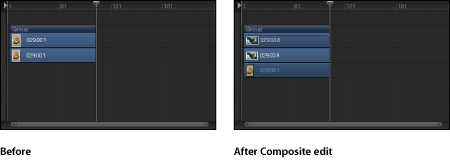
When you choose Composite from the drop menu, the new object is added to a new track in the active group, and all layers remain visible in the Canvas simultaneously.
Drag an item from the File Browser, Library, or Media list into the Timeline track area.
As you drag, a tooltip appears at the pointer, indicating the frame number where you are located.
When you reach the frame where you want the new layer to start, position the pointer over the layer you want as the background, holding down the mouse button until the drop menu appears.
Choose Composite from the drop menu.
The new layer is composited into the project.
Insert
When you choose Insert from the drop menu, Motion leaves the existing layer in its track, but pushes it forward in time to make room for the new layer. For example, if you insert a five-frame movie into a group containing an existing layer, the new movie is added to the Timeline at the frame where you drop it, pushing the remaining frames of the original movie out five frames.
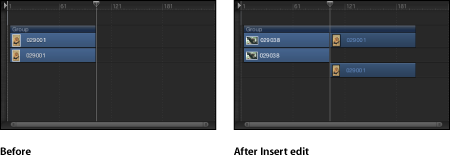
If you insert a new item midway through an existing layer, the existing layer is split into two layers, each on its own track.
Drag an item from the File Browser, Library, or Media list over an existing layer in the Timeline track area.
As you drag, a tooltip appears at the pointer, indicating the frame number where you are located.
Drag to the frame where you want the new layer to start, holding down the mouse button until the drop menu appears.
Choose Insert from the drop menu.
The new layer is inserted into the track, breaking the original bar into two, and pushing the frames after the insertion further out in time.
Overwrite
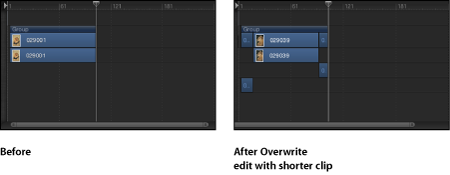
The Overwrite drop menu option deletes the existing layer, overwriting it with your new layer.
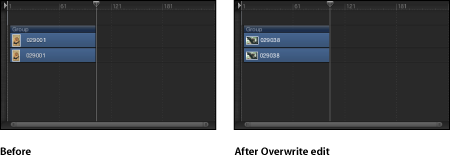
If the new layer is shorter than the one currently in the group, the Overwrite option splits the duration of the existing layer and deletes only the frames where the new layer appears.
Drag an item from the File Browser, Library, or Media list into the Timeline track area.
As you drag, a tooltip appears, indicating the frame number where you are located.
Drag to the frame where you want the new layer to start, holding down the mouse button until the drop menu appears.
Choose Overwrite from the drop menu.
The frames of the new layer replace the frames of the original layer. If the original layer contained more frames than the new one, the old layer is split into two layers and the additional frames remain.
Exchange
The Exchange drop menu option is a variant of the Overwrite option, but instead of dropping the entire duration of the new layer into the project, the duration of the existing layer is used.
For example, if you drag a 30-second clip over a 5-second clip, choosing Exchange swaps the existing 5 seconds with the first 5 seconds of the longer clip.
If you exchange a longer clip with a shorter one—for example, swapping a 10-second clip with one that lasts only 5 seconds—the first 5 seconds are replaced, and the final 5 seconds of the original remain.
Important: The exchange edit transfers any filters, behaviors, and keyframes from the original layer onto the new layer.
Note: You cannot use Exchange with audio files.
Drag an item from the File Browser, Library, or Media list into the Timeline track area.
As you drag, a tooltip appears, indicating the frame number where you are located.
Drag to the frame where you want the new layer to start, holding down the mouse button until the drop menu appears.
Choose Exchange from the drop menu.
The old layer is replaced by the new layer.
Adding Multiple Clips to the Timeline Track Area
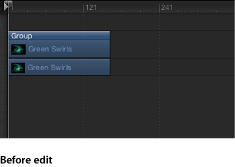
When you drag more than one item to the Timeline, the new layers appear in their own tracks above any existing layers. This is equivalent to performing a composite edit with a single object. A drop menu lets you choose whether the additional layers should be stacked up as a composite, or whether they should appear one after another (sequentially).
Shift-click or Command-click to select multiple items in the File Browser, Library, or Media list, then drag them to the Timeline track area.
Drag to the frame where you want the new layers to start, holding down the mouse button until the drop menu appears.
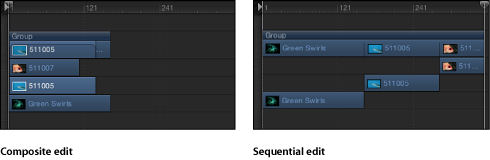
Choose Composite from the drop menu.
Multiple layers are added to the project at the same point in time, each new layer on its own track.
Also, if you release the mouse button in the Timeline track area before the drop menu appears, a composite edit is applied by default.
Alternatively, you can drop the multiple layers into the Timeline layers list. Doing so results in a composite edit.
Shift-click or Command-click to select multiple items in the File Browser, Library, or Media list, then drag them to the Timeline track area.
Drag to the frame where you want the new layers to start, holding down the mouse button until the drop menu appears.
Choose Sequential from the drop menu.
The multiple layers are edited into the project, one after another, each on its own track.
Setting Drag and Drop Preferences
You can set preferences that specify where an item is dropped when you add it to the Timeline Layers list or Canvas. You can choose between items appearing at the start of the project or at the current playhead position. You can also set the delay time before a drop menu appears.
Choose Motion > Preferences (or press Command-Comma).
The Preferences window appears.
Click the Project icon.
The Project pane opens.
In the Still Images & Layers section, click the appropriate button to create layers at “Current frame” or “Start of project.”
Note: The Create Layers At preference applies only when you drag items to the Timeline layers list, the Layers list, or Canvas. Clips dropped on a specific frame in the Timeline track area appear at that exact location.
Choose Motion > Preferences (or press Command-Comma).
The Preferences window appears.
Click the General icon to view the General pane.
In the Interface section, adjust the Drop Menu Delay slider to set the delay pause for drop menus in Motion.