Adding Markers
A marker is a visual reference point in the Timeline that identifies a specific frame. You can add as many markers as you want in the Timeline ruler while playing the project, or when the playhead is stopped.
Use markers to:
Add a visual reference to an object.
Add a visual reference to a project marker in the mini-Timeline.
Align other objects or keyframes to an important point in time.
Add notes about a specific area in your project.
Customize effects templates for use in Final Cut Pro X. For more information about template markers, see Working with Markers in Templates.
You can assign different colors to different types or markers and create marker groups. For example, use green to label all audio markers or pink to identify all temporary object markers.
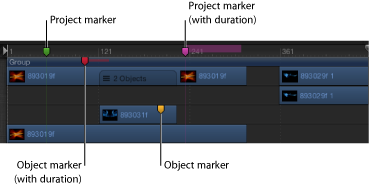
You can add two types of markers: project markers and object markers. Project markers are fixed to a specific frame or timecode value in the ruler. Object markers are attached to an object and move around as you move the object in the Timeline.
Place the playhead at the frame where you want the marker.
Ensure that no objects are selected, then do one of the following:
Choose Mark > Markers > Add Marker.
Press M.
Shift-click the Timeline ruler.
Control-click Timeline ruler, then choose Add Marker from the shortcut menu.
A green marker is added in the Timeline ruler.
Note: You can also press Shift-M to add a project marker at the playhead position, even if an object is selected.
Place the playhead at the frame where you want the marker.
Select the object to add the marker to, then do one of the following:
Choose Mark > Markers > Add Marker.
Press M.
A red marker is added to the bar for the selected object.
In this way, you can add markers while playing your project. The markers appear at the frame where the playhead is at the time you press the M key (or choose Mark > Markers > Add Marker).
Moving and Deleting Markers
Timeline markers can be easily moved or deleted.
Drag the marker left or right to a new location.
Drag the marker vertically out of the area where it resides, then release the mouse button.
The marker disappears with a “poof” animation.
Double-click the marker, then click Delete Marker in the Edit Marker dialog.
Position the playhead over the marker (select the group or object for group or object markers), then choose Mark > Markers > Delete Marker.
Control-click the marker, then choose Delete Marker from the shortcut menu.
Deleting All Markers
In addition to deleting a single marker, you can delete all markers from your project in one step. You can choose to delete all project markers or all object markers in a selected object.
Choose Edit > Deselect All (or press Command-Shift-A).
Choose Mark > Markers > Delete All Markers.
Select the object containing the markers you want to delete, then choose Mark > Markers > Delete All Markers.
Editing Marker Information
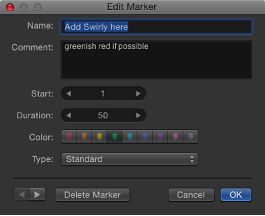
You can edit the information for a marker, including its name, starting frame, duration, and color. You can also add comments to the marker. Comments show up as a tooltip when the pointer is placed over the marker.
Open the Edit Marker dialog by doing one of the following:
Double-click a marker to display the Edit Marker dialog.
Control-click the Marker, then choose Edit Marker from the shortcut menu.
The Edit Marker dialog appears.
For object markers, move the playhead to the marker, then choose Mark > Markers > Edit Marker (or press Command-Option-M).
Enter a name in the Name field.
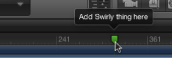
Text added to the Name field for project markers appears when the pointer is over the marker.
Enter a value or drag in the Start field.
The marker moves to the frame number you enter (or timecode number, if the timing display is set to show timecode).
Enter a value or drag in the Duration field to specify the range of frames (or timecode) for the marker.
Enter text in the Comment field.
This comment appears as a tooltip when you pause the pointer over project markers.
Click a Color button to set the marker color.
Project markers have an additional field called Type. For more information, see Adding Template Markers.
Click OK to accept your changes.
Navigating with Markers
You can jump from your current playhead position to a nearby project marker forward or backward.
Control-click the Timeline ruler, then choose Next Marker from the shortcut menu.
The playhead jumps to the starting position of the next project marker.
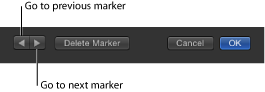
You can also choose Mark > Go To > Next Marker or press Command–Option–Right Arrow.
Control-click the Timeline ruler, then choose Previous Marker from the shortcut menu.
The playhead jumps to the starting position of the previous project marker.
You can also choose Mark > Go To > Previous Marker or press Command–Option–Left Arrow.
You can also navigate to adjacent markers via the Edit Marker dialog. In that case, the dialog remains open and the contents are replaced with the information for the next marker.