Working in the Ruler
You can perform several types of functions using the ruler area of the Timeline. You can move the playhead to a specific frame to view the project at a specific time. You can also set In and Out points so playback occurs only within the specified frames. In addition, you can select a range of frames, so you can delete, cut, or paste into the selected frames.

Navigating in the Timeline
Motion provides many controls for navigating the Timeline. You can drag the playhead to “scrub” through your project as quickly or slowly as you want, or immediately jump to a specific frame. Additionally, you can jump to object boundaries, markers, and other important indicators in the Timeline.
Many navigation tasks are accessible via the timing display in the toolbar.
Note: The timing display can be set to show frames or timecode. To set the timing display duration to frames, choose Show Frames from the pop-up menu on the right side of the timing display (the inverted arrow).
Double-click the current frame number in the timing display, enter a new frame number, then press Return.
Drag left or right over the current frame number in the timing display to rewind or advance.
Drag the playhead in the Timeline ruler to the frame you want.
Click the Timeline ruler at the frame number where you want to move the playhead.
With the Canvas or Project pane active, enter a new frame number, then press Return to jump to that frame.
With the Timeline active (and no objects selected), enter a new frame number, then press Return to jump to that frame.
Important: When the Timeline is active and an object is selected, typing a number and pressing Return moves the selected object, rather than the playhead.
Type a plus sign (+), then type the number of frames to move forward.
Important: When the Timeline is active and an object is selected, typing a number and pressing Return moves the selected object, rather than the playhead.
Type a minus sign (–), then type the number of frames to move backward.
Important: When the Timeline is active and an object is selected, typing a number and pressing Return moves the selected object, rather than the playhead.
Double-click in the timing display.
Do any of the following:
To move forward in seconds, type a plus sign (+), enter the number of seconds to move forward, then enter a period. For example, to move 2 seconds ahead, enter “+2.” (with a period after the number), then press Return. To move ahead in minutes, enter two periods after the number, and to move ahead in hours, enter three periods after the number.
To move backward in seconds, enter a minus sign (–), enter the number of seconds to move backward, then enter a period. For example, to move 2 seconds backward, enter “–2.” (with a period after the number), then press Return. To move backward in minutes, enter two periods after the number, and to move backward in hours, enter three periods after the number.
Important: When the Timeline is active and an object is selected, typing a number and pressing Return moves the selected object, rather than the playhead.
Press the Space bar.
Click the “Go to next frame” or “Go to previous frame” button in the transport controls (to the right of the Play button).
Choose Mark > Go to > Previous Frame or Next Frame.
Press the Left Arrow key to move backward or the Right Arrow key to move forward.
Choose Mark > Go to > 10 Frames Back or 10 Frames Forward.
Press the Shift key, then press the Left Arrow or Right Arrow key.
Click the “Go to start of project” button in the transport controls.
Choose Mark > Go to > Project Start.
Press Home.
Click the “Go to end of project” button in the transport controls.
Choose Mark > Go to > Project End.
Press End.
With an animated object selected, press Shift-K.
With an animated object selected, choose Mark > Go to > Next Keyframe.
With the animated object selected, press Option-K.
With the animated object selected, choose Mark > Go to > Previous Keyframe.
For information on displaying keyframes in the Timeline, see Timeline View Options.
In addition to moving to new positions in the ruler, you can navigate to objects in the Timeline, such as objects, markers, and keyframes. For more information on markers, see Adding Markers. For more information on keyframes, see Keyframes and Curves.
Select the object to navigate to.
Do one of the following:
Choose Mark > Go to > Selection In Point or Selection Out Point.
Press Shift-I (for the In point) or Shift-O (for the Out point).
Defining the Play Range
Ordinarily, clicking the Play button plays your project from the first frame until the last. However, you can change the play range of your project by modifying the In and Out points in the Timeline ruler. You might do this to focus on a specific section as you fine-tune your project or make other changes to it. When you finish, reset the In and Out points to the beginning and end of your project.
In the ruler, drag the In point marker from the left edge of the ruler to the frame where you want to set the In point. As you drag, the playhead also moves with your pointer. When you release the mouse button, the playhead snaps back to its previous position.
Choose Mark > Mark Play Range In.
In the ruler, move the playhead to the frame where you want to set the In point, then press Command-Option-I.
In the ruler, drag the Out point marker from the right edge of the ruler to the frame where you want to set the Out point.
Choose Mark > Mark Play Range Out.
In the ruler, move the playhead to the frame where you want to set the Out point, then press Command-Option-O.
Choose Mark > Reset Play Range.
Press Option-X.
The In and Out points reset themselves to the beginning and end of the project.
Choose Mark > Go to > Play Range Start or Play Range End.
Press Shift-Home (In point) or Shift-End (Out point).
Working with Regions
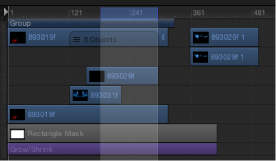
Sometimes you might want to make changes to a range of frames, known as a region. You might do this to cut or copy a section of time to remove it or move it to a new position in your project. Regions need not align with object edges in the Timeline. You can create a region that begins midway through an object or one that includes empty frames beyond the edges of objects.
Holding down the Command and Option keys, drag in the Timeline ruler.
A light highlighted band appears over the selected frames.
Position the pointer over the region, then drag to move the region.

Note: This operation does not move objects within the region.
Command-click the track to deselect.

After you define a region, you can delete or ripple delete it. When you choose Ripple Delete (choose Edit > Ripple Delete), the region is deleted, and the resulting gap closes. You can cut or copy the region to move it to the Clipboard so you can paste it somewhere else.
Note: Pasting a region does not paste at the current playhead location. To move a pasted region to the playhead location, press the Shift key while you drag the pasted object. As you approach the current playhead location, the object snaps into place.
Pasting into a Region Using the Paste Special Command
You can also paste objects into a defined region using the Paste Special command. You have three choices for how the “paste into” is performed. You can insert, pushing the existing region down in time; overwrite the existing contents of the region; or exchange the existing objects with the Clipboard contents. In all these cases, the pasted objects never exceed the duration of the region they are pasted into.
Select the object to copy to the Clipboard to be pasted.
Press Command-C to copy or Command-X to cut your selection.
Holding down the Command and Option keys, drag in the ruler to select a region.
Choose Edit > Paste Special.
The Paste Special dialog appears.
Select Insert, Overwrite, or Exchange, then click OK.
The Clipboard contents are pasted into the region using the method you specified. For more information on the different editing types, see Adding Layers to the Track Area.
Inserting Time
You can select a region to add blank playback time into your project (which will appear black in the Canvas). For example, you might want to add some black frames between two objects, or add frames in as a placeholder for a clip you don’t yet have. This is called inserting time.
Holding down the Command and Option keys, drag in the ruler.
Drag as wide an area as you want to insert.
Choose Edit > Insert Time.
The number of frames in the region is added to the project, beginning at the end of the selected region and pushing any existing objects further out in time.
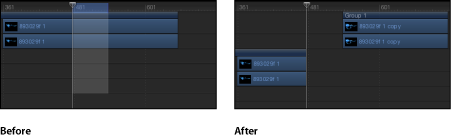
If time is inserted during a range that contains a video clip, the clip is split onto two tracks and objects beyond the split point are placed in a new group.
Project Duration
Motion projects default to ten seconds in length. You can change this duration to match the needs of your project. To learn how to change the default project duration, see Project Properties.
The project duration is displayed at the bottom of the Motion window. You can also display the duration in the timing display in the toolbar.
Choose Show Project Duration from the pop-up menu in the timing display (the downward-facing arrow).
Click the watch icon to the left of the numbers in the timing display.
With the timing display set to show project duration, double-click the number, then enter a duration value.
With the timing display set to show project duration, drag left or right over the number to decrease or increase the duration.
Choose Edit > Project Properties (or press Command-J), then change the value of the Duration field in the Properties Inspector.
Note: Click the downward arrow to the right of the numbers in the timing display and choose Show Frames or Show Timecode to switch between viewing the project duration in frames or timecode.