Canvas
Most of the Motion workspace is occupied by the Canvas. Similar to the document window in many other applications, the Canvas is the visual workspace where you arrange and lay out objects in your composition. Adding layers and effects to your project is as simple as dragging them from the Library or File Browser to the Canvas.
Use the transport controls at the bottom of the Canvas to view your project at regular speed or frame by frame. On either side of the transport controls are buttons that show and hide panes of the interface, turn audio playback on and off, and turn full-screen mode on and off.
The mini-Timeline is above the transport controls and below the main body of the Canvas window. This control provides a view of where selected layers in the Canvas begin and end in time, allowing you to manipulate the timing of those objects.
What you see in the Canvas is what will be output when you share a project. However, this window is not only a place to view the results of your work; the Canvas is where you modify and arrange the elements of your project.
You can manipulate the items in the Canvas to modify physical attributes such as position, scale, and rotation. And you can use familiar drag-and-drop techniques to apply behaviors or filters to the items in the Canvas. See Using Behaviors and Using Filters to learn more about how to use these features.
Drag the toolbar (below the Canvas) up or down to shrink or enlarge the Canvas.
Choose Window > Hide Project Pane (or press F5).
Choose Window > Hide Timing Pane (or press F6).
Deselect the Show/Hide Timeline button, Show/Hide Audio Timeline button, and Show/Hide Keyframe Editor button in the lower-right corner of the Motion project window.
Viewing the Canvas on a Second Display
You can show the Canvas on a second display. For more information, see Viewing the Canvas or Timing Pane on a Second Display.
Status Bar
The status bar at the top-left side of the Canvas provides information about the current project: dynamic tool information, color, coordinates, and frame rate.
The display of this information is controlled in the Status Bar section of the Appearance pane in Motion Preferences (type Command-Comma to open Motion Preferences).
Dynamic Tool Information
When you adjust an object in the Canvas using onscreen controls, the status bar displays transform information. For example, when you scale an object in the Canvas, the width and height values are displayed.
In the Appearance pane of Motion Preferences, select the Dynamic Tool Info checkbox.
Adjust an object in the Canvas.
The status bar displays information about adjustment as you drag in the Canvas.
Color Information
Some motion graphics projects require you to match or align colors in your project. The status bar can provide visual and numeric information about the color of the pixel under the pointer, as well as the value of the alpha channel. No clicking is necessary—as you move the pointer over the Canvas, the status bar updates.
In the Appearance pane of Motion Preferences, select the Color checkbox.
Choose a color format from the Display Color As pop-up menu:
- RGB: The red, green, blue, and alpha components of the color are represented in values from 0–1. Super-white values can exceed the 0–1 value range.
- RGB (percent): The red, green, blue, and alpha components of the color are represented in values from 1–100.
- HSV: The hue is represented from 1–360, and the saturation and value (luminance) are represented in values from 1–100.
Move the pointer over the Canvas.
The color information displayed in the status bar updates as you move the pointer.
Coordinate Information
For precision placement of objects in the Canvas, it can be helpful to know the exact pixel position of the pointer. The status bar can display this information in an X and Y coordinate system (Cartesian). The center point of the Canvas is 0, 0.
In the Appearance pane of Motion Preferences, select the Coordinates checkbox.
When you move the pointer in the Canvas, the coordinate information updates in the status bar.
Frame Rate Information
Part of the way Motion plays back a project in real time is by lowering the frame rate when a sequence is too complex to render at full speed. You can monitor the current frame rate—in frames per second (fps)—in the status bar.
Note: The frame rate appears in the status bar the only while a project is playing.
In the Appearance pane of Motion Preferences, select the “Frame rate (only during playback)” checkbox.
When you play the project, the frame rate appears in the upper-left corner of the status bar.
Canvas View Options
This section discusses how to view the Canvas using the view options pop-up menus in the top-right corner of the Canvas.
- Zoom Level pop-up menu: The Zoom Level pop-up menu offers several default zoom levels. Zooming the Canvas does not change the size of the images in your project. It changes the current view of the window.
You can set the view to percentages of 12, 25, 50, 100, 200, 400, 800, or 1600, or to Fit In Window.
For more information on zooming in and out of the Canvas, see Canvas Zoom Level.
- Channels pop-up menu (unlabeled): The Channels pop-up menu (the color spectrum icon) controls which color channels are displayed in the Canvas. Use this menu to view a single color channel in the Canvas, to examine layers’ alpha channels, or to manipulate effects that affect only a single color channel. This menu has the following options:
- Color: Shows the image as it would appear on a video monitor. Visible layers appear in natural color and transparent areas reveal the background color as set in the Properties Inspector for the project. The background color is black by default. To change it, press Command-J, then choose a color from the Background Color control in the Properties Inspector.
Note: The Background pop-up menu in the Properties Inspector must be set to Solid to export the background color with the project. This option creates a solid alpha channel on export (when exporting using a codec that supports alpha channels). When the Background pop-up menu is set to Transparent, the color is visible in the Canvas, but does not render as part of the alpha channel.
- Transparent: Shows the background area of the Canvas as transparent. A checkerboard pattern appears by default where no images block the background.
- Alpha Overlay: Displays the image in normal color, but adds a red highlight over transparent areas of the image.
- RGB Only: Displays the normal mix of red, green, and blue channels but displays transparent areas (including semitransparent areas) as opaque.
- Red: Displays only the red channel as a range of black to white.
- Green: Displays only the green channel as a range of black to white.
- Blue: Displays only the blue channel as a range of black to white.
- Alpha: Displays the alpha (transparency) channel of the layers in the Canvas.
- Inverted Alpha: Displays an inverted view of the alpha (transparency) channel.
- Render pop-up menu: The Render pop-up menu controls the quality and resolution of the Canvas display and lets you enable or disable features that can impact playback performance. When an option is active, a checkmark appears beside the menu item.
If a complex project is causing your computer to play at a very low frame rate, you can make changes in this menu to reduce the strain on the processor. This frees you from waiting for the image to be rendered at full resolution each time you make an adjustment, allowing you to watch complex projects at high frame rates while you work.
Note: These options are also available in the View pull-down menu (View > Resolution, Quality, or Render Options).
The Render pop-up menu displays the following options:
- Dynamic: Reduces the quality of the image displayed in the Canvas during playback or scrubbing in the Timeline or mini-Timeline, allowing for faster feedback. Also reduces the quality of an image as it is modified in the Canvas. When playback or scrubbing is stopped, or the modification is completed in the Canvas, the image quality is restored (based on the Quality and Resolution settings for the project).
- Full: Displays the Canvas at full resolution (Shift-Q).
- Half: Displays the Canvas at half resolution.
- Quarter: Displays the Canvas at one-quarter resolution.
- Draft: Renders objects in the Canvas at a lower quality to allow optimal project interactivity. There is no antialiasing.
- Normal: Renders objects in the Canvas at a medium quality. Shapes are antialiased, but 3D intersections are not. Floating point (32-bit) footage is truncated to 16-bit. This is the default setting.
- Best: Renders objects in the Canvas at best quality, which includes higher-quality image resampling, antialiased intersections, antialiased particle edges, and sharper text.
- Custom: Allows you to set additional controls to customize render quality. Choosing Custom opens the Advanced Quality Options dialog. For information on the settings in the Advanced Quality Options dialog, see Advanced Quality Settings.
- Lighting: Turns the effect of lights in a project on or off. This setting does not turn off lights in the Layers list (or light scene icons), but it disables light shading effects in the Canvas.
- Shadows: Turns the effect of shadows in a project on or off.
- Reflections: Turns the effect of reflections in a project on or off.
- Depth of Field: Turns the effect of depth of field in a project on or off.
- Motion Blur: Enables/disables the preview of motion blur in the Canvas. Disabling motion blur can result in a performance improvement.
Note: When creating an effect, title, transition, or generator template for use in Final Cut Pro X, the Motion Blur item in the View pop-up menu controls whether motion blur is turned on when the project is applied in Final Cut Pro.
- Field Rendering: Enables/disables field rendering. Field rendering is required for smooth motion playback on many TV monitors. Field rendering nearly doubles rendering time, so disabling this item can improve performance.
Note: When creating an effect, title, transition, or generator template for use in Final Cut Pro, the Field Rendering setting in the View pop-up menu does not control whether field rendering is applied in Final Cut Pro. Rather, field rendering is controlled in the Properties Inspector for the project. (Press Command-J to open the Properties Inspector.) When Field Order is set to anything other than None, field rendering is used in Final Cut Pro, regardless of the Field Rendering status in the View pop-up menu.
- Frame Blending: Enables/disables frame blending in the Canvas. Frame blending can smooth the appearance of video frames by interpolating the pixels between adjacent frames to create a smoother transition.
- View and Overlay pop-up menu: The View and Overlay pop-up menu provides access to the guides and controls that can be viewed in the Canvas. When an option is active, a checkmark appears beside the menu item.
Note: Many of these options are also available in the View pull-down menu.
The View and Overlay pop-up menu displays the following options:
- Show Overlays: Turns the display of overlays in the Canvas on or off. This setting must be on to view any other overlay items (grids, guides, and so on). To turn the camera overlays on or off, use Show 3D Overlays.
Note: You can also press Command-Slash (/).
- Rulers: Turns display of the rulers along the edge of the Canvas on or off. You can specify where the rulers appear in the Canvas section (Alignment) of Motion Preferences. For more information on using rulers, see Canvas Rulers.
Note: You can also press Command-Shift-R.
- Grid: Turns a grid display on and off over the Canvas. You can set the spacing and color of the grid in the Canvas section (Alignment) of Motion Preferences.
Note: You can also press Command-Apostrophe (’).
- Guides: Turns display of manually created guides on and off. Guides can only be created if rulers are displayed. You can change the color of the guides in the Canvas pane (Alignment) of Motion Preferences.
Note: You can also press Command-Semicolon (;).
- Dynamic Guides: Turns display of automatic dynamic guides on and off. These guides appear when dragging a layer past edges of other layers when snapping is enabled (choose View > Snap). You can change the color of dynamic guides in the Canvas pane (Alignment) of Motion Preferences.
Note: You can also press Command-Shift-Colon (:).
- Safe Zones: Turns display of the title safe and action safe guides on and off. By default, these guides are set at 80% and 90%. You can change these settings and the color of the guides in the Canvas pane (Zones) of Motion Preferences.
Note: You can also press the Apostrophe key (’).
- Film Zone: Turns display of film aspect ratio guides on and off. This can be helpful if you are creating a project for videotape to be transferred to film. You can change the size of the guides as well as their color in the Canvas pane (Zones) of Motion Preferences.
Note: You can also press Shift-Quotation Mark (”).
- Handles: Turns display of object handles in the Canvas on and off. Some onscreen transformations, such as resizing, require visible object handles. Handles appear only on selected objects.
- Lines: Turns display of lines that outline an object on and off. Lines only appear on selected objects.
- Animation Path: Turns animation paths on and off. These editable paths indicate the route along which animated objects travel. If the selected object is not positionally animated, this command does not appear to have any effect. If handles are not displayed, the path curves cannot be adjusted in the Canvas. Except for the Motion Path behavior, animation paths created by behaviors are for display only and are not editable.
- Show 3D Overlays: Turns 3D overlays in the Canvas on and off, including Camera overlays, 3D View Tools, Compass, Inset View, 3D grid, and 3D scene icons. (3D overlays appear in projects that contain 3D groups.)
Note: You can also press Command-Option-Slash (/).
- 3D View Tools: Turns the Camera menu and 3D View tools in the Canvas on and off.
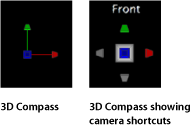
- Compass: Turns the 3D Compass in the Canvas on and off. Using red, green, and blue axes, the compass shows your current orientation in 3D space. The red axis is X (horizontal), the green axis is Y (vertical), and the blue axis is Z (depth).
Holding the pointer over the 3D Compass exposes color-coded shortcuts to the reference camera views. Click any colored view icon, such as Front, Left, Right, Perspective, and so on to switch to a different camera view. The Canvas animates as it changes view. For more information on working with the 3D Compass and different views, see Views.
- Inset View: Turns the Inset view in the Canvas on and off. When enabled, a temporary window appears in the lower-right corner of the Canvas displaying an Active Camera or Perspective view of the project, helping you stay oriented as you move objects in 3D space. In the 3D pane of Motion Preferences, you can change the size of the Inset view, as well as control whether the Inset view appears on transform changes, on all changes, or manually.
The Perspective view changes to fit the objects in the Inset view (even if objects are no longer visible in the main window). This view is triggered when you are looking through the camera. The Active view is triggered when you use a camera view other than the active camera (such as Front). For more information on the Inset view, see Inset View.
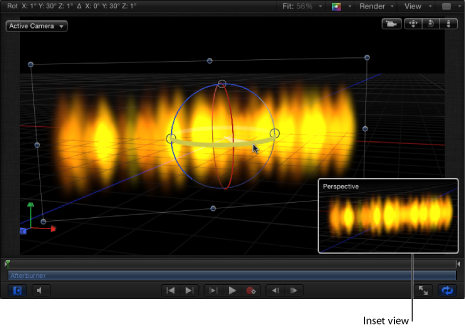
Note: Because project elements are 2D (flat) objects, the elements are not visible when you use orthogonal camera views (Left, Right, Top, and Bottom) unless the elements are rotated in 3D space (or unless text, particles, or the replicator is using the Face Camera parameter in its Inspector). This is because orthogonal views are at right angles (perpendicular) to the elements. When an object is selected, a thin gray line represents the object in the Canvas. For more information on using cameras, see Cameras.
- 3D Grid: Turns the grid in the Canvas on and off. The 3D grid helps you stay oriented and can be used to guide the placement of objects in your project. The 3D grid appears when you are in a 3D workspace.
- 3D Scene Icons: Turns the display of cameras and lights in the Canvas on or off. Scene icons appear in the Canvas as wireframe icons. Lights appear with red (X), green (Y), and blue (Z) adjust 3D handles that let you transform and rotate them. The handles are still displayed when the 3D Scene Icons command is turned off. For more information on the 3D scene icons, see 3D Scene Icons.
- Correct for Aspect Ratio: Applies an artificial distortion of the Canvas in projects with nonsquare pixels. When the setting is on, the computer monitor simulates what a TV monitor displays. When the setting is off, projects with nonsquare pixels appear stretched. This is because computer monitors have square pixels. This setting does not modify the output of the project.
- Show Full View Area: When enabled, this setting lets you see the portion of a layer that extends beyond the edge of the Canvas. This setting is disabled by default, because it slows your project’s interactivity.
- Use Drop Zones: Turns drop zones on and off. When turned on, a checkmark appears next to the menu item, and drop zones accept objects dragged to them. When turned off, drop zones ignore objects dropped onto them. For more information on using drop zones, see Drop Zones.
- Save View Defaults: Saves the current state of all settings in this menu as the default state for new projects.
- View Layouts pop-up menu: The View Layouts pop-up menu lets you specify how to view your project in the Canvas. You can view the Canvas as a single workspace or choose from available window arrangements in the menu.
Note: Although the workspace views are available for 2D projects, they are most useful when working in 3D space.
- Single: The default value, displays a single window in the Canvas.
- Two-up, side by side: Displays two windows in the Canvas, one next to the other.
- Two-up, top and bottom: Displays two windows in the Canvas, one on top of the other.
- Three-up, large window below: Displays three windows, two next to each other on top and a larger window below.
- Three-up, large window right: Displays three windows, two stacked on the left side and a larger window spanning the right side.
- Four-up, large window right: Displays four windows, three stacked on the left side and one larger window on the right side.
- Four-up: Displays four windows, all the same size.
Advanced Quality Settings
When you choose Custom in the Quality section of the Render pop-up menu (or in the View > Quality menu), the Advanced Quality Options dialog appears.
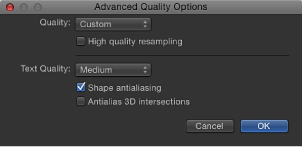
The Advanced Quality Options dialog provides additional controls to fine-tune rendering performance and quality. It contains the following options:
- Quality: Sets rendering quality. These options are identical to the Quality settings in the Render pop-up menu.
For more information on the Render popup menu, see Canvas View Options.
Choose one of four settings from this pop-up menu. Each setting activates different options in the dialog.
- Draft: None of the quality options are selected, and Text Quality is set to Low. This option allows optimal project interactivity.
- Normal: “Shape antialiasing” is selected, and Text Quality is set to Medium. This option allows project interactivity that is slower than Draft, but much faster than Best.
- Best: “High quality resampling,” “Shape antialiasing,” and “Antialias 3D intersections” are selected. Text render quality is set to High. This option slows down project interactivity.
- Custom: No options are selected until you select individual quality settings in the Advanced Quality Options dialog.
Canvas Zoom Level
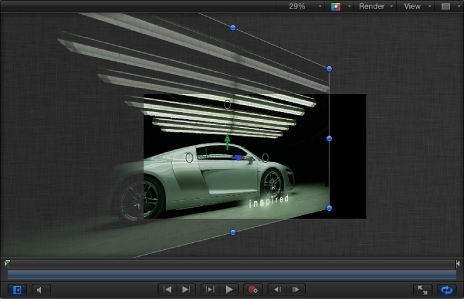
You can zoom in on the Canvas to allow precision alignment and placement of objects, and you can zoom out to get a sense of the big picture or to see the path of a moving object. You can also use dynamic zoom modes to zoom in or out of the Canvas, or to zoom to specific areas of the Canvas. If you have a Multi-Touch device, you can pinch closed to zoom out and pinch open to zoom in.
Zooming the Canvas does not change the size of the images in your project. It only changes the view of the entire window.
Choose a zoom level from the Zoom Level pop-up menu.
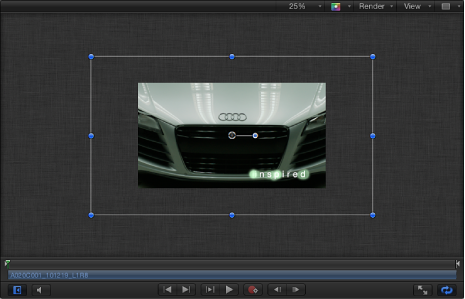
In the following image, 25% is chosen from the Zoom Level pop-up menu.
Holding down the Space bar and Command key (in that order), drag diagonally in the Canvas. The zoom occurs around the spot clicked in the Canvas.
Pinch closed to zoom out or pinch open to zoom in.
After you zoom in, use a two-finger swipe in any direction to scroll around.
Holding down the Space bar and Command key (in that order), drag the area of the Canvas to zoom. While still holding down the keys, click the mouse button to zoom in 50 percent increments of the current zoom level. Holding down the Space bar, Command key, and Option key (in that order), the Canvas click to zoom out in 50 percent increments of the current zoom level.
Note: To pan the Canvas without selecting the Pan tool, hold down the Space bar and drag in the Canvas.
Choose Fit In Window from the Zoom Level pop-up menu.
Choose 100% from the Zoom Level pop-up menu.
In the toolbar, double-click the Zoom tool (located in the Pan tool pop-up menu).
In the toolbar, double-click the Pan tool.
Canvas Rulers
Using rulers in the Canvas can help you compose or align elements of your project, as well as snap objects to rulers.
In the View pop-up menu, enable Rulers (or press Command-Shift-R).
When Rulers are enabled, a checkmark appears next to the item in the pop-up menu.
By default, rulers appear along the left and top sides of the Canvas. You can change the location of the rulers in the Canvas pane of Motion Preferences.
Choose Motion > Preferences.
In the Canvas pane, click Alignment, then choose a ruler layout from the Ruler Location pop-up menu.
Click in the gray area of the horizontal or vertical ruler, and drag into the Canvas.
As you drag, the value of the guide is displayed in the Canvas.
Note: Guides must be enabled in the View pop-up menu (or by pressing Command-Semicolon) to display the guides.
The ruler units are in pixels, with the 0, 0 point in the center of the Canvas.
When the guide is in the location you want, release the mouse button.
Drag from the corner where the rulers meet into the Canvas.
When the guides are in the location you want, release the mouse button.
Drag the guide off the Canvas.
To delete the guide, drag into the Project pane or Timing pane areas, then release the mouse button.
Choose Motion > Preferences.
In the Canvas pane, click Alignment, click or Control-click the Guide Color well, then select a color.
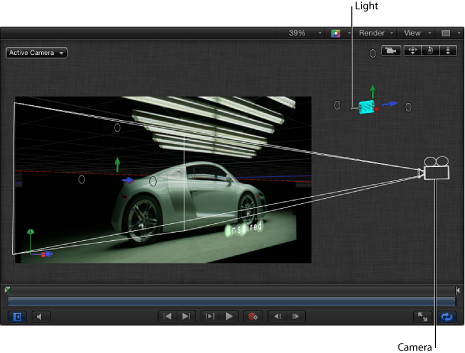
Canvas in 3D Mode
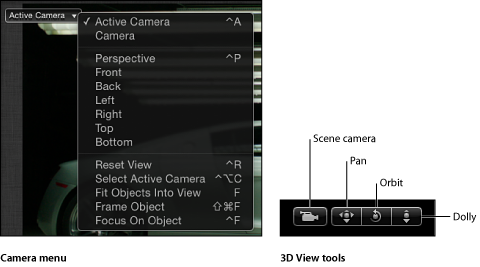
In addition to the traditional 2D project workspace, Motion provides a 3D workspace in which to arrange and animate objects, including groups, layers, cameras, and lights. When you switch to 3D mode, additional controls become available in the Canvas. A small set of 3D View tools appears in the upper-right corner of the Canvas window, and a 3D Compass appears in the lower-left corner. The upper-left corner of the Canvas contains the Camera menu, where you can choose which camera to use to view the project in 3D space.
Important: You must add at least one camera or light to your project to create a 3D workspace.
Click the New Camera button in the toolbar.
A dialog appears that prompts you to switch your 2D groups to 3D groups.
Click Switch to 3D to add a camera and create a 3D project.
If you click Keep as 2D, a camera is added to your project, but groups remain 2D groups.
Click the New Light button in the toolbar.
A dialog appears that prompts you to switch your 2D groups to 3D groups.
Click Switch to 3D to add the light and create a 3D project.
If you click Keep as 2D, a light is added to your project, but all groups remain 2D groups. Lights have no effect in 2D projects.
Manipulating the 3D View
The 3D workspace provides tools for manually changing your view or viewing a scene from a reference camera, such as Front, Back, Top, Bottom, and so on. You can also choose to view the scene through any camera added to your project.
Note: The Left, Right, Top, and Bottom camera views are orthogonal views. You cannot animate or export these views.
Click the Camera menu in the upper-left corner of the Canvas and choose a camera from the list. Motion animates the view change as it moves to the view.
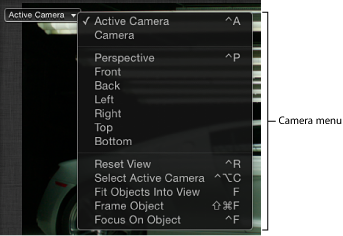
If you modified the view, an asterisk appears next to the name of the camera view. For more information, see 3D View Tools.
Note: If you isolate a layer or group (by choosing Object > Isolate), the Camera menu shows the name of the isolated object as the current view. For more information on the Isolate feature, see Layers List.
Drag the Pan, Orbit, or Dolly tool in the 3D View tools.
Like a camera move, the view in the Canvas moves, rotates, or zooms.
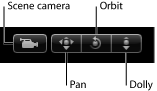
Important: The gray scene camera icon appears to the left the 3D View tools when a user-created scene camera is active. A scene camera is used for rendering specific camera views. This icon is a reminder (not a button or control) that when you use the 3D View tools, you are moving the scene camera, which affects your project’s output.
Double-click the Pan, Orbit, or Dolly tool.
Click the Camera menu (in the upper-left corner of the Canvas) and choose Reset View.
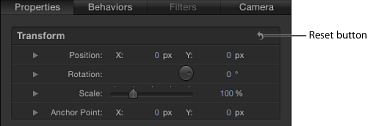
In the Properties Inspector for the camera, click the Transform parameters reset button.
Manipulating Objects in 3D Space
The 3D workspace provides tools for manipulating objects in 3D space. These tools include 3D onscreen controls that manipulate the object, 3D transform controls in the HUD, and parameters in the Properties Inspector for the object.
Select the object to transform and select the 3D Transform tool in the toolbar.

Scale handles appear around the edge of the object, and three colored 3D axis handles appear at the anchor point of the object. Each arrow-shaped handle corresponds to an axis along which you can move the object.
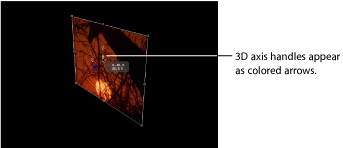
Drag the relevant transform handle and the object moves along the selected axis.
The red axis is X (horizontal), the green axis is Y (vertical), and the blue axis is Z (depth).
Select the object to transform, then select the 3D Transform tool in the toolbar.
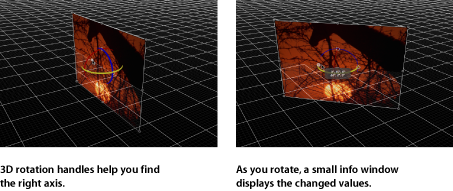
Scale handles appear around the edge of the object, and three colored 3D axis handles appear at the anchor point of the object. The three small circles near the axis handles are 3D rotation handles. Each rotation handle corresponds to an axis around which you can rotate the object.
Position the pointer over a rotation handle on either side or above the colored arrows.
The red ring indicates rotation around the X axis.
The green ring indicates rotation around the Y axis.
The blue ring indicates rotation around the Z axis.
When the 3D rotation handle is active, drag left or right in the Canvas to rotate the object around the selected axis.
Select the object to reset.
In the Properties Inspector for the camera, click the Transform parameters reset button.
For more information on 3D transforms, see 3D Transform Tools.
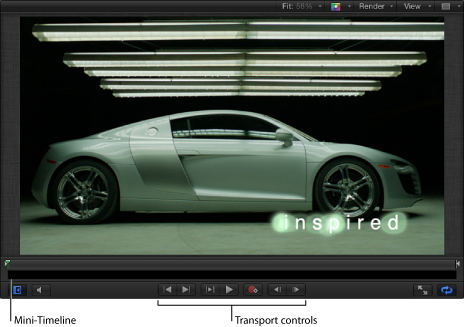
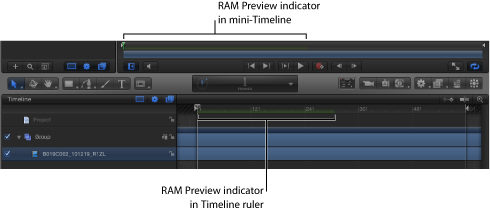
Mini-Timeline
The mini-Timeline is above the transport controls and below the Canvas. The mini-Timeline provides an at-a-glance look at where selected objects fit into the project as a whole. The mini-Timeline also provides controls to perform quick edits such as moving, trimming, and slipping objects without opening the Timing pane.

The playhead indicates which frame you are viewing, and shows In and Out markers to identify the play range. The length of the mini-Timeline represents the duration of the project.
You can add objects (such as clips, images, particle emitters, and so on) to a project at a specific time by dragging items from the File Browser or Library to the mini-Timeline.
Drag the item from the File Browser or Library to the mini-Timeline, releasing the mouse button when the tooltip indicates the frame you want.
Select the object to move, drag the object bar in the mini-Timeline to the left or right to reposition it in time, then release the mouse button when you reach the position you want.
Select the object, position the pointer over the beginning or ending edge of the object in the mini-Timeline, then drag the edge of the object bar to change its duration.
A tooltip appears to indicate the In or Out point and the amount of change your edit is causing.
For more information on using the mini-TImeline, see Mini-Timeline.
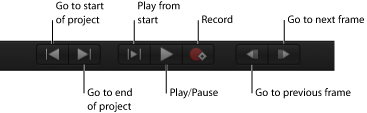
Canvas Buttons and Transport Controls
In the lower portion of the Canvas, there are several buttons that modify the workspace and let you control playback of the project.
The first two buttons modify the workspace and audio playback:
- Play from start: Plays from the play range In point to the play range Out point, letting you watch a portion of the entire project. To learn how to define the In and Out points, see Defining the Play Range.
- Go to previous frame: Moves the playhead backward by one frame. Clicking the button (or holding down the shortcut key) rewinds the project one frame at a time. The keyboard shortcut is the Left Arrow (or Page Up) key.
Note: If you have a Multi-Touch trackpad, you can rotate left to go to the previous frame.
- Go to next frame: Advances the playhead by one frame. Clicking the button (or holding down the shortcut key) advances the project one frame at a time. The keyboard shortcut is the Right Arrow (or Page Down) key.
Note: If you have a Multi-Touch trackpad, you can rotate right to go to the next frame.
The last two buttons modify the Canvas workspace and looping of video playback.
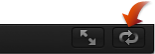
- Player Mode: Hides the File Browser, Library, Inspector, Project pane, and Timing pane to maximize Canvas space. For more information, see Player Mode.
- Loop playback: Controls whether playback loops indefinitely, or whether playback stops when the end of the play range is reached. The keyboard shortcut is Shift-L. For more information on setting a project play range, see Defining the Play Range.
Player Mode
When you click the Player Mode button below the Canvas, the Canvas expands to fill the Motion workspace. This is helpful for watching project playback without the distraction of the software interface. In this mode, the menus, toolbar, and timing display remain active. The Show/Hide Timeline, Show/Hide Audio Timeline, and Show/Hide Keyframe Editor buttons at the lower-right corner of the workspace also remain available, as does the Show/Hide File Browser/Library/Inspector button at the lower-left corner of the workspace.
Choose Window > Player Mode.
Click the Player Mode button above the toolbar.
Press F8.
Position your pointer over the menu, then choose Window > Player Mode again.
Press F8 again.
RAM Preview
When you play a project in the Canvas, Motion performs complex calculations to represent the objects and effects that appear in each frame. This is called rendering. The project plays back as quickly as possible up to the frame rate specified in the Properties Inspector. With a very complex project, the frame rate can be significantly reduced, making it difficult to see how the project looks when played at full frame rate.
You can render parts of your project and store the frames in RAM. This lets you play back your project and see it play at full frame rate. This is called RAM Preview. You can render the play range, a selection, or the entire project. As the frames are rendered, a progress dialog appears and shows which frame is being rendered, how many more frames remain, and an approximation of the time remaining.
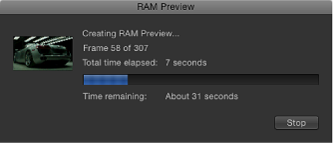
You can interrupt RAM Preview by clicking the Stop button. The section that has been rendered is stored in RAM.
Note: Because some sections of a project may be more complex than others, the Time remaining value may be somewhat inaccurate.
Choose Mark > RAM Preview > All.
The RAM Preview dialog appears, and displays a progress bar. When RAM Preview is completed, the dialog closes.
When a section of your project is stored in RAM, a green glow appears along the bottom of the Timeline ruler and the mini-Timeline.
RAM Previewing Regions
Previewing large sections of your project using RAM Preview requires large quantities of RAM to store frames. You may not have enough RAM to store all frames you want to preview. You can restrict which frames are rendered by choosing to preview the play range or a selection. Using RAM Preview on a selection renders all visible layers in the project from the first frame of the selection until the last.
For more information on setting a project play range, see Defining the Play Range.
Choose Mark > RAM Preview > Play Range.
The RAM Preview dialog appears, and displays a progress bar. When RAM Preview is completed, the dialog closes.
In the Timeline, Command-Option-drag the region to preview.
A highlight appears over the selected frames.
For more information on regions, see Working with Regions.
Choose Mark > RAM Preview > Selection.
The RAM Preview dialog appears. When RAM Preview is completed, the dialog closes.
Canvas Shortcut Menu
When no objects are selected, the Canvas has its own shortcut menu that allows you to access several useful tools.
Control-click an empty area of the Canvas (in the gray area outside the project) and choose an option from the shortcut menu:
- New Group: Adds a group to the project above existing groups in the Layers list.
- Import: Opens the Import Files dialog, which allows you to import files from the Finder.
- Paste: Pastes any item copied to the Clipboard into the selected group in the project.
- Project Properties: Opens the Properties Inspector for the project, which allows you to modify the project’s background color, aspect ratio, field rendering, motion blur, reflections, and so on. For more information on project properties, see Project Properties.