Timing Display
The timing display, located in the center of the toolbar, allows you to view the current frame (or timecode number) of the playhead, or the total duration of the project. You can also use the timing display to navigate to a specific frame, move frames in small or large increments, and scrub frames. Additionally, you can modify the duration of the project.
Click the clock icon.
When the project’s duration is displayed, the clock icon looks like this:

When the current time is displayed, the clock icon looks like this:

Click the right side of the timing display (the inverted triangle) to open the pop-up menu, then choose Show Current Time or Show Project Duration.
With the timing display pop-up menu set to Show Project Duration, drag over the numbers in the display, up to increase the value or down to decrease the value.
Double-click in the timing display, enter a duration into the field, then press Tab or Return to confirm your entry.
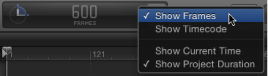
Choose Show Frames or Show Timecode from the timing display pop-up menu (the inverted triangle).
With the timing display pop-up menu set to Show Current Time, drag over the numbers in the display, up to move the playhead forward or down to move it backward.
With the timing display pop-up menu set to Show Current Time, double-click the number display, type the desired timecode or frame number, then press Return to confirm your entry.
With the timing display pop-up menu set to Show Current Time, press the Left Arrow key (or Page Up key) to move backward or the Right Arrow key (or Page Down key) to move forward.
Ensure that the timing display pop-up menu is set to Show Project Duration.
Double-click the timing display, then do one of the following:
To set the duration in seconds, enter the number of seconds followed by a period. For example, to create a 10-second project, enter “10.” (10 followed by a period) in the field, then press Return.
To set the duration in minutes, enter the number of minutes followed by two periods. For example, to create a 10-minute project, enter “10..” (10 followed by two periods) in the field, then press Return.
To set the duration in hours, enter the number of hours followed by three periods. For example, to create a 1-hour project, enter “10...” (10 followed by three period) in the field, then press Return.
This procedure works in timecode as well as frames.
Ensure that the timing display pop-up menu is set to Show Current Time.
Double-click the timing display, then do one of the following:
To move forward in seconds, enter a plus sign (+), enter the number of seconds to move forward, then type a period. For example, to move 2 seconds ahead, enter “+2.” (a period after the number two), then press Return. To move ahead in minutes, enter two periods after the number, then press Return. To move ahead in hours, enter three periods after the number, then press return.
To move backward in seconds, enter a minus sign (–), then enter the number of seconds to move backward, and then enter a period. For example, to move 2 seconds backward, enter “–2.” in the field, then press Return. To move backward in minutes, enter two periods after the number; to move backward in hours, enter three periods after the number.
Enter a plus sign (+) followed by the number of frames to move forward.
Enter a minus sign (–) followed by the number of frames to move backward.