Modifying Keyframes
The Keyframe Editor provides an ideal environment for manipulating keyframes because you can simultaneously see their values, placement in time, and how the changes affect the interpolative curves surrounding them.
Using the Edit Keyframes Tool
To use the following set of instructions, select the Edit Keyframes tool (above the Keyframe Editor parameter list.
Choose Add Keyframe from the Animation menu for any parameter to add a keyframe at the position of the playhead.
Double-click or Option-click the animation curve.
Curves created when keyframes are added are set to the interpolation method used by the rest of that curve. For example, position channels default to using Bezier curves, so new keyframes are added as Bezier keyframes. For more information on interpolation methods, see Modifying Curves.
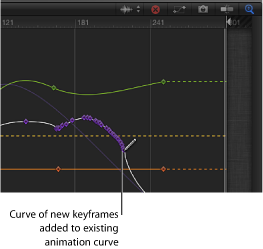
Option-drag a curve segment.
A keyframe is added to the segment, and its value is displayed as you drag the keyframe.
In the graph area, drag the keyframe along the Y axis (up and down) to change its parameter value. To change its position in time, drag along the X axis (left to right).
Press the Shift key while dragging to constrain movement to one axis.
Tip: Keyframes can also be constrained to the Y axis by turning on “Lock keyframes in time in Keyframe Editor” in the Time pane of the Motion Preferences window.
When dragging a keyframe in the graph, numbers appear indicating the position and value of the keyframe. The first number is the frame number (or timecode number) and the second number is the parameter value.
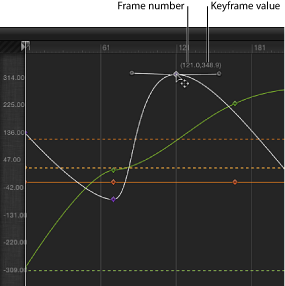
When you drag two keyframes closer along the X axis, the transformation between those values happens more quickly. When you drag keyframes farther apart from each other, the change happens more slowly.
Double-click the keyframe to modify, enter the value into the value field, then press Return.
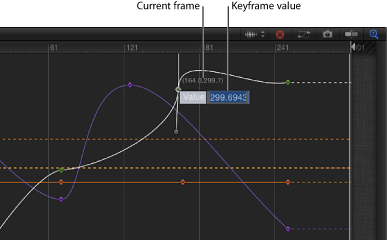
This changes the value of the keyframe along the Y axis (up and down).
Note: To dismiss an active value field without making changes, press Esc.
Drag in the value slider in the parameter list.
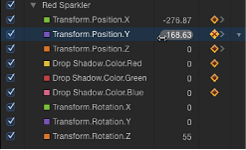
Drag to the right to increase the value of the keyframe along the Y axis.
Drag to the left to decrease the value of the keyframe along the Y axis.
Press Shift while dragging to change the value in increments of 10.
Press Option while dragging to change the value in increments of .01.
Select keyframes.
Do one of the following:
- To move the selected keyframes to a specific frame: Enter a number, then press Return.
- To move the selected keyframes forward by a specific number of frames: Enter a plus sign (+) and the number of frames, then press Return.
- To move the selected keyframes back by a specific number of frames: Enter a minus sign (–) and the number of frames, then press Return.
Select the keyframe, then press Delete.
Note: You can drag to select multiple keyframes.
Control-click the keyframe, then choose Delete from the shortcut menu.
Navigate to the keyframe, then choose Delete Keyframe from the Animation menu for that parameter.
Click the Animation menu in the parameter list, then choose Reset Parameter.
Note: You can also use the Animation menu in the Inspector.
In addition to modifying keyframes, you can add and delete keyframes in the graph.
Reversing, Locking, and Disabling Keyframes
You can reverse keyframes to reverse the corresponding animated effect without re-animating it. Further, you can lock keyframes (individually or in groups) if you have a complicated curve and you want to prevent further adjustment. Finally, you can disable an entire curve to suspend animation for that parameter.
In the graph area Keyframe Editor, drag a bounding box to select the keyframes to reverse.
Control-click a selected keyframe, then choose Reverse Keyframes from the shortcut menu.
The keyframes are reversed.
Select the keyframes to lock, then control-click a keyframe and choose Lock from the shortcut menu.
Lock prevents further modification the keyframes.
Tip: You can also lock all keyframes in the Keyframe Editor by selecting “Lock keyframes in time in Keyframe Editor” in the Time pane of Motion Preferences.
Select the keyframes to disable, then Control-click a keyframe and choose Disable from the shortcut menu.
Disabled keyframes are ignored and have no effect on the object’s animation. If you disable a keyframe, the curve readjusts itself as if that keyframe didn’t exist, even though the keyframe is present in the Keyframe Editor, in a dimmed state.
Copying and Pasting Keyframes and Animation Curves
Keyframes and the animation curves they form can be moved from one parameter to another using copy and paste commands. This technique can be useful for copying a keyframe effect from one object to another, for moving a keyframe path earlier or later in the same parameter, or for creating keyframes on one parameter and applying them to another.
To copy keyframes, select the keyframes you want to copy, individually or as an entire curve.
Using the Edit Keyframes tool, drag a selection box in the graph area around the keyframes to select.
Shift-click the keyframes you want to select.
After you select the keyframes, cut or copy them to move them to the Clipboard.
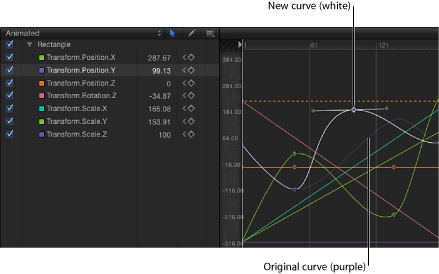
Note: If the curve appears white (and not the keyframe), the keyframes are not selected.
Choose Edit > Copy (or press Command-C).
Choose Edit > Cut (or press Command-X).
To paste the keyframes, select the parameter you want to paste to, and the place where you want the pasted keyframes to begin.
Select the destination parameter in the parameter list (on the left side of the Keyframe Editor).
Place the playhead at the point where you want the keyframes to begin.
Choose Edit > Paste (or press Command-V).
Note: Pasted keyframes might not make a curve identical to the original if the parameter scales are different.
Choose Edit > Copy (or press Command-C).
Select a parameter row in the parameter list of the Keyframe Editor.
Shift-click or Control-click in the parameter list to select multiple parameters.
After you select the parameters, you can cut or copy them to move them to the Clipboard.
Choose Edit > Cut (or press Command-X).
When pasting animation curves, any keyframes in destination parameters are replaced, and the timing of the original keyframes is retained in the new destination.
In the parameter list of the Keyframe Editor, select the destination parameter.
Choose Edit > Paste (or press Command-V).
Note: Pasted animation curves might not make a curve identical to the original if the parameter scales are different.
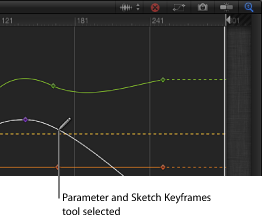
Using the Sketch Keyframes Tool
The Sketch Keyframes tool (next to the Edit Keyframes tool) allows you to sketch animation curves in the Keyframe Editor graph area, creating keyframes as you go. To sketch a curve, the parameter to animate must first appear in the parameter list. See Custom Parameter Sets for methods of displaying curves.
In the parameter list, select the parameter to sketch.
Select the Sketch Keyframes tool (above the parameter list).
Drag in the graph area to sketch an animation curve.
Drawing new keyframes overwrites existing keyframes at the frames where you draw.
Select the Sketch Keyframes tool (above the parameter list).
In the parameter list, select the parameter.
Click in the graph area to add a keyframe.
Additional clicks create additional individual keyframes.
Using the Transform Keyframes Tool
The Transform Keyframes tool allows you to drag a selection box around a number of keyframes, then manipulate their positions by adjusting the handles of the selection box.
Select the Transform Keyframes tool (above the parameter list).
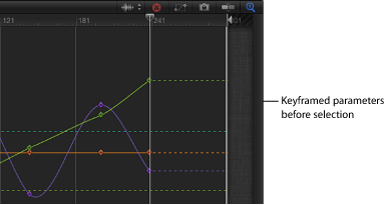
In the graph area, drag to create a box enclosing the keyframes to manipulate.
A selection box with eight handles appears in the graph area.
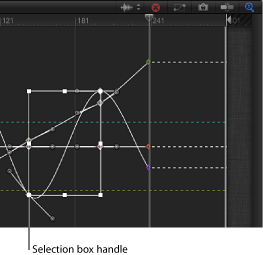
After you draw a selection box, you can manipulate the box and keyframes in several ways. Drag a handle of the selection box to move the keyframes.
Important: When transforming keyframes using the Transform Keyframes tool, by default keyframes are adjusted in whole-frame increments. You can adjust keyframe in sub-frame increments if the “Allow sub-frame keyframing” checkbox is turned on in the Time pane of Motion Preferences. Sub-frame adjustments allow greater precision, but use the Next/Previous Keyframe controls (or keyboard shortcuts) to move the playhead to keyframes that are between frames. If you move a sub-frame-adjusted keyframe using the pointer, the frame snaps to the nearest whole frame.
Drag inside the selection box to move the box and the enclosed keyframes.
Moving left and right repositions the keyframes in time, and moving up and down increases and decreases the parameter values of the keyframes.
Note: No matter where you drag the box, only the keyframes selected by the original box are manipulated, even if the repositioned box overlaps keyframes outside of the original selection. To manipulate additional keyframes, redraw the selection box in the graph area.
Drag any handle to resize the selection box.
The selection box changes shape relative to the handle on the opposite side or corner of the box, which remains locked in place.
Hold down the Option key and drag a handle of the selection box.
Both sides of the box scale up or down around its center as you drag along the axes.
Hold down the Command key and drag a corner handle of the selection box.
Each corner handle moves independently of the other three corner handles of the selection box.
In the Keyframe Editor, click once anywhere outside the selection box.
Choose the Edit Keyframes tool.
The selection box disappears.
Tip: You can also draw a new selection box outside of the old one to surround a different group of keyframes.
Manipulating Animation Curves
You can select and move animation curves in the graph area of the Keyframe Editor.
Press Command-Option, then drag a keyframe on the curve.
Press Command-Option, then drag a curve segment between two keyframes.
You can also move selected segments of the curve by selecting adjacent keyframes.
Curve Snapshots
When modifying keyframes, it is often helpful to have a frame of reference for your curves. A saved reference of curves lets you compare modified curves to the original curves. Additionally, a saved reference—known as a curve snapshot—acts as a safety net if you need to restore a curve’s original state.
Click the Take/Show Curve Snapshot button in the upper-right corner of the Keyframe Editor.

With Take/Show Curve Snapshot enabled, as you move keyframes in the Keyframe Editor, the original curve—as it appeared when you took the snapshot—retains its color. As long as you remain in the Keyframe Editor editing the current set of curves with the Take/Show Curve Snapshot button enabled, the snapshot curve remains available.
If, after editing a curve, you want to revert to the snapshot, you can do so from the Animation menu in the Keyframe Editor.
From the Animation menu in the Keyframe Editor, select Set to Curve Snapshot.
The curve reverts to the state of its last snapshot.
Important: If you leave the Keyframe Editor, or load a different set of curves into the Keyframe Editor, curve snapshots are taken again, replacing the previous curve snapshots.