Inspector
In Motion, you modify images, clips, and effects by adjusting parameters—numeric attributes that define each characteristic of a project. The Inspector is where you find the controls to modify parameters: sliders, dials, pop-up menus, checkboxes, and so on. (For more information on Inspector controls, see User Interface Controls.)
When you select an image, clip, or effect in Motion, its parameter controls become available in the Inspector, ready for adjustment. In other words, the Inspector is contextual: what appears in the Inspector is based on the selected object. An object must be selected for its parameters to appear in the Inspector.
The Inspector contains four panes, each of which displays parameter controls for the selected object. The first three panes, Properties, Behaviors, and Filters, are present for any selected object. The fourth pane, generically called the Object pane, changes its name and contents depending on the type of object selected.
Click Inspector in the top-left corner of the Motion workspace.
Choose Window > Inspector (or press Command-3).
The Inspector opens.
Note: If the Inspector is open, choosing Window > Inspector (or pressing Command-3) collapses the pane containing the Inspector, File Browser, and Library, maximizing the Canvas work area.
With the Inspector open, choose Window > Inspector (or press Command-3).
Click the “i” button in the lower-left corner of the Motion workspace.
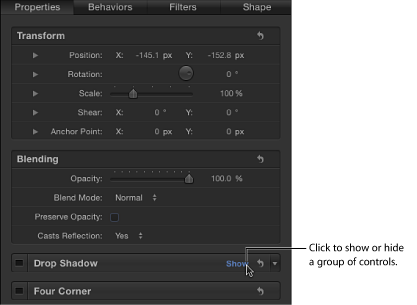
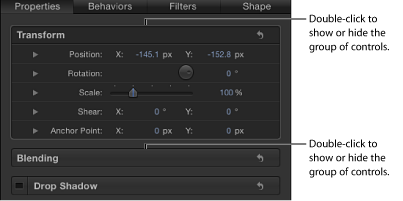
Some groups of parameters appear in a group that can be shown or hidden. There are two ways to show or hide the controls.
Position the cursor at the right end of the row that contains the group name (to the left of the Reset button).
Click Show to display the parameters or Hide to conceal the parameters.

Double-click the empty space in a row that contains a group name.

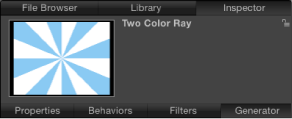
Inspector Preview Area
The preview area contains a visual preview of the object and can show the multiple frames of moving footage. The Inspector preview area is similar to the File Browser and Library preview areas, but it has no Apply or Import button.

Properties
This pane, also referred to as the Properties Inspector, contains controls for setting basic attributes of the selected object, such as Transform controls (position, scale, rotation, and so on), Blending controls (opacity, blend mode, and so on), Shadows controls, Four Corner controls, Crop controls, and controls for designating the object’s In and Out points.
Note: Parameter controls are available in the Properties Inspector depending on the type of object selected. For example, when a 3D group is selected, the Lighting and Reflection controls appear in the pane, but the Crop, Drop Shadow, and Four Corner controls do not.
When the Project object (located at the top of the Layers list) is selected, controls become available Inspector that allow you to modify the project’s background color, aspect ratio, field rendering, motion blur, reflections, and so on. For more information on project properties, see Project Properties.
Behaviors
This pane, also referred to as the Behaviors Inspector, contains controls for adjusting attributes of applied behaviors. If the object has no applied behaviors, the Behaviors Inspector remains empty. If the object has multiple applied behaviors, grouped controls for each behavior appear stacked in this pane, with controls for the most recently applied behavior at the top.
Filters
This pane, also referred to as the Filters Inspector, contains controls for adjusting attributes of applied filters. If the object has no applied filters, the Filters Inspector remains empty. If the object has multiple applied filters, grouped controls for each filter appear stacked in this pane, with controls for the most recently applied filter at the top.
Object
This pane, also referred to as the Object Inspector, contains controls that vary depending on the type of object selected. The name of the pane is also context-sensitive, changing depending on the type object selected. The different Object Inspectors are described below:
- Object: Appears when there is no selected object. There are no parameters in the Object pane.
- Image: Appears when an image, image sequence, movie, or drop zone is selected. When media is selected, this pane contains the Drop Zone checkbox, the state of which determines whether the image selected is a drop zone target. When the checkbox is selected, additional parameters become available. For more information, see Drop Zone Parameters.
- Group: Appears when a group is the selected object. The pane contains the Type parameter, which allows you to convert a group from 2D to 3D, and vice versa. A 2D group has different available parameters than a 3D group.
When set to 2D, Fixed Resolution parameters become available, which allow you to manually define the size of a group. By default, Fixed Resolution is disabled, and the size of the group is determined by the layers in that group. For more information, see Fixing the Size of a Group.
Note: When selected, Fixed Resolution crops the group to the size specified in the Fixed Width and Fixed Height parameters around the anchor point of the group.
When set to 3D, the Flatten and Layer Order parameters become available. When the Flatten checkbox is selected, all elements in the 3D group are flattened like a card or billboard. When the Layer Order checkbox is selected, the project elements are sorted by their order in the Layers list rather than their order in Z space. For more information, see Layer Order and Depth Order.
- Project: Appears when the Project object (located at the top of the Layers list) is selected and contains the Publishing and Snapshots pane. The Publishing pane lists all parameters set to be published in a template (except for filter onscreen controls). The Snapshots pane is used to create different display aspect ratios for templates. For more information on publishing and templates, see Creating Templates for Final Cut Pro X.
- Camera: Appears when a camera is selected and contains controls specific to a scene camera, including angle of view and depth of field parameters. For more information on using cameras, see Cameras.
- Light: Appears when a light is selected and contains controls to change the light type, color, intensity, and falloff. When the Shadows checkbox is selected, parameters become available that control the shadow cast by a Point or Spot light. For more information on working with lights and shadows, see Lighting or Shadows.
- Rig: Appears when a rig is selected and contains buttons that allow you to choose widget types to map multiple parameters to a single control. For more information on rigging, see Using Rigs.
- Media: Appears when an item is selected in the Media list of the Project pane. (For more information see Project Pane.) These parameters deal mostly with attributes of the file on disk or how the file is interpreted by Motion. Because multiple project objects can reference a single media file, the pane contains a list of linked objects. Making changes in this pane affects all objects that refer to the selected media file. For more information on working with media parameters, see Source Media Parameters.
- Text: Appears when text is selected and contains all controls that affect the text. The Text Inspector is divided into three panes:
- Format: Contains standard controls to adjust font, size, tracking, kerning, justification, alignment, line spacing (leading), and so on. It also contains a large text-entry field where you can edit the contents of text used in your project. The Format pane also includes a pop-up menu of preset text styles.
- Style: Contains controls to adjust the fill, outline, glow, and drop shadow of selected text. Each section is grouped and can be turned on or off by selecting the checkbox next to the category name. The Style pane also includes a pop-up menu of preset text styles.
- Layout: Contains paragraph style controls to set text on a path, direction, rendering, how text objects are affected when behaviors are applied, and how anchor points are used. This pane also contains controls to create a type-on effect or to modify text path options. For more information on working with text parameters, see Creating and Editing Text.
- Mask: Appears when a mask is selected and contains controls to change the mask’s shape, to define how multiple masks interact, to invert a mask, to smooth the shape of a mask or adjust its softness, or to change the color of the mask in the Canvas. This inspector also contains position value sliders for mask control points. For more information on working with mask attributes, see Mask Parameters.
- Image Mask: Appears when an image mask is selected and contains Mask and Mask Options controls. These controls allow you to change the mask’s source, reference frame (if the source is a clip), offset, wrap mode, source channel, blend mode, and so on. For more information, see Applying Image Masks to a Layer.
- Shape: Appears when a shape is selected and contains controls that affect the shape. The controls are divided into four panes:
- Style: Contains controls to modify the fill and outline of a shape and the brush type of an outline or paint stroke. This pane also includes a pop-up menu of preset shape styles.
- Stroke: Contains controls for modifying paint strokes. Use these controls to set stroke color and brush scale, and to adjust opacity, spacing, width, and other parameters.
- Advanced: Contains controls that allow the dabs of a paint stroke to be animated like particles.
- Geometry: Contains controls that allow you to change the shape type, to close or open a shape, to smooth a shape, and to adjust the position of a shape’s control points using value sliders. For more information on working with shapes, see Using Shapes, Masks, and Paint Strokes.
- Emitter: Contains controls for modifying a particle emitter, including emitter shape, space (2D or 3D), angle, and range. This pane also provides access to cell controls. For emitters with multiple cells, these controls affect all cells. For more information on using particles, see Working with Particles.
- Particle Cell: Contains controls for modifying particle cells. Particle cells can only be selected in the Layers list or Timeline layers list. This pane contains controls for attributes such as birth rate, speed, angle, and color.
- Replicator: Contains controls for modifying replicator attributes, including shape, space (2D or 3D), pattern, size, and cell controls. For more information on using the replicator, see Using the Replicator.
- Replicator Cell: Contains controls for modifying replicator cells. Replicator cells can only be selected in the Layers list or Timeline layers list. This pane contains controls for attributes such as angle, color, and scale.
- Generator: Displays the parameters and attributes of the selected generator, such as the Center, Size, and Intensity parameters of a Lens Flare generator. The parameters listed depend on the selected generator. For more information on generators, see Working with Generators.
- Audio Track: Contains controls for adjusting an audio file selected in the Audio list of the Project pane or in the Audio Timeline, including level, pan, and output bus. For more information on working with audio, see Working with Audio.
- Master: Contains controls for adjusting a Master audio track selected in the Audio list of the Project pane, including level, pan, and the output bus of audio tracks in the project. For more information on working with audio, see Working with Audio.