Managing Projects
When you work on a project in Motion, it’s important to be organized. This includes keeping careful track of your project files, saving often, and maintaining regular backups. Motion also autosaves projects to files that can be retrieved at any time (unless Use Autosave Vault is deselected in Preferences).
Saving Projects
As with any application, it’s wise to save early and often as you work on your project. This way, you don’t lose work due to unforeseen circumstances such as a blackout occurring just as you were about to finish your latest animated masterpiece.
In addition to preserving your work for future use, Motion’s save commands can be used in other ways to manage the development of your project. For example, if you’re happy with your current composition but want to create a variation, use the Save As command to save a copy of the current project. You can then alter the duplicate, leaving your original project alone in case you don’t like your changes.
Choose File > Save (or press Command-S).
If the project has not been saved, the Save As dialog appears.
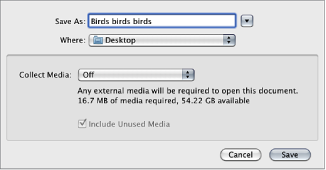
Enter a name into the Save As field, choose a location on your hard disk to save the file, then click Save.
Note: If the project has been saved, the project file is updated without opening a dialog.
Choose File > Save As (or press Command-Shift-S).
The Save As dialog appears.
Enter a name into the Save As field, choose a location on your hard disk, then click Save.
Important: When using the Save As command, use a name that is different from the name of any saved versions of the same project. Otherwise, you run the risk of overwriting a version of this project file you want to keep.
Collecting Media
When saving a project, you can to gather the media used in the project in a folder. Collecting these files organizes your project media in a single place, making portability and backup easier. By default, Collect Media is turned off.
Choose File > Save As (or press Command-Shift-S).
The Save As dialog appears.
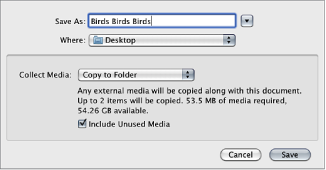
Choose Copy to Folder from the Collect Media pop-up menu.
This creates a folder with the name specified in the Save As field. A Motion project file of the same name is created in that folder, as well as a folder named “Media” containing all media files used in the project.
When using this option, you can specify whether unused media are collected as well.
Using Autosave
Motion saves backups of your project in a folder on your hard disk. In the Cache pane of Motion Preferences, you can specify how frequently projects are saved, as well as the location of the saved files. Saved projects are time- and date-stamped. For more information about autosave, see Autosave.
Choose Motion > Preferences (or press Command-Comma).
Click Cache.
In the Autosave group, select Use Autosave Vault.
By default, the Autosave Vault folder is located in your /Users/username/Movies/Motion Projects/ folder.
In the Cache pane of Motion Preferences, click Choose and select a location in the dialog.
Choose File > Restore From Autosave.
The Restore Project dialog appears.
Choose a saved project from the pop-up menu.
Reverting Projects
The Revert to Saved command discards all changes you’ve made to a project since the last time you saved it. The Revert command is useful as a tool for trying out changes in your project. You can save your project in the state you like it, then make the changes you want. If you don’t like the result, use the Revert to Saved command to immediately go back to the way it was before.
Note: You can also use the application’s unlimited undo feature to achieve the same purpose in incremental steps. For more information on the Undo command, see Edit Menu.
Choose File > Revert to Saved.
Important: This command cannot be undone.
Opening and Closing Projects
You can open a saved project file in the Finder or from within Motion. Only one project can be open at a time.
Double-click a Motion project file.
Select a Motion project file, then drag it onto the Motion application icon in the Applications folder or in the Dock, if you’ve placed one there.
Select a Motion project file, then choose File > Open (or press Command-O).
Control-click a Motion project file, then choose Open from the shortcut menu.
Motion starts and opens the selected project.
Choose File > Open (or press Command-O).
The Open dialog appears.
In the Open dialog, navigate to the project file you want, then click Open.
Choose File > Import as Project or press Shift-Command-I.
The Import Files as Project dialog appears.
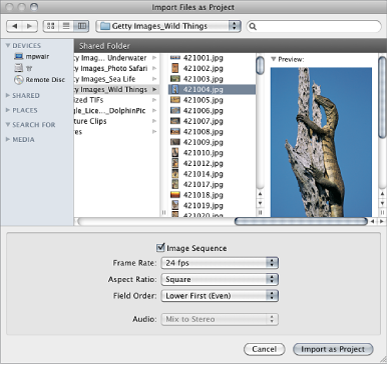
Navigate to and select the files to populate the project, Shift-clicking to select contiguous items or Command-clicking to select noncontiguous items.
As you select files, format settings at the bottom of the dialog become available. Settings inherent to the selected files remain dimmed, but propagate to the new project.
For example, because movie files have an inherent frame rate, aspect ratio, and field order, those settings are dimmed in the Import Files as Project dialog. Because still images do not have a frame rate or a field order, those settings are enabled in the dialog, allowing you to choose a frame rate and field order for the new Motion project.
If needed, set the Frame Rate, Aspect Ratio, Field Order, and Audio mix settings.
If you selected an item from an image sequence, select the Image Sequence checkbox to have Motion use each image as a frame in a movie clip. For more information, see Image Sequences.
Except for Frame Rate, these settings can be modified after the project is created, in the Properties Inspector. For more information, see Project Properties.
Click Import as Project.
The file opens in a Motion project window.
You can also open existing projects and templates, and create projects from presets using the Project Browser. For more information, see The Project Browser.
Moving and Archiving Motion Project Files
To move a Motion project file to another computer, you must also move all media that the project uses, including all QuickTime, still image, and audio files. In addition, any third-party Motion plug-ins or nonstandard fonts used in the project must be installed on the new computer, or they’ll be unavailable to your project.
Similarly, when you finish a project and want to archive it, it’s a good idea to archive the project file and all media, (especially media that wasn’t captured from a device-controllable video or audio source), graphics, fonts, custom behaviors, filters, and third-party add-ons used in the project. If you need to restore the project for later revisions, you’ll have everything you need to get started quickly. If you have a recordable CD or DVD drive, backing up your media is easy. For more information on copying files to a CD or DVD, see Mac Help in the Finder Help menu.
The easiest way to collect all media for your project is to use the Collect Media feature. For more information, see Collecting Media.
Note: If you move a project to another computer without collecting, its media can go offline even though you’ve moved its media files with it. For more information on how to relink media files to your project, see Online Versus Offline Media.
Unused Media
By default, media used by objects added to your project are managed by Motion. If you delete an object from the Canvas or Layers list, the source media is removed from the Media list. You can turn off this feature in the General pane of Motion Preferences. For more information, see Media.
Searching for Projects Using the Finder
Spotlight indexes the following properties of Motion projects, allowing you to perform advanced searches. Use Spotlight in the Finder to take advantage of this feature.
Project property | Description |
|---|---|
Width | Project width, in pixels |
Height | Project height, in pixels |
Duration | Project duration, in seconds |
Layer name | The name of a layer in a project |
Media name | The name of a media object in a project |
Pathname | The path to a media object in a project |
Text | The content of a text object in a project |
Description | Text in the Project Description field in the Properties Inspector |
Marker name | The name of a marker in the Timeline of a project |
Marker comment | Text of a marker comment in a project |
Project Properties
When you create a project, you specify a set of project properties—Resolution, Frame Rate, Duration, and so on. You can change these properties at any time, even after you add objects to the project.
The Properties Inspector lets you define the most essential attributes of a project. By choosing different parameters, you can accommodate nearly any video or film format you need to output to. These properties are the default settings used when you export your project.
Do one of the following:
Choose Edit > Project Properties (or press Command-J).
Select the Project object at the top of the Layers list, then open the Inspector and click Properties.
The Inspector opens and displays the Properties pane.
In the Properties Inspector, change any necessary parameters, then click OK.
Important: Project Frame Rate cannot be changed after a project is created.
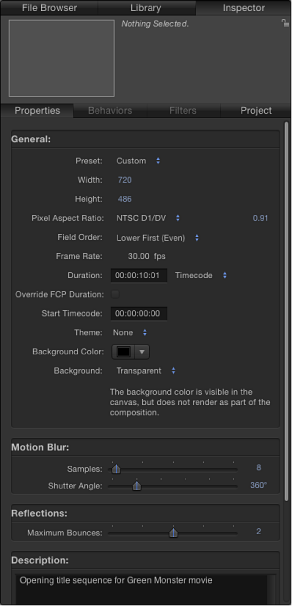
The Properties Inspector for the project contains settings for video file format, timecode display, motion blur, and other project attributes.
General Settings
The following parameter controls appear in the General section of the Properties Inspector:
- Preset: Use this pop-up menu to choose a common video format to base your preset on. After choosing a preset, you can adjust the other parameters in the Properties Inspector to customize your format settings. For more information about managing Motion project presets, see Creating, Editing, and Deleting Presets.
- Width and Height: Use this value slider to define the size of the Canvas and the default output resolution of your project. Drag left or right over the values to decrease or increase them. Frame size is usually defined by the video format you plan on outputting to. For example, NTSC DV format video is 720 x 480, whereas PAL DV format video has a frame size of 720 x 576.
- Pixel Aspect Ratio: Use this pop-up menu to set whether the project is created using square or nonsquare pixels. Computer displays, film, and high-definition video use square pixels, while standard-definition video uses nonsquare pixels. Choose Square for projects intended for the web, high-definition projects, and film, or choose a nonsquare pixel ratio corresponding to each international standard-definition broadcast format. A value slider to the right of this pop-up menu displays the numerical aspect ratio, in case you need to change the dimensions manually.
- Overwrite FCP Duration: (This checkbox appears only in Final Cut Transition projects.) When creating custom transitions in Motion for use in Final Cut Pro X, select this checkbox to overwrite the default transition duration (as defined in the Editing pane of Final Cut Pro Preferences). For more information, see Creating Templates for Final Cut Pro X.
- Background: Use this pop-up menu to define whether the Background Color is rendered as part of the alpha channel. Regardless of the selection, the Background Color is visible in the Canvas. There are three options:
- Transparent: The background color does not render as part of the alpha channel.
- Solid: The background color creates a solid alpha channel.
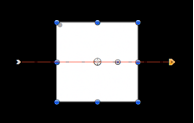
- Environment: The background color creates a solid alpha channel and interacts with 3D projects, including blend modes and reflections. In the following images of the Canvas, Reflection is turned on for the elliptical shape (in the shape’s Properties Inspector). In the left image, the elliptical shape retains its original white color because Background is set to Solid. In the right image, the pink background is reflected in the elliptical shape because Background is set to Environment.

Motion Blur and Reflections Settings
Below the General section of the Properties Inspector are two sections that can affect how your project looks when exported: Motion Blur and Reflections.
The Motion Blur controls simulate the effect a camera’s mechanical shutter has on a frame of film or video when the camera or its subject is moving. In Motion, motion blur affects objects in your project that are animated using behaviors or keyframes. This allows you to create more natural-looking motion in your project, even though the animation is artificially created. As with a camera, faster objects have more blur; slower objects have less blur.

The Motion Blur section of the Properties Inspector has two settings:
- Shutter Angle: Use this slider to define the size of the motion blur that appears for animated objects. Increasing the shutter angle increases the number of frames over which the shutter is open.
The following image shows a shape keyframed to move quickly across the Canvas horizontally.
In the next image, Motion Blur is enabled and Samples is set to the default value of 8.

Note: When using larger Shutter Angle values, it may be necessary to increase the Samples value to eliminate unwanted artifacts.
In the above image, the Shutter Angle is set to the default of 360 degrees, which represents 1 frame. In the following image, Shutter Angle is set to 600 degrees.

The Reflections section of the Properties Inspector has one parameter:
- Maximum Bounces: Use this slider to limit the number of recursive reflections that can occur when two or more shiny objects reflect one another. This parameter is intended to prevent an endless repetition of reflective bounces.
For more information about reflections, see Reflections.
Description Field
At the bottom of the Properties Inspector is a field where you can enter a brief description of the project, including significant characteristics of the project preset, such as frame size and frame rate.
Changing the Frame Size of a Project
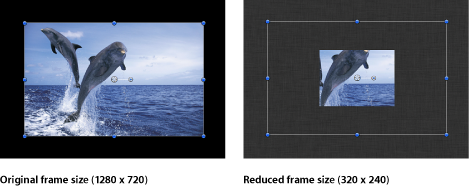
When you change the frame size of a project (via the Width and Height parameters in the Properties Inspector), you effectively change the size of the Canvas, increasing or reducing layout space for objects in the project.
Changing the size of the Canvas does not change the size or position of objects in the Canvas. Further, because the coordinate system in Motion uses 0, 0 as the center of the frame, all objects remain arranged in their current positions relative to the center of the frame as the edge of the frame shrinks toward the center. This can result in objects being cut off as the frame shrinks past their edges.
In the following example, a project with a frame size of 1280 x 720 is reduced to 320 x 240. The 720 x 480 video clip is smaller than the original frame size but bigger than the reduced frame size.
Note: Because Motion is resolution-independent, it’s not usually necessary to change your project’s frame size. You can output a project at any size, regardless of the current frame size, by changing the settings in Motion’s Share windows. For example, if you build a project with a frame size for standard-definition broadcast, you can still export a half-resolution version of the project to post on the web by exporting to the necessary size.