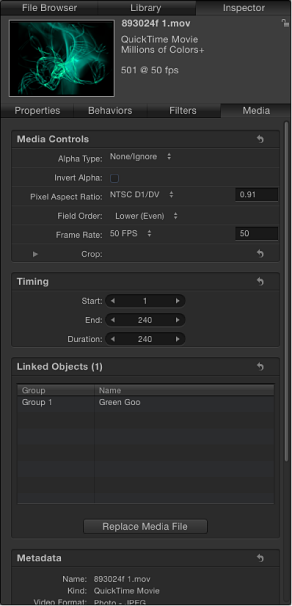
Source Media Parameters
When you select a source media item in the Media list, the Media Inspector displays adjustable parameters that define how the image or movie clip is displayed and composited in the project.
Motion attempts to interpret the correct parameter settings for each source media item you add to a project. However, additional manual adjustment is sometimes necessary. Because Motion is a nondestructive application, changes made to these parameters are not applied to the source media files on disk. Parameter changes affect how objects are drawn in Motion.
Media Inspector
The following controls let you modify source media in the Media list. Modifying source media modifies all layers in a project linked to that source media.
Note: The parameters described below do not apply to Photoshop files imported as separate layers. PDF files with transparent backgrounds do not have the Alpha Type or Invert Alpha parameters.
- Alpha Type: Use this pop-up menu to choose how Motion deals with alpha channels in the media item. An alpha channel contains information defining areas of transparency in the image or movie. When you import an image file or QuickTime movie, its alpha channel is immediately recognized by Motion. There several different ways to embed alpha channel information into files, which correspond to the options in this menu. Motion assigns an option based on an analysis of the object when it is imported, but you can override the default if necessary, by choosing any of the following:
- None/Ignore: This is the default setting for objects with no alpha channel. This option also allows you to ignore an object’s alpha channel, so the entire object appears solid.
- Straight: These alpha channels are kept separate from the red, green, and blue channels of an image. Media files using straight alpha channels appear fine when used in a composition, but they may look odd when viewed in another application. Translucent effects such as volumetric lighting or lens flares in a computer-generated image can appear distorted until the clip is used in a composition. If Straight is chosen but you see a black, white, or colored fringe around the object, this parameter is incorrectly set and should be changed to a Premultiplied option, depending on the color of the fringe.
- Premultiplied-Black: This type of alpha channel is multiplied with the clip’s red, green, and blue channels. As a result, objects with premultiplied alpha channels look correct, even with translucent lighting effects, because the entire image is precomposited against a solid color. This option interprets alpha channels that are precomposited against black.
- Premultiplied-White: This option interprets alpha channels that are precomposited against white.
- Guess Alpha Type: This option forces Motion to analyze the file in an attempt to figure out what kind of alpha channel is used. If you’re unsure, use this setting.
- Invert Alpha: Select this checkbox to invert an alpha channel that is incorrectly generated in reverse. Ordinarily, an alpha channel is a grayscale channel, where white represents areas of 100 percent opacity (solid), gray regions represent translucent areas, and black represents 0 percent opacity (transparent).
- Pixel Aspect Ratio: Use this pop-up menu to set the type of pixel relevant to the project, square or nonsquare. In general, objects created for computer display, film, and high-definition video use square pixels, while objects created for some video formats (such as DV, HDV, DVCPRO HD, and others) use nonsquare pixels. A value field to the right of this pop-up menu displays the numeric aspect ratio, in case you need a custom ratio. By correctly identifying each object you add to your project, you can mix and match both kinds of media.
- Field Order: Use this pop-up menu to choose a field order that matches the field order of the device used to capture an interlaced clip. There are two choices: Upper (Odd) or Lower (Even). If you choose incorrectly, you’ll notice during playback that the video stutters during playback. When this happens, choose the opposite field order. Clips shot on film or with a progressive scan video camera have no interlacing, therefore Field Order should be set to None. By correctly identifying each object in your project, you can mix and match clips with a different field order. For more information about field order and interlacing, see Field Order.
- Frame Rate: Use this pop-up menu to choose a frame rate in frames per second (fps) that matches a clip’s native rate. For example, film is 24 fps, PAL video is 25 fps, and NTSC video is 29.97 fps. Additional frame rates are available for other video formats. If the frame rate you require is not listed, enter a number in the text field to the right of the pop-up menu. If you modify a QuickTime file’s frame rate but need to change it back to the file’s original rate, choose “From file” at the bottom of the Frame Rate pop-up menu.
Although you can mix clips using different frame rates, clips playing at a frame rate different from that of the project might not play smoothly.
Note: Project frame rates are determined by the project preset. To edit a preset or to create a preset, choose Motion > Preferences and use the options in the Presets pane.
- Fixed Width and Fixed Height: Use these sliders (available for still images) to change the resolution of source media. When the Large Stills control (in Motion Preferences) is set to Scale to Canvas Size, these values display the resolution of the original file.
When a PDF is selected in the Media list, these controls set the maximum resolution to which a PDF object can be smoothly scaled. For more information, see Fixing the Resolution of a PDF Object.
- Crop: Click the disclosure triangle to reveal four sliders that define the number of pixels to be cropped from each of the source media’s four sides, relative to the outer edge of the bounding box that surrounds that source media. Cropping an item in the Media list also crops all instances of that item in layers of the project. A similar Crop parameter appears in the Properties Inspector when you select a layer in the Layers list. For more information, see Parameters in the Properties Inspector.
- Timing: Use these value sliders to set the start, end, and duration of the source media:
- Start: Sets the In point of the source media, in constant and variable speed modes. Adjusting this parameter moves the In point to the specified frame without affecting the duration of the media.
- End: Sets the Out point of the source media, in constant and variable speed modes. Adjusting this parameter moves the Out point to the specified frame without affecting the duration of the media.
- Duration: Sets the total duration of the source media. If Time Remap is set to Constant Speed, adjusting Duration also affects the Speed and Out point. If Time Remap is set to Variable Speed (in the Timing controls of the Properties Inspector), adjusting Duration does not affect variable speed playback.
- Linked Objects: Use this list to see all objects in the Layers list that are linked to the selected source media in the Media list. The first column shows the name of the group containing an instance of the source media; the second column shows the layer name. Changing the layer name in the Layers list updates the name appearing in this list.