Project Pane
The Project pane, located between the File Browser, Library, or Inspector and the Canvas, contains three lists, each of which provides access to a different aspect of your project:
- Layers list: Displays the hierarchy of objects (groups, layers, cameras, lights, behaviors, filters, and so on) in your project.
- Media list: Shows the files imported into your project.
- Audio list: Provides access to, and control of, audio files in your project.
More than simple lists of items in a project, these panes let you organize key attributes of a motion graphics composition, including the stacking order of image layers, audio settings, and source media settings.
Choose Window > Show Project Pane (or press F5).
Click the Show/Hide Project Pane button in the bottom of the Canvas.

Use a horizontal three-finger swipe on a Multi-Touch device.
When the Project pane collapses, the Canvas expands.
Drag the right edge of the pane left or right.
Choose Window > Hide Timing Pane (or press F6).
The Timing pane is hidden and the Project pane is lengthened.
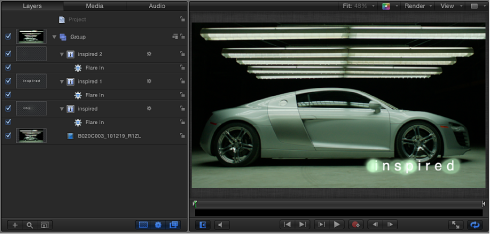
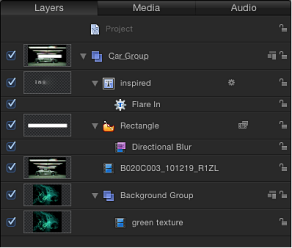
Layers List
The Layers list of the Project pane displays an overview of all image layers, effects, and masks used in a project. The top row of the Layer’s list contains the Project object that, when selected, gives you access to the project’s global settings (in the Project Inspector). Beneath the Project object are the groups, image layers, and effects objects that combine to form the composition displayed in the Canvas. In a 2D project, the stacking order of layers and groups in the Layers list determines which layers appear in front of others in the Canvas.
The hierarchy of items in the list shows which images are in front of or behind other images in the Canvas. All image layers and effects objects—except for cameras, lights, rigs, and the Project object—must reside in groups. Masks, behaviors, and effects can be applied to groups or to layers. Applied masks, behaviors, and effects are listed beneath the group or layer to which they are applied. The masks, behaviors, and effects appear indented in the list.
The Layers list displays several icons that indicate linked audio, 2D/3D status, and lock status. Similarly, layers modified by masks, behaviors, or filters display icons for each effect. Clicking mask, behavior, or filter icons turns the display of these objects, as well their effect on the project, on or off.
If the Project pane is visible, click Layers at the top of the pane.
Choose Window > Layers (or press Command-4).
The Layers list opens in a column view.
Layers List Controls
The Layers list contains the following controls:
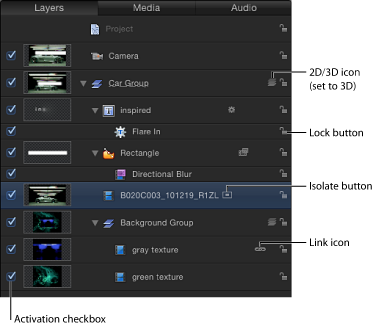
- Isolate button: Appears for a selected layer, group, or camera in a project that contains a camera. The button has an active and inactive state. Clicking the Isolate button for a layer or group sets that object to its original face-forward orientation (so you can apply a mask, for example). Clicking the button again returns to the previous view. Clicking the Isolate button for a camera takes you to that camera’s view.
Note: When a group or layer is isolated, the name of the item replaces the current camera listing in the Camera menu (in the upper-left corner of the Canvas).
- Blend Mode pop-up menu: Displays the blend mode of the layer or group. Click the pop-up menu to choose a blend mode. You can turn the display of the blend mode pop-up menu on or off in the Layers Columns section of the View menu. This pop-up menu is not displayed by default. To display the Blend Mode pop-up menu in the Layers list, choose View > Layers Columns > Blend Modes. For more information on blend modes, see Using Blend Modes.
Working in the Layers List
You can customize the Layers list to accommodate working styles and the needs of projects.
Adjusting the Height of Layers List Rows
There are two ways to adjust the row height for objects displayed in the Layers list.
Position the pointer over a horizontal line and drag up or down to decrease or increase the height of all rows.
Icons and thumbnails resize themselves as you make the adjustment.
Click the Scale button at the bottom of the Layers list (to the right of the Add and Search buttons), then drag the slider. Drag left to decrease the height of the rows and drag right to increase their height.
Adding and Removing Groups
The Layers list has controls to add groups and to remove objects from the project.
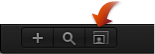
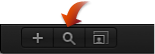
Click the Add button (+) in the lower-left corner of the Project pane.
Choose Object > New Group (or press Command-Shift-N).
An empty group is added above the current group.
Note: You can also create groups when dragging files to the Layers list from the File Browser or Library. For more information, see Adding Media Files to a Project.
Control-click the object to remove, then choose Cut or Delete from the shortcut menu.
Select the object to remove, then choose Edit > Delete (or press Delete) or Edit > Cut.
The object is removed. This action removes the object from the Canvas as well.
Note: If you delete a media file (an imported image, image sequence, audio file, or QuickTime movie) from the project, the file is also removed from the Media list unless “Automatically manage unused media” is deselected in the General pane of Motion Preferences. When this setting is turned off, media files are deleted from the Layers list (and Canvas) but remain in the project in the Media list. Drag an item from the Media list into the Canvas to add it to the Layers list.
Filtering the Layers List View
As a project becomes more complex, you might want to hide some objects from view to focus on a few key objects. You can filter the Layer’s list using the Search button in the lower-left corner of the Project pane.
Click the Search button, then enter the name of the objects to view in the Search field.
When you begin typing in the Search field, the Layers list hides objects that do not contain the text you type. Hidden objects continue to appear in the Canvas.
Click the Clear button at the right of the Search field.
The Search field is cleared and the Layers list returns to the unfiltered view.
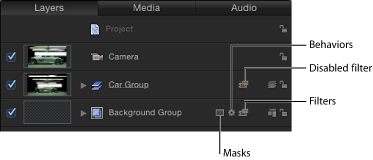
Hiding and Showing Effects
Masks, behaviors, and filters can be turned on and off in the Layers list by using the buttons at the bottom-right corner of the list.
Note: Hiding the effect in the Layers list does not disable it from view in the Canvas nor prevent you from modifying the effect’s parameters or manipulating its onscreen controls.
Click the Show/Hide Masks button.
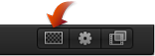
Click the Show/Hide Behaviors button.
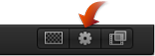
Click the Show/Hide Filters button.
Additional Options in the Layers List
The Layers list shortcut menu gives you access to additional commands to help organize and manipulate layers. Control-click a layer in the Layers list, then choose a command from the shortcut menu. The command is applied to the layer you Control-clicked. The menu contains the following commands:
- Cut: Removes the layer and places it on the Clipboard.
- Copy: Copies the layer to the Clipboard.
- Paste: Places the contents of the Clipboard in the current location.
- Duplicate: Creates a layer identical to the selection.
- Delete: Removes the selected layer.
- Group: Places the selected layers into a group. (For more information on working with groups, see Grouping and Ungrouping Layers.)
- Ungroup: Restores the components to their ungrouped state if the selection contains a group.
- Active: Turns the layer on or off. This is equivalent to clicking the activation checkbox in the On column.
- Solo: Hides other layers in the project. When a layer is soloed, checkboxes for other layers and groups are dimmed. You can solo multiple layers and groups at a time.
- Isolate: Isolates the selected layer, group, or camera (when a project contains a camera). For a layer or group, choosing Isolate changes the item back to its original face-forward orientation to allow the application of a mask, for example. Clicking a camera’s Isolate button activates that camera’s view. This is the same as clicking the Isolate icon in the Name column.
- 3D Group: Switches the group from 2D mode to 3D mode.
- Blend Mode: Sets the blend mode for the selected layer. This is equivalent to setting a value using the Blend Mode pop-up menu (when chosen in View > Layers Columns).
- Add Image Mask: Adds an image mask to the selected layer. An image mask creates transparency in another object by deriving an alpha channel from another layer, such as a shape, text, movie, or still image. For more information, see Applying Image Masks to a Layer.
- Make Clone Layer: Clones the selected layer. Like the Duplicate command, Make Clone Layer lets you make copies of a selected layer. However, copies created by the Make Clone Layer command are automatically modified to match changes made to the original layer. For more information on cloning layers, see Making Clone Layers.
- Reveal Source Media: Opens the Media list and highlights the media file associated with the selected clip.
When no items are selected in the Layers list, the shortcut menu provides this set of commands:
- New Group: Adds a group to the project above existing groups in the Layers list.
- Import: Opens the Import Files dialog, which allows you to import files from the Finder.
- Paste: Pastes any item copied to the Clipboard into the selected group in the project.
- Project Properties: Opens the Properties Inspector for the project, which allows you to modify the project’s background color, aspect ratio, field rendering, motion blur, reflections, and so on. For more information on project properties, see Project Properties.
Media List
The second list in the Project pane contains a complete list of all media files (audio, image, image sequence, and QuickTime movie files) in the project. The items in this list are links to source media files that remain on your hard disk or networked hard disk. Applied effects (such as filters or behaviors) and graphics content created in Motion (such as masks, shapes, or text), do not appear in the Media list.
If the Project pane is visible, click Media at the top of the pane.
Choose Window > Media (or press Command-5).
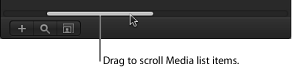
To display additional columns in the Media list, drag the scroller at the bottom of the Media list.
For descriptions of the Media list column headers, see View Menu.
Working in the Media List
You can customize the Media list to organize and manage media in your project.
Showing and Hiding Columns
You can choose which Media list columns are displayed or hidden.
Control-click a column header, then choose the item to show or hide from the pop-up menu.
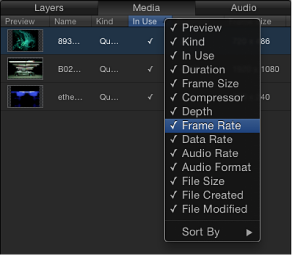
Items in the list with a checkmark are displayed in the Media list. Items with no checkmark are hidden.
Drag the column left or right to a new position.
In the header row, drag a column border to resize the width.
Adding and Removing Media
In the Media list you can add files to the project, or remove them.
Click the Add button (+) in the lower-left corner of the Project pane; then, in the Import Files dialog, select a file to add and click Import.
With the Media list active, choose File > Import (or press Command-I); then, in the Import Files dialog, select a file to add and click Import.
Control-click in the Media list, choose Import Media from the shortcut menu, then add a file via the Import Files dialog.
The file is added to the Media list.
To import an image sequence, turn on the Image Sequence checkbox. If this checkbox is deselected, only files selected in the Import dialog are imported. To select multiple files, Shift-click the files; to select noncontiguous files, Command-click the files.
Important: Files added to the Media list are not added to the Canvas. To add a file to the Canvas, drag the file from the Media list to the Canvas.
Control-click the file, then choose Delete or Cut from the shortcut menu.
Select a file to remove, then choose Edit > Cut (or press Delete).
The media is removed. If the media is used in the Canvas, an alert appears asking you to confirm that you want to remove the files from the project.
Additional Options in the Media List
The Media list shortcut menu gives you access to commands to help organize and manipulate layers. Control-click an item in the Media list, then choose a command from the shortcut menu. The command is applied to the layer you Control-click.
The menu contains the following commands:
- Open in Viewer: Opens the selected item in the viewer window. This is equivalent to double-clicking a file in the File Browser.
- Open in QuickTime Player: Opens the selected item in the QuickTime Player application.
- Reveal in Finder: Switches out of Motion, and opens a Finder window where the Media file resides on disk.
- Reconnect Media: Opens the Reconnect Media dialog where you can assign a source file on disk to correspond to the media file in Motion.
- Cut: Removes the file and places it on the Clipboard.
- Copy: Copies the file to the Clipboard.
- Paste: Places the contents of the Clipboard in the current location.
- Duplicate: Creates a file identical to the selected file.
- Delete: Removes the selected file.
When no items are selected in the Media list, the shortcut menu provides this set of commands:
- Import Media: Imports media into the Media list but does not place the media in the Canvas or Layers list.
- Reconnect Missing Media: Reconnects offline media. When a source media file is moved from where it was stored on disk, you must reconnect the media to your project. This command displays a dialog that lets you navigate to the new location of the file.
- Remove Unused Media: Removes the source media not used in the project from the Media list.
- Paste: Pastes media files in the Clipboard into the Media list, but does not place the media into the project.
- Project Properties: Opens the Properties Inspector for the project, where you can set basic project information such as project width and height, pixel aspect ratio, background color, and much more. For more information on the Properties Inspector, see Creating a Blank Motion Project.
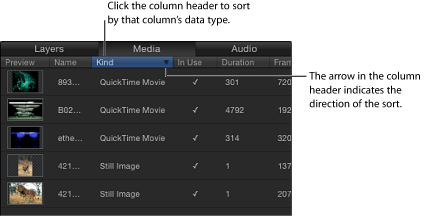
Sorting Columns in the Media List
Use the following procedures to sort items in the Media list.
Click the column header.
Note: Sorting does not work in the Layers list or Timeline layers list.
The layers are sorted in the column and a small arrow appears indicating the direction of the sort.
Click the header of the column that contains the small arrow.
The arrow points in the opposite direction, and the data is sorted in reverse order.
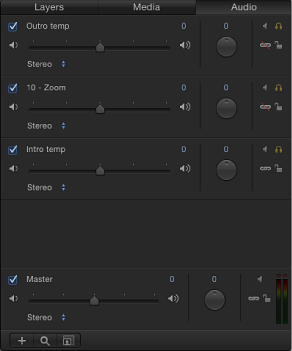
Audio List
The Audio list displays all audio files and files containing audio (such as a multitrack QuickTime movie) in your project. You can modify the levels of individual files or you can modify the overall audio level of the project. For more information on working with audio in Motion, see Working with Audio.
If the Project pane is visible, click Audio at the top of the pane.
Choose Window > Audio (or press Command-6).
Working in the Audio List
You can customize the Audio list to manage audio assets.
Adding and Removing Audio Files
The Audio list has controls to add files and to remove files from the project.
Click the Add button (+) in the lower-left corner of the Project pane; then, in the Import Files dialog, navigate to the file to import, select the file, and click OK.
With the Audio list active, choose File > Import (or press Command-I); then, in the Import Files dialog, navigate to an audio file, select the file, and click Import.
The file is added to the project (the Audio and Media lists).
Note: When importing a QuickTime movie that contains multiple audio tracks, select Mix to Stereo in the Import Files dialog to import the file with a single audio track. Select Import All Tracks to import the file with individual tracks.
Control-click the file, then choose Delete from the shortcut menu.
Select the file to remove, then choose Edit > Delete (or press Delete).
The file is removed. This action removes the file from the project (from the Audio and Media lists).
Filtering the Audio List
As a project becomes more complex, you might want to hide audio files from view to focus on a few key tracks. You can filter the Audio list using the Search button in the lower-left corner of the list. For instructions on how to filter your view, see Filtering the Layers List View.
Additional Options in the Audio List
The Audio list shortcut menu gives you access to commands to help organize and manipulate layers. Control-click a track in the Audio list, then choose a command from the shortcut menu. The command is applied to the track you Control-clicked. The menu contains the following commands:
- Cut: Removes the file and places it in the Clipboard.
- Copy: Copies the file to the Clipboard.
- Paste: Places the contents of the Clipboard in the current location.
- Duplicate: Creates a file identical to the original file.
- Delete: Removes the selected file.
- Active: Turns the file on and off. This is equivalent to clicking the activation checkbox in the On column.
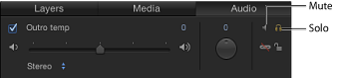
- Mute: Mutes the track. This is equivalent to clicking the Mute button in the Status column.
- Solo: Solos the track. This is equivalent to clicking the Solo button in the Status column.
- Reveal Source Media: Opens the Media list and highlights the media file associated with the selected clip.
When no items are selected in the list, the shortcut menu provides this set of commands:
- Import Audio: Opens the Import Files dialog, which you can use to navigate to the audio file to import.
- Paste: Pastes any audio data in the Clipboard into the Audio list and Media list.
- Project Properties: Opens the Properties Inspector for the project, where you can set project information such as project width and height, bit depth, aspect ratio, background color, render settings, and much more. For more information on the Properties Inspector, see Creating a Blank Motion Project.
Audio Master Track
Each project has a Master audio track. The controls for the Master track are located at the bottom of the Audio list, below the audio tracks. Using the Master track’s controls, you can make changes that affect the final mixed output of all audio tracks. For example, you can lower the volume of all tracks simultaneously or pan all tracks to the left or right.
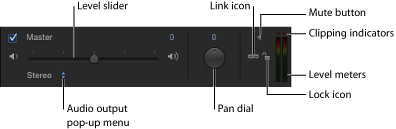
The Master track is turned on by default. When it is deselected, no sound is audible when you play the project, and no audio is included when you export your project. When it is turned on, all audio tracks that are turned on are included in your export.
To the right of the Master track controls are stereo level meters that display the combined level of all audible tracks.
Except for an editable name field and a solo icon, the Master track has the same controls as the individual audio tracks. For more information, see Working with Audio.