Customizing and Creating Templates
Motion comes with a collection of templates you can customize. You can also create templates. To learn about creating Templates for use in Final Cut Pro X, see Creating Templates for Final Cut Pro X.
Customizing Projects Created with Templates
When you open a new project file from a template, the project is a duplicate of the original template. There’s nothing special about template-based projects, and they can be edited and modified like any other project.
Most templates, especially those you create yourself, are intended to simplify the process of creating titles and graphics for recurring projects. Examples include titles and lower thirds for news and interview programs, graphics for magazine shows, and any repeating program that requires graphics with a consistent look that must be updated from show to show. Well-designed templates allow you to exchange key objects and edit the text to update them for the next show in the series.
Changes you make to projects created from templates have no effect on the original templates.
Exchanging Media
The easiest way to customize a template-based project is to exchange the media used in the template with your own media, from the File Browser or the Library. When you exchange media, the new media item appears in your project with the same parameter values used by the previous object. In addition, filters, masks, behaviors, or keyframed parameters applied to the original media remain applied to the exchanged media.
For more information about exchanging objects, see Exchanging Media in a Project.
Customizing Text Objects
Text objects are easily updated using the Text tool. Editing a text object does nothing to change the format, style, or layout of the text. Further, simple edits made to text objects have no effect on filters, masks, behaviors, or keyframed parameters applied to that object.
For more information on editing text objects, see Adding Text.
Modifying Behaviors and Keyframes
Objects in template-based projects are animated using a combination of behaviors and keyframed parameters. These can be edited to customize the motion of the objects. For more information on modifying behaviors, see Working with Behaviors. For more information on modifying keyframes, see Modifying Keyframes.
Drop Zones
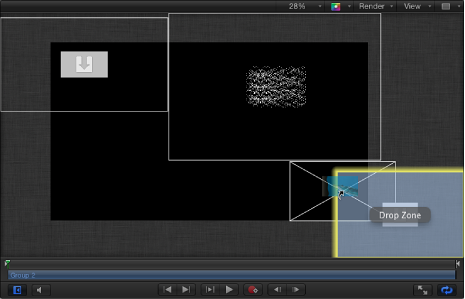
Drop zones let you replace footage in a Motion template by dragging clips onto the Canvas. A drop zone layer appears as a rectangle with a downward arrow in its center. The drop zone’s layer name appears in the center of the drop zone. Any media item (image or footage) dragged into the region defined by the drop zone object replaces the drop zone placeholder graphic. When you drag media over the drop zone, a highlight appears around the drop zone area.

Note: If there are multiple overlapping drop zones in the Canvas, the topmost one has priority when you drag an item over the zone. You can force all drop zones to appear by using the expose feature. For more information, see Exposing Drop Zones.
Adding a drop zone to a Final Cut Pro X template in Motion enables Final Cut Pro users to easily assign media to an editing project. For more information about creating templates for use in Final Cut Pro, see Creating Templates for Final Cut Pro X.
Creating Drop Zones
You create drop zones in either of two ways: by adding an empty drop zone object or by converting an existing layer into a drop zone. Any still image or video clip can be converted into a drop zone via the Image Inspector.
Choose Object > New Drop Zone or press Command-Shift-D.
A drop zone layer is added to the project.
Position and scale the drop zone object.
If needed, rename the drop zone layer in the Layers list.
Open the Inspector and click Image to access the drop zone parameters.
For more information about using these parameters, see Drop Zone Parameters.
Select the drop zone object, then resize the drop zone in the Canvas using the Select/Transform tool.

Add a video clip or still image to your project.
Position and scale the image or clip where you want the drop zone to appear.
Open the Image Inspector and click the Drop Zone checkbox.
The drop zone parameters appear.
To replace the original image with a drop zone graphic, click the Clear button.
An active drop zone replaces the original image. For more information about using remaining Drop Zone parameters, see Drop Zone Parameters.
Modifying Drop Zone Images
After you add a source image to the drop zone, you can pan or scale the image within the boundary of the drop zone. You can add a solid color to the drop zone to fill empty areas that are the byproduct of panning or resizing the image.
Drag an image from the File Browser or Library to the Drop Zone in the Layers list. When the pointer changes to a curved arrow, release the mouse button.
Drag an image from the File Browser, Library, or Media list (in the Project pane) to the Drop Zone in the Canvas. When the pointer changes to a curved arrow and the drop zone is highlighted in yellow in the Canvas, release the mouse button.
Drag an image from the Media list to the Source Media well in the Image Inspector.
In the Image Inspector, click To and select a media item in the project from the pop-up menu.
Select the drop zone.
Do one of the following:
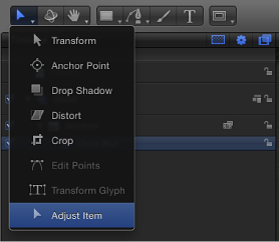
In the Canvas, double-click the drop zone.
The Adjust Item tool is selected.
In the toolbar, select the Adjust Item tool.
The drop zone bounding box appears as a dotted line.
Drag the scale handles in the Canvas to resize the image.
The image’s bounding box appears as a solid line and scales uniformly. Portions of the image that extend beyond the edges of the drop zone appear semitransparent.
Select the drop zone.
In the Image Inspector, drag the Scale slider. To adjust the horizontal or vertical scale independently, click the Scale disclosure triangle to reveal the X and Y subparameters.
Select the drop zone.
In the toolbar, select the Adjust Item tool.

The drop zone bounding box appears as a dotted line.
The Pan tool appears when the pointer is over the drop zone image. Drag within the drop zone to pan the image.
The image’s bounding box appears as a solid line. The dotted line represents the edges of the drop zone. Portions of the image that extend beyond the edges of the drop zone appear semitransparent.
Select the drop zone.
In the Image Inspector, adjust the Pan parameter X and Y value sliders. Click the Pan disclosure triangle to reveal individual X and Y sliders.
Select the drop zone.
In the Image Inspector, select the Fill Opaque checkbox.
Any empty portion of the drop zone is filled with black.
Use the Fill Color well to choose a custom drop zone fill color.
Drop Zone Parameters
You can add any media object to any drop zone, but the object might not have the same dimensions as the drop zone. Motion provides controls to help ensure the image placed in the drop zone is handled as you want, scaling, stretching, and positioning the object correctly.
The Image Inspector contains the following drop zone controls:
- Use Display Aspect Ratio: Select this checkbox to resize media placed in the drop zone according to the project’s aspect ratio. For more information about display aspect ratios, see Adding Multiple Display Aspect Ratios to a Template .
Controlling Drop Zones
When constructing your template, you can disable drop zones so you don’t accidentally drop a clip. Later, when using the template, you can turn drop zones back on.
Choose View > Use Drop Zones
A checkmark appears next to the menu item when drop zones are enabled (which means they accept objects dragged to them). When no checkmark appears next to the menu item, drop zones are disabled (which means they ignore objects dragged to them).
Exposing Drop Zones
Use the expose feature in Motion to reveal obscured drop zones in the Canvas. The expose command shows an exploded view of valid drop zones in the Canvas.
Use the Library or File Browser to locate an item to import into the project.
While holding down the Command key, drag the item onto the Canvas.
Objects in the Canvas shrink and separate in an exploded view so you can see them all. Moving the pointer over an object reveals its Layers list name.
Note: You cannot Command-drag nonimage objects (shapes, Motion projects, particles, etc.) to the Canvas.
Drop the object onto its target.
The object replaces its target, and the Canvas view returns to normal.
Creating Templates
In addition to using and customizing templates that ship with Motion, you can build new templates. Template files contain everything that ordinary projects do, including media layers, text objects, shapes, generators, behaviors, and filters, in any combination.
You can create custom templates for commonly used shots that you regularly create. For example, if you make titles for a news program, you can create templates for the opening title, interstitial graphics, bumpers, and other repetitious shots.
Templates are standard Motion projects that are saved in a special way.
Choose File > Publish Template.
A save dialog appears.
Enter a name for the template and choose a category from the Category pop-up menu.
The template is organized in the Project Browser under the category you assign. Create a custom category by choosing New Category from the menu.
Choose New Theme from the Theme pop-up menu, enter a descriptive name in the New Theme dialog, then click Create.
If you want the template project to retain media in the Media list that isn’t present in the composition, select “Include unused media.”
If you want a preview of the template to appear in the Project Browser, select Save Preview Movie.
Note: If you want to add the template to a Final Cut Pro project, select the “Publish as Final Cut Generator” checkbox. For more information, see Creating Templates for Final Cut Pro X.
Click Publish.
The template is saved in the /Users/username/Movies/Motion Templates/Compositions folder on your computer.
Note: If you selected the “Publish as Final Cut Generator” checkbox, the template is saved in the /Users/username/Movies/Motion Templates/Generators. For more information, see Creating Templates for Final Cut Pro X.
Template Rules of Thumb
When designing templates, there are a few useful rules of thumb:
- Use descriptive group and layer names: Group and layer names in a template should describe each object’s function. For example, text objects in a titling template might be named “Main Title,” “Starring,” “Guest Star,” and so on. If you use visual elements in the template’s composition, their layer names should describe their function: “Background Texture,” “Divider,” and “Main Title Background,” for example. Descriptive layer names are especially important if others use the template.
- Use snapshots to create alternate versions of a template for each resolution you need: If you regularly create projects for a variety of output formats, you can build alternate versions of a template in different display aspect ratios—all within a single template. For example, when you create a template with a 16:9 aspect ratio, you can add an alternate version customized for 4:3 displays. When the template is applied to a clip in Final Cut Pro, the editing application chooses the version that matches its current display aspect ratio. These alternate display versions of a single template are called snapshots. Snapshots eliminate the need to create multiple versions of the same template for different display ratios. For more information about snapshots, see Adding Multiple Display Aspect Ratios to a Template .
- Place all media files used in a template in a central folder: To avoid problems with offline or missing media, move all media files for the template into a central folder on your computer before you begin the working on the project. Although customized templates are saved in the /Users/username/Movies folder on your computer, media added to the template remains in its original location on disk. A central location for all media resources ensures that files are not lost. Alternatively, you can use the File > Save As command, and use the Collect Media option. For more information, see Collecting Media.
Organizing Templates in the Project Browser
You can organize and access custom templates in the Project Browser. All templates are organized into categories. You can add, delete, and rename categories in the Project Browser.
Choose File > New From Project Browser
The Project Browser appears.
Select a template type (Compositions, Final Cut Effects, Final Cut Generators, Final Cut Transitions, Final Cut Titles) from the sidebar (on the left).
Click the Add button (+) at the bottom of the sidebar.
Enter a name for the category in the dialog that appears.
Click Create.
The new category appears in the column at the left under the template type you selected.
Choose File > New From Project Browser.
The Project Browser appears.
Select a category in the sidebar.
Press Delete or click the Delete button (–).
An alert dialog prompts you to confirm the deletion.
The directory on your disk corresponding to that category is placed in the Trash, but is not deleted. Template files in that category’s directory are also placed in the Trash.
Choose File > New From Project Browser.
The Project Browser appears.
Select a category from the sidebar.
In the project stack, select the template to delete.
Press Delete.
An alert dialog prompts you to confirm the deletion.
Click the Delete button.