Shadows
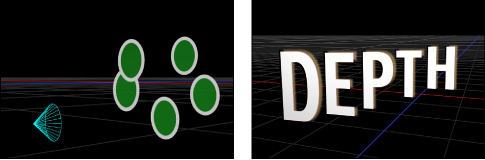
Motion scenes that include Point or Spot lights can recreate more natural, realistic effects by casting shadows. Shadows are created when an opaque or semi-opaque object blocks light from hitting another object. To see a shadow in Motion, you need at least three things: A shadow-casting light source, an object to cast a shadow, and another object upon which the shadow is cast. Multiple lights cast multiple shadows that may or may not be visible depending on the relative positions and settings of the objects in the scene.
Note: Ambient and Directional lights do not cast shadows.
Warning: Some changes you make to 3D objects with shadows applied cause shadows to disappear. This occurs when the change causes rasterization of the 3D object—adjusting the opacity of a group or turning on the glow attributes for a text object, for example. Flattening the 3D group allows it to cast shadows again. For more information about disappearing shadows, see Shadows and Rasterization.
In Motion, you can control whether a light source creates shadows and whether each object in the scene receives shadows and/or casts shadows. You can even have an object cast a shadow when it is invisible. The strength, sharpness, shape, and position of the shadow depends on the type and positions of the lights and relative position of all three objects.
Cast Shadows Versus Drop Shadows
There are two common types of shadow effects used in motion graphics work: drop shadows and cast shadows. Motion can create both effects, but because they have different purposes and applications, it may be helpful to consider the differences between them. Cast and drop shadows simulate the effect of light blocked by an opaque object. But a cast shadow is a 3D effect requiring a light source and an object for the shadow to fall upon, whereas a drop shadow is a 2D effect simulating a cast shadow without a light source and therefore is limited to a very small range of settings.
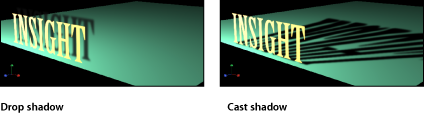
Drop shadows are commonly used to simulate depth and separate foreground objects from the background in 2D projects. The classic drop shadow effect is used on light-colored titles so the text is legible against dark and light backgrounds. In a drop shadow effect, the imaginary light source does not create any shading effect on the surface of the object, and the shadow’s position is set at a fixed direction.
A drop shadow is rendered as a part of the foreground object, so it doesn’t interact with background objects. However, because it is an effect, its appearance can be customized. The softness, opacity, position, and color can be adjusted and animated without having to manipulate a light source.
Cast shadows are true 3D effects, and their appearance is determined by the light source and the other objects in the scene. Multiple cast shadows interact with each other and take their shapes based on the surfaces and positions of the objects upon which they are cast.
This section addresses cast shadow effects. For information on drop shadows, see Drop Shadows.
Shadow Controls
Shadows are controlled by adjusting settings in two places. Point and spot lights have a Shadows section in the Light Inspector, and all visible objects have a Shadows section in the Properties Inspector.
Note: 2D groups at the root level of the project do not have lighting or shadow controls. To enable shadows on such a group, convert it to 3D or embed it in another 3D group.
- Shadows: This checkbox allows you to turn on Shadows controls. (When activated, the checkbox is blue.) The Shadows checkbox allows you to set some lights to cast shadows, and others not to cast shadows.
Selecting this checkbox causes the light to cast shadows on objects in front of it if the objects also have shadow controls enabled. Deselecting it exempts the light from generating shadows, regardless of settings of individual objects.
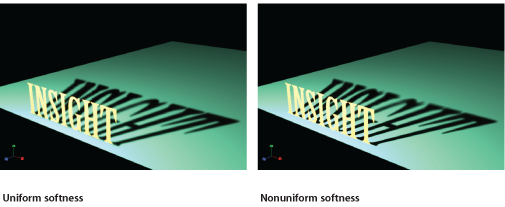
- Softness: This slider determines how blurry a shadow will appear.
Note: The appearance of a shadow depends on the rendering quality of the object casting it. Because a shadow may be larger than the original object, you may see some jagged edges or aliasing on the shadow. If you see such artifacts, check how your image looks when the project is set to best quality, rather than draft or normal. For more about Canvas display quality, see Canvas View Options.
- Uniform Softness: This checkbox lets you constrain the results of the softness slider to a uniform amount of blur on the shadow regardless of distance between the light, the object casting the shadow, and the object receiving the shadow.
By deselecting the checkbox, you enable nonuniform softness, where the farther the objects are from each other, the more blur is applied.
Note: Selecting nonuniform softness can impact playback performance.
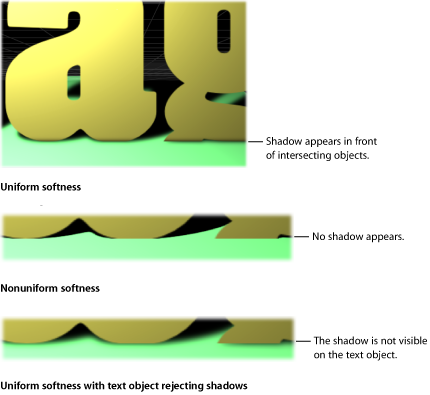
Note: Intersecting objects reveal an unnatural effect of using uniform softness. Because an equal amount of blur is applied to the entire shadow, the blur appears to spill out in front of the intersecting object, creating a strange appearance. This effect can be eliminated in two ways: by deselecting the Uniform Softness checkbox or by setting the object to not receive shadows.
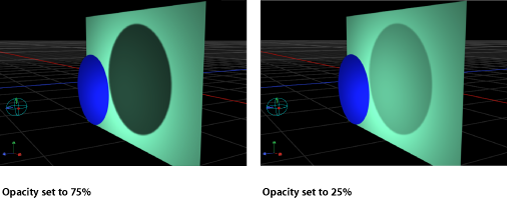
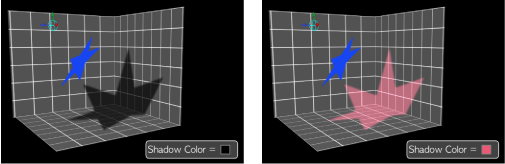
- Color: This control allows you to set the color of the shadow. Although semitransparent objects cast lighter shadows than opaque objects, you cannot create light transmission effects wherein a semitransparent object allows some light to pass through it, picking up its color or pattern and projecting that as part of the shadow, as light passing through stained glass does. For more information on using the color controls, see Color Controls.
Note: When light shading is turned on, shadows are multiplied with the objects upon which they are cast. This means that the result is a darkening effect, regardless of the color of the shadow. If you select a shadow color lighter than the background upon which is is cast, the shadow may not be visible. So, for example, when shading (lighting) is turned on, it is not possible to cast a white shadow on a dark surface. To override this effect, you must disable shading. For more about using shadows without lights, see Shadows Without Lights.
Every visible object in a 3D space has shadow controls in the Properties pane of its Inspector. This includes shapes, clips, particles, and so on. Lights, Cameras, and 2D groups at the root level of the project do not have shadow controls.
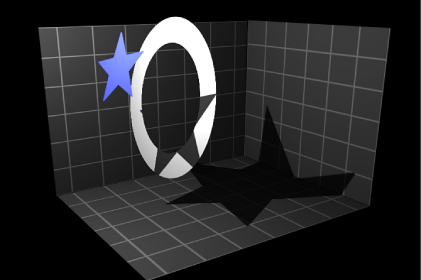
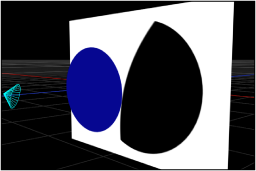
- Receive Shadows: This checkbox controls whether neighboring objects’ shadows affect the current object. When deselected, light affects the object as if the shadow-casting object did not exist. The following image depicts an object (the white ring) with the Receive Shadow checkbox selected and the Casts Shadow checkbox deselected.

Shadows and Complex 3D Objects
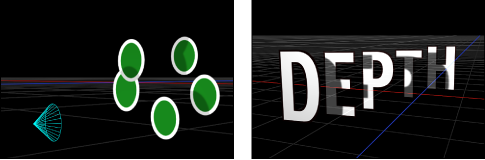
When using shadows with objects such as particle systems, text objects, or replicators that are set to 3D, shadows are cast from one part of the object onto another part. This is called self-shadowing.
Modifying the object in a way that causes rasterization prevents shadows from displaying.
In some cases you may be able to find another way to perform the effect that does not require rasterization. For example, in the following images, rather than modifying the opacity of the particle emitter, which causes rasterization, you can modify the opacity of the particle cells and maintain the shadows.
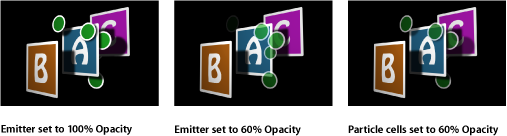
In the second figure, the layer order of the particle system is affected, and particles appear in front of the letter A. For more about how rasterization affects shadows, see Shadows and Rasterization.
Shadows Without Lights
Lighting and shadows can each be disabled independently. You can keep shadows visible, even when lighting is disabled, allowing you to keep the original unshaded look of the scene. Turning off lighting also changes the way shadows are rendered.
When Shading (the visible effect of lighting) is disabled, shadows behave differently. Rather than being multiplied with the object upon which they are cast, the shadow’s color and opacity are controlled only by the Shadows settings in the Light pane of the shadow-casting light’s Inspector.

This enables you to create shadows of any color or opacity, from traditional dark shadows to brightly colored or even white shadows.
Shading can be disabled globally by choosing View > Render Options > Lighting or by choosing Lighting in the Render pop-up menu in the status bar. (Make sure there is no checkmark beside the menu item.) Shading can also be disabled for a specific object in the Lighting section of an object’s Properties Inspector. For more about disabling lighting/shading, see Disabling Lighting.

With spot lights, enabling shadows but disabling shading can create a seemingly strange result where the shadow is suddenly cut off because it has exceeded the scope of the light cone. Because the shading effect of the light cone is turned off, the shadow edge looks unnatural.
To correct such an occurrence, increase the Cone Angle in the Light Inspector.
Disabling Shadows
Rendering shadows can significantly impact playback performance, so you might want to temporarily disable shadows to improve playback speed while working on other aspects of your project.
From the Render pop-up menu in the status bar, choose Shadows (or press Option-Control-S).