Lighting
Lighting can be applied to a motion graphics project to enhance the depth and scope of compositions, or it can help create realistic environments for composites.
Motion’s lighting system only works on 3D groups and their children.
Choose Object > New Light (or press Command-Shift-L).
A light object is added to the Layers list, the Timeline, and the Canvas (represented by a wireframe icon), and the 3D Transform tool in the toolbar becomes active.
If you add a light to a project with no existing 3D groups, the following dialog appears:
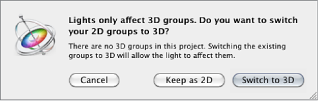
If you select Keep as 2D, a light at the root level has no effect until you have at least one root-level 3D group. By default, 3D groups and objects display the shading from lights as soon as lights are added.
A light is activated when it is a child of the following objects:
The project (for example, a light is at the root level of the project)
An unflattened 3D group
Properties Affecting the Appearance of Lights
When you add lights to a scene, two groups of properties contribute to the appearance of lights: light properties and object lighting properties. You can adjust light properties by selecting a light object in the project and then modifying the parameter values in the Light pane in the Inspector. You can manipulate object lighting properties by selecting a nonlight layer in your project (an image, movie clip, shape, and so on) and then adjusting the Lighting parameters in that object’s Properties pane.
Light properties—the quality of the light source itself—fall into the following categories: the type of light, its intensity, and its color. A light bulb, the sun, and lighting in a dance club have different appearances. You can use lighting properties to simulate these differences.
Light Parameters
When you create a light, or select a light object in the Layers list, the Light pane becomes available in the Inspector.
- Light Type: A pop-up menu that lets you choose from four categories of light.
- Ambient: An ambient light emits light in all directions, illuminating all objects in the scene from all directions equally. This type of light has no position and no representation in the Canvas. The most common use for ambient lights is to add an overall fill effect or color cast.
Note: There is no global ambience property in Motion, so you may have to add an ambient light to prevent total blackness.
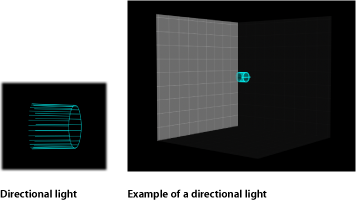
- Directional: A directional light emits parallel rays of light in a specified direction from a source located at an infinite distance. Only the rotation of this light has bearing on its effect. A directional light icon, in conjunction with the transform controls, can be used to assist in visualizing the direction the light is traveling in a scene. The directional light icon appears as a cylinder with one end removed. The circle represents the back of the light, and the lines indicate the direction in which the light is traveling.
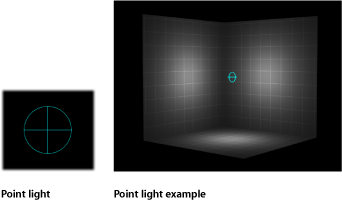
- Point: A point light emits light outward from a single point in 3D space in all directions. Optionally, you can add falloff based on an object’s proximity to the light. This is Motion’s default light, and it produces results similar to that of an incandescent light bulb.
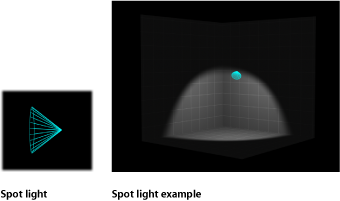
- Spot: A spot light emits light from a conical light source and casts an elliptical pattern on objects hit by the light. Using a spot light allows for a high degree of accuracy when you need to limit the area affected by the light.
- Intensity: A slider that cats as a dimmer switch for lighting. If you use a Directional light at 100% intensity pointed straight at a red object, the object looks red. If you lower the intensity, the object and scene get darker. However, if you increase the intensity above 100% you can begin to overexpose your scene, eventually causing the object to appear white. The Intensity value slider ranges from 0 and 400, but there is no upper limit for Intensity (use the adjacent value slider to set a value above 400).
Note: Multiple lights interacting with an object combine to increase the object’s apparent brightness as they would in the real world. If you have two spot lights overlapping in space and pointing in the same direction with Intensity set to 100%, you see the same result as having a single spot light with its Intensity set to 200%.
- Falloff Start: A slider that enables you to adjust where the falloff point of a light begins. In the real world, light falls off—or has less of an effect—as the distance from the light source increases. Usually falloff starts at the center of the light object. Setting Falloff Start adds additional control to your lighting. This parameter applies to light types that use a Position parameter (Point and Spot).
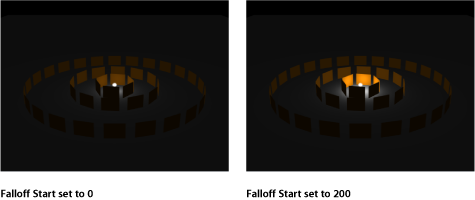
In the example below, a light is positioned slightly above the origin of the scene. There are three rings of cards at a distance of 200, 500, and 1000 units from the light. (In this example, a visible light source—the bulb at the center of the rings of cards—is simulated for illustrative purposes.) The light’s Intensity is set to 100% and Falloff is set to 10%. When Falloff Start is set to 0 (left, below), the light begins to fall off by the time it hits the innermost ring. When Falloff Start is set to 200 (right, below), the inner ring is lit at 100% intensity and the outer rings are slightly brighter than before.
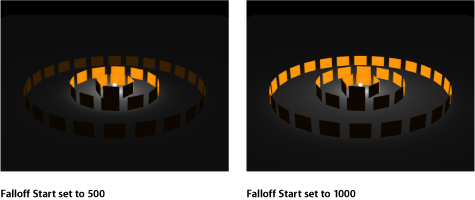
When Falloff Start is increased to 500 (left, below), the inner and middle rings are lit at 100% intensity, and the outer ring is brighter than before. Finally, when Falloff Start is set to 1000 (right, below), all rings are lit at 100% intensity.
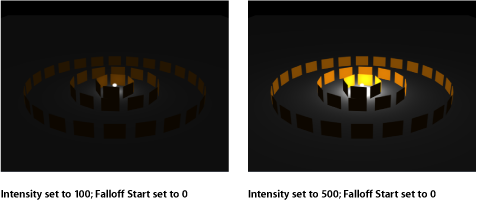
In the next example, the image on the left contains a light with Intensity set to 100%, while the image on the right has a light Intensity of 500%. In the image on the right, the outer rings are slightly brighter, but the innermost ring is overexposed. If the Falloff Start of the light in the image on the right is increased to 1000, the rings are overexposed.
- Cone Angle: A dial that becomes available only when Light Type is set to Spot. The Cone Angle is measured from the center of the light outward. The angle may be set to a value between 0 and 90 degrees. The distance of the light from its target affects the result of this parameter. If the light is close, a wider spot cone angle may be needed to light more of the object. If the light is further away, a lower Cone Angle may be needed to isolate objects.
- Soft Edge: A dial that becomes available only when Light Type is set to Spot. Like Cone Angle, this parameter can be set to a value between 0 and 90 degrees. Its starting point begins at the outer edge of the Cone Angle. If set to 0, spot lights have a hard edge. Low values produce a slight softening effect to the boundary of the lit area. Higher values produce a wide, more natural fade. Adding softness expands the area of your light, so you might need to adjust the angle to achieve a specific effect.
Note: Point lights and spot lights also contain a set of parameters to control how they cast shadows. For more information on these parameters, see Shadows.
The Light HUD contains the Light Type, Color, Intensity, Falloff Start, and Falloff parameters, which are also available in the Inspector. The Light HUD also contains 3D transform controls. For more information, see 3D Transform HUD Controls.
Object Lighting Parameters
All lightable objects have properties that control how they react to lights in a scene. You can adjust these properties for an object via the Lighting section of the Properties Inspector.
- Shading: A pop-up menu that enables you to set how an object responds to lights in the scene. If set to On, the object can be lit. If set to Off, the object ignores scene lights. If set to Inherited (the default), the object uses the Shading value of its parent.
Note: It is possible to set the Shading parameter of a child of a group (however deep it is nested) to On. That setting overrides any group settings previously applied to the child object.
- Shininess: A slider that sets how strong an object’s highlights appear. Higher values create a glossier appearance. If the Shininess slider is not visible, click the disclosure triangle next to Highlights to reveal it. This Shininess parameter is disabled when the Highlights parameter is deselected.
You might need to fine-tune object surface properties and lighting parameters to achieve a specific result.
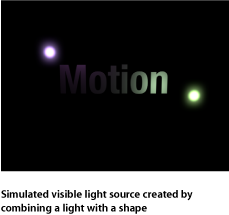
Simulating Visible Lights
Light sources are not visible. You can simulate a visible light source by combining a point light and an image or shape.
Note: Use the Match Move behavior to move a simulated light source with a light in a movie clip. For more information on the Match Move behavior, see Match Move Workflows.
Disabling Lighting
Lighting effects can significantly impact playback performance. Therefore, you might want to temporarily disable lighting to improve playback speed while working on other aspects of your project.
From the Render pop-up menu in the status bar, choose Lighting (or press Option-L).