Organizing Groups and Layers in Motion
When you drag a media file from the Library or File Browser into the Canvas, Layers list, or Timeline, or generate an image from within Motion, the resulting element is represented as a layer. Think of layers as a series of clear overlays stacked on top of each other. These layers combine to create the composite you see in the Canvas. Motion provides a graphical representation of this layer hierarchy in the Layers list and in the Timeline. You can rearrange the stacking order of layers in your composition by dragging them to a new location in either list.
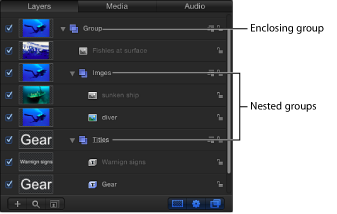
Layers, in turn, are nested in containers known as groups. When you create a layer, that layer is placed inside a group. You can drag a layer from one group to another, but layers cannot exist on their own, outside a group. Layers nested inside groups appear indented in the Layers list and Timeline.

A group can also contain other groups nested inside it. In this way, you can construct complex hierarchies of nested groups, with each nested group subordinate to the group that contains it.
It’s a good idea to group layers that work together as a unit. Doing so ensures that animation and effects applied to the enclosing group affect all layers nested in that group. By nesting related layers you want to animate inside a group, you can save time by animating the enclosing group, instead of animating each layer.
For example, when you select a group that has three layers nested in it, the entire group is selected as a single unit.
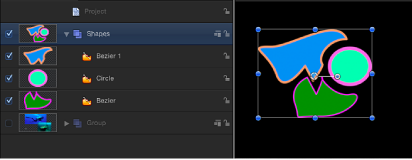
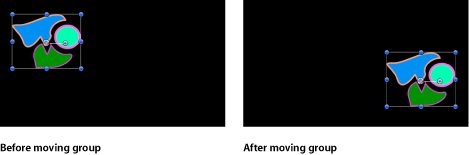
Moving a selection in the Canvas moves all three layers simultaneously.
Regardless of how they’re nested, layers can always be animated independently. Subordinate groups can also be animated independently.
In the following example, a filter is applied to a layer in a group containing three fish layers. All other layers in the group remain unaffected.
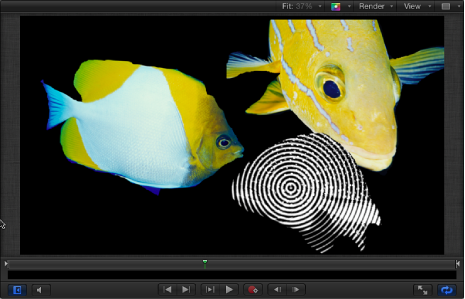
However, If you apply the same filter to the group, all layers in that group are affected by the filter, as if they were a single layer.
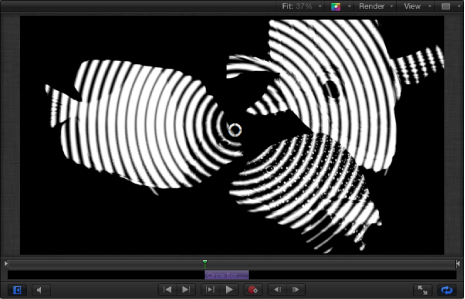
Many filters produce different results when applied to a group, rather than individual layers in a group, as shown in the images below.

Background of a Project
Two parameters in a project’s Properties Inspector affect the background color of a project and how a composition appears when exported out of Motion. (To open a project’s Properties Inspector, choose Edit > Project Properties).
- Background: Use this pop-up menu to set whether the background color is rendered as part of the alpha channel. If set to Solid, the background color creates a solid alpha channel. If set to Transparent, the background color does not render as part of the alpha channel. In either case, the background color is visible in the Canvas.
Selecting Layers and Groups in the Layers List
To reorganize layers and groups in a project, you must select which ones to move. This section covers the methods to select layers in the Layers list.
Click a layer or group in the Layers list.
Doing so deselects all other selected objects.
Note: Selecting a group does not also select the layers nested underneath it. However, operations performed on a selected group also affect layers nested in it.
Shift-click any two layers in the Layers list.
Doing so selects both layers, and all layers in between.
Click to the left of the thumbnail column and drag up or down to select multiple layers. (This method works only when you begin dragging above the first or below the last object.)
Command-click any unselected layer or group to add it to the selection.
Command-click any selected layer or group to deselect it.
Choose Edit > Select All (or press Command-A).
Click the first group or layer in the list, then Shift-click the last group or layer in the list.
Choose Edit > Deselect All (or press Command-Shift-A).
Reorganizing in the Layers List
The order in which layers and groups appear in the Layers list helps determine the layout of the composition. The order of layers and groups determines which objects appear in front of other objects in the Canvas. You can change the ordering of objects in the Canvas or in the Layers list.
Note: When using 3D groups, you can rearrange the order in 3D space to override the hierarchy visible in the Layers list. For more information about layer order in 3D groups, see 2D and 3D Group Interaction.
Drag a layer or group up or down in the Layers list.
A position indicator shows the new position the selection occupies when you release the mouse button.
Note: You can also use the Bring and Send commands in the Object menu to move layers up and down in the nested hierarchy in any group. This is especially useful when working with selected objects in the Canvas. For more information, see Arrangement Commands in the Object Menu.
To organize the objects in a project into multiple groups, you can create new, empty groups.
Click the Add button (+) at the bottom of the Layers list.
Choose Object > New Group (or press Command-Shift-N).
New groups appear at the top of the Layers list, and are numbered incrementally based on the number of groups you’ve created so far.
When you have more than one group, you can move layers back and forth between them, changing their nested relationship in your project.
Select one or more layers.
Do one of the following:
Drag the selected layers to a position underneath another group.
A position indicator appears to show where the layer is placed when you release the mouse button.
Choose Edit > Cut (or press Command-X), then select the group to paste into, and choose Edit > Paste (or press Command-V).
You can also copy a layer from one group to another.
Option-drag selected layers from one group to another.
Select layers, choose Edit > Copy (or press Command-C), then select the group to paste into, and choose Edit > Paste (or press Command-V).
Nesting Groups Inside Other Groups
In addition to nesting layers inside groups, you can also nest groups inside other groups. You might do this if you’re creating a layer hierarchy to control the relationship of one group of layers to another, or if you’re grouping layers to which you want to apply a single set of behaviors and filters.
Nesting a group works the same way as nesting a layer.
Select one or more groups.
Do one of the following:
Drag the groups onto another group.
Drag the groups to a position underneath another group.
Choose Edit > Cut (or press Command-X) to cut the groups, then select the group where you want to paste, and choose Edit > Paste (or press Command-V).
Grouping and Ungrouping Layers
You can also nest layers together in a group using the Group command. You can group layers that appear in the same group, or you can group groups that are nested at the same level relative to the hierarchy of your project. You cannot group groups that appear at different levels.
Select all layers or groups you want to group together.
Choose Object > Group (or press Command-Shift-G).
A new group is created and is numbered incrementally based on the number of groups you’ve created so far. The layers or groups you selected are nested in the group.
Groups of nested layers or groups can also be ungrouped, which deletes the containing group and moves objects and layers in it up the group hierarchy.
Select the group containing the nested layers or groups to ungroup.
Choose Object > Ungroup (or press Command-Option-G).
Note: You cannot ungroup groups that are at the root (project level) of the Layers list hierarchy.
Showing and Hiding Groups and Layers
Layers and groups appearing in the Layers list can be hidden to make them invisible in the Canvas without removing them from your composition. For example, if you place a large object into your project and it’s in the way of objects you want to move or rotate in the Canvas, you can hide the offending object. You can also hide objects you’re not sure you want to keep, while preserving their placement in case you want to use them later.
If you hide a group, you also hide all layers and groups nested in it. Hidden layers and groups are not rendered when your project is exported.
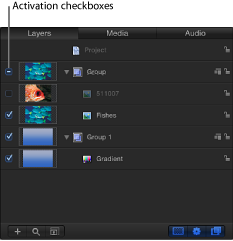
Click the checkbox to the left of an object or group in the Layers list or Timeline.
Choose Object > Active (or press Control-T) to turn the layers on or off.
Control-click a layer or group, then choose Active from the shortcut menu.
Note: If you hide layers in a group, the enclosing group’s checkbox displays a dash instead of a checkmark, to indicate that some layers are not visible.
You can “solo” a layer or group to hide all other layers in the project. This technique can be useful to isolate a single object in the Canvas to animate or manipulate without interfering with other objects in your composition.
Select layers or groups to solo.
Choose Object > Solo (or press Control-S).
Note: You can also Control-click an object in the Layers list, then choose Solo from the shortcut menu.
All other layers or groups are deactivated, and only the soloed object is visible in the Canvas. When the selected item is soloed, the solo menu item displays a checkmark.
Fixing the Size of a Group
By default, the size of a group is determined by the layers in that group. Because animated objects often grow in size, the active height and width of a group (its resolution) can become large. You can constrain the resolution of a group to a specific width and height in the Group pane of the Inspector.
The project in the following image contains a particle system. The animated particles, although not visible when they move off the Canvas, make the group containing them large.
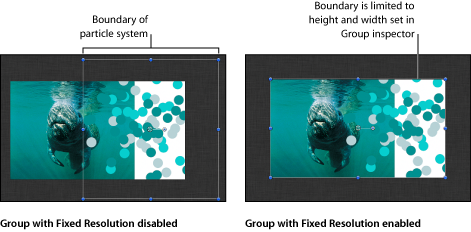
You can crop the size of a group that contains growing objects using the Fixed Resolution checkbox in the Group pane of the Inspector.
If a project contains animated objects that move or expand beyond the edges of the Canvas and you don’t activate the Fixed Resolution checkbox, your computer processing time can increase.
Note: The Group pane of the Inspector (which contains the Fixed Resolution parameter) is only accessible when a group is selected in the project.
When the Fixed Resolution checkbox is selected, objects in the group but outside the Canvas are cropped to the size of the group defined in the parameter.
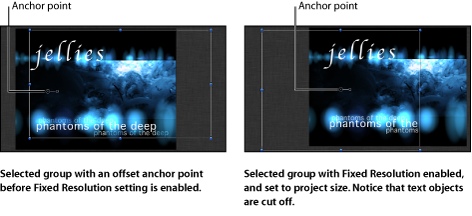
When enabled, the Fixed Resolution parameter crops the group to the size specified in the Fixed Width and Fixed Height parameters. This means that if the group’s anchor point is offset, the cropping might not occur around the edges of the Canvas, and objects can become cut off.
In the Layers list (or the Timeline), select the group.
In the Inspector, click the Group pane.
Turn on the Fixed Resolution checkbox.
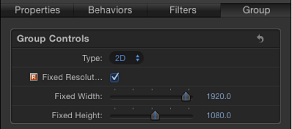
By default, the group’s resolution is set to the project size. An indicator appears to the right of Fixed Resolution, informing you that the group is rasterized. For more information on rasterization, see About Rasterization.
To define a resolution other than that of the project, adjust the Fixed Width and Fixed Height sliders.
Note: When you select a layer in a fixed-resolution group, the bounding box around the layer appears at its original size, unaffected by the containing group’s resolution.
Locking Groups and Layers
When you finish making adjustments to a layer or group, you can lock it to prevent accidental modification. Locked layers cannot be moved, and their parameters cannot be altered or animated. Animation and behaviors applied to the layer before being locked still play. Locking a group also locks all layers and groups nested in it.
Note: You cannot lock objects that contain published parameters (for use in Final Cut Pro X). Such objects display a dimmed lock control. For more information about publishing parameters, see Publishing Parameters in Templates.
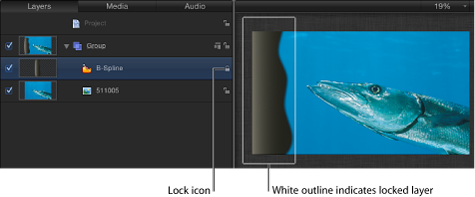
Click the layer’s lock icon in the Layers list.
Select layers or groups, then choose Object > Lock (or press Control-L).
The locked layer’s bounding box in the Canvas turns white to indicate it is locked.
Collapsing and Uncollapsing Group Hierarchies
Groups and layers in the Layers list appear in a hierarchy that shows which layers are nested inside which groups. Nested layers and groups appear underneath and indented to the right of the group they’re nested in.
To make the Layers list easier to manage, you can collapse all layers that appear nested in a single group using that group’s disclosure triangle. Collapsed groups appear as a single row in the list, and can be moved or nested like any other layer. Each group’s thumbnail displays a preview of its composite, making it easy to see what’s nested inside.
Click the disclosure triangle to the left of that group’s name and icon.
Press the Up Arrow and Down Arrow keys to navigate up and down the Layers list, then press the Right Arrow key to open a group, or the Left Arrow key to collapse a group.
Renaming Groups
You can rename the groups and layers that appear in the Layers list to further organize your project and make each group’s and object’s purpose easier to identify. When you rename a layer, the original name of the source media file on disk remains unchanged. Also, changing a layer’s name in the Layers list does not change the name of its corresponding source media in the Media list. You cannot change the name of source media in the Media list.
In the Layers list, double-click the name of a group or layer.
When the name is highlighted, enter a new name.
When finished, press Return to accept the name.
The new name is also accepted when you click another layer or group.
Searching for Groups and Layers
If it’s difficult to find a single group or layer in a large project, you can use the Search field at the bottom of the Layers, Media, and Audio lists. It is similar to the Search field in the File Browser, and allows you to search for all layers or groups with a name containing the search term you enter.
At the bottom of the Layers list, Media list, or Audio list, click the Search button.
The Search field appears.
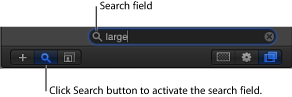
Enter a search term in the Search field.
As soon as you begin typing, all groups and layers with names that don’t contain the search term are hidden from view, leaving only a list of groups and layers that match.
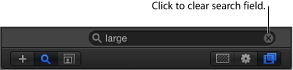
Click the Clear button at the far right of the Search field to restore the full contents of the Layers list, Media list, or Audio list.
Note: Groups and layers hidden as the result of a search operation are not disabled in the Canvas, and they are not prevented from rendering during export.
In addition to searching for layers by name, you can find an object’s source media in the Media list using the Reveal Source Media command.
Sorting Objects in the Media list
The Media list contains the following columns that provide information about each object in your project.
Column | Description |
|---|---|
Preview | Displays a thumbnail of the media object. |
Name | Lists the filename of the source media on disk where the object is linked. If you change the name of corresponding linked objects in the Layers list, this name doesn’t change. |
Kind | Lists the type of file, whether it’s a still image, QuickTime movie, image sequence, or audio file. |
In Use | Indicates that the media is in use in the project. |
Duration | Displays the total duration of the object, in frames or timecode, depending on what is displayed in the Timeline. |
Frame Size | Displays the frame size of the object, in pixels. |
Format | For QuickTime movies, displays the codec used. For still images, displays the method of compression that’s applied based on the file type. |
Depth | Specifies the color depth of the image. |
Vid Rate | Displays the video frame rate of the object, in frames per second. |
Audio Rate | For audio files and QuickTime movies, displays the sample rate of the audio. |
Audio Bit Depth | For audio files and QuickTime movies, specifies the bit depth of the audio. |
File Size | Shows the size of the source media file on disk. |
File Created | Shows the file creation date of the source media file on disk. |
File Modified | Shows the file modification date of the source media file on disk. This is a useful parameter to use for file management. |
Drag a column header to the right or left to move it.
Use the scale control at the bottom of the Media list.
Drag the separator between the rows of items.