Mask Parameters
A selected mask’s parameters appear in the Mask Inspector.
Except for control points parameters, the parameters in the Mask HUD are identical to the parameters in the Inspector.
Mask Controls in the Inspector
These controls allow you to adjust how the mask is drawn, how each mask operates upon an object, and how masks are combined with one another. The Mask Inspector also allows you to fine-tune mask control point positions using value sliders.
- Shape Type: This pop-up menu lets you change the type of control points used to define the mask. For example, if you originally created a Bezier mask, you can choose B-Spline from this menu to change how the mask is drawn. Changing the shape type might dramatically change the mask’s form even though its control points remain fixed at their original coordinates. There are three options:
- Linear: All of a mask’s control points are joined by hard angles, and the resulting mask is a polygon. The control points of a Linear mask lie directly on its edge.
- Bezier: Control points can be a mix of Bezier curves and hard angles, creating any sort of mask. The control points of a Bezier mask lie directly on its edge.
- B-Spline: Control points are all B-Spline points, with different degrees of curvature. B-Spline control points lie outside the surface of the mask, but are connected by the B-Spline frame.
Note: You can hide the B-Spline frame by turning off Lines in the View pop-up menu above the Canvas.
- Mask Blend Mode: Determines how a mask interacts with the alpha channel of the layer to which it’s applied. When a layer has multiple masks, each mask can have a different Mask Blend Mode. When this happens, each mask adds to, or subtracts from, the layer’s alpha channel according to the selected mode. The final alpha channel is the combined result of all masks applied. There are four choices in this pop-up menu:
- Add: This is the default selection for new masks. Each new mask adds to the existing alpha channel. This is useful for adding back regions of an image that other masks are cutting out. In the following example, both the rectangle and circle masks create opaque regions.
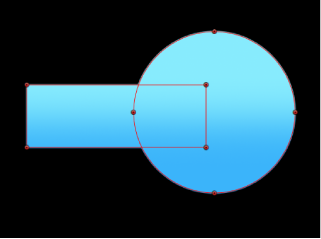
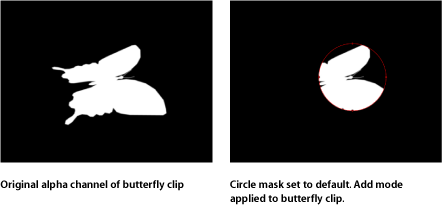
If the layer contains an alpha channel, a mask set to Add mode isolates only the masked section of the original alpha channel.
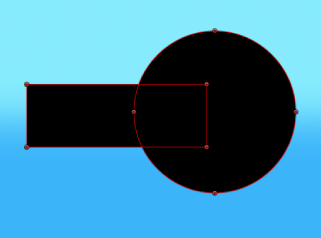
- Subtract: Subtracts a mask from the alpha channel. This is useful for creating holes in the middle of objects, or for masking out additional regions of an image that are untouched by other masks. In the following example, both the rectangle and circle masks create transparent regions.
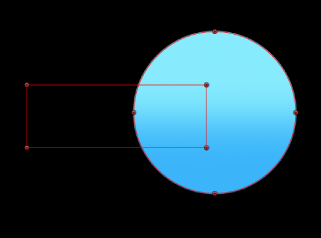
- Replace: This setting uses the current mask to completely replace the object’s original alpha channel, as well as any other masks that are applied to the same object that appear underneath the current mask in the Layers list. You can add masks above, set to whatever blending mode you like. In the following example, the circle mask overrides the rectangle, because is the topmost mask nested in the gradient object.
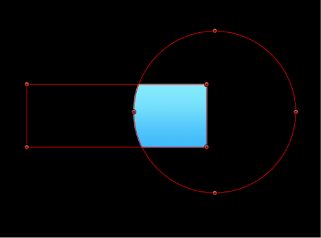
- Intersect: Masks set to intersect do not replace an object’s original alpha channel. Instead, they mask out all regions of the object that do not overlap the mask itself. This includes other masks applied to the same object that appear nested underneath the intersecting mask in the Layers list. In the following example, only the overlapping areas of the rectangle and circle masks are opaque. Everything else is transparent.
- Invert Mask: When this checkbox is selected, the mask is inverted—its solid and transparent areas are swapped. This is useful if you need to switch the solid and transparent areas of an existing mask.
Tip: You can apply different filters and effects to the foreground and background of an image by first masking the foreground subject, duplicating the layer and its mask, then inverting the duplicate layer’s mask. Effects applied to the background can then be completely isolated from the foreground, or vice versa.
Note: You can adjust the opacity of a mask in the Properties Inspector.
- Preserve Scale: This checkbox controls whether the Roundness setting is absolute or relative to the overall mask size. When enabled, the roundness will remain at the same approximate percentage of curvature as the object is scaled. When disabled, the curvature will vary as the overall mask changes size.
- Feather: A slider that feathers (softens) the edges of a mask. Positive feathering values soften the edge of the mask from its edge outward. Negative feathering values soften the edge of a mask inward from the edge. Feathering the edge of a mask can soften a harsh rotoscoping job, making the masked object blend more easily with the background.
- Falloff: Controls how “steep” the feathering is. Higher values result in feathering that’s pushed in farther inward, so the edge of the feathering effect is more transparent. Lower values result in the “core” of the feathering effect being pushed farther outward, so the edge of the feathering effect is less transparent.