Parameter Behaviors
These behaviors can be applied to any object parameter that can be animated, and their effects are limited to just that parameter. The same Parameter behavior can be added to different parameters, resulting in different effects. For example, you can apply the Oscillate behavior to the opacity of an object to make it fade in and out, or you can apply it to the rotation of an object to make it rock back and forth. You can also apply Parameter behaviors to filter parameters, generator parameters, the parameters of particle systems, or even the parameters of other behaviors. Examples include Oscillate, Randomize, and Reverse.
For more information on applying Parameter behaviors, see Applying Parameter Behaviors.
The following sections cover the Parameter behaviors:
Audio
This behavior allows you to animate nearly any parameter based on properties of an audio file, such as bass frequency. For example, the Audio parameter behavior can be applied to the Scale parameter of an object so it scales up and down based on the amplitude of the bass, or to the Opacity parameter so it fades in and out to the beat. For more information on using the Audio parameter behavior, see Audio Parameter Behavior.
Average
This behavior smoothes the transition from one value to another caused by keyframes and behaviors applied to a parameter. Use the Average behavior to smooth out animated effects. Averaged motion moves more fluidly, while averaged changes to parameters such as Opacity and to filter parameters appear to happen more gradually. Use the Window Size parameter to adjust the amount by which to smooth the affected parameter.
Tip: The Average behavior can be used to smooth out the sequence of values generated by a Randomize behavior.
- Window Size: A slider lets you adjust the amount of smoothing to apply to the affected parameter by specifying the number of adjacent frames to average together. Higher values apply more smoothing by averaging a wider range of values, resulting in more fluid animation. Lower values average a narrower range of values and apply less smoothing with values closer to the original.
The HUD lets you adjust the Window Size parameter and change the parameter assignment.
Clamp
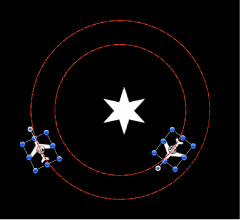
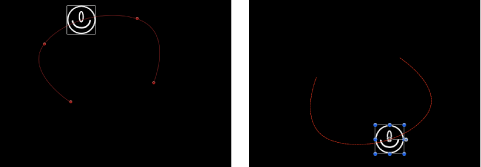
This behavior allows you to define a minimum and maximum value for an animated parameter. In the following illustration, the center star has an applied Vortex behavior that’s set to affect the two airplane shapes. As a result, the airplanes circle around the center star, as indicated by the red animation path.
In the following illustration, a Clamp behavior is applied to the X Position parameter of the outer airplane shape. The Max value is set to 230 and the Min value is set to 0. The result is that the animation path is “clamped,” because the image can travel up to 230 pixels to the right but does not move left past the 0 point, creating a half-circle animation.
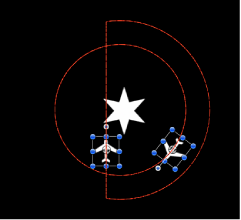
The circle motion path is essentially cut in half. If a negative value is entered in the Min value field, the image moves past the 0 point.
- Max: A value slider that lets you define the maximum amount of change for an animated parameter.
The value is represented as a percentage, in pixels, or in degrees, depending on the parameter assignment. For example, if Clamp is applied to the Rotation parameter, the Min and Max values are degrees. If Clamp is applied to the X Position parameter, the values are in pixels.
The HUD lets you set the clamp to Min, Max, or Min and Max values, and also to change the parameter assignment.
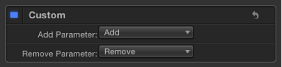
Custom
The Custom behavior allows you to make your own behaviors by creating a set of parameters, then keyframing them to create the type of animation you want to apply to an object. By saving custom behaviors you create in the Library, you can create your own collection of behaviors to suit your needs.
You apply the Custom behavior like any other non-Parameter behavior in Motion: by dragging it from the Library onto an object in the Canvas or Layers list, or by selecting an object in the Canvas or Layers list, then choosing Custom from the Add Behavior pop-up menu.
Note: Although the Custom behavior is a Parameter behavior, it does not appear in the shortcut menu when you Control-click a parameter.
Unlike other behaviors, the Custom behavior doesn’t start out with any parameters in the Behaviors Inspector. Instead, a pair of pop-up menus allows you to add and remove any parameters you want to use.
There are no HUD controls for this behavior.
Adding a Custom Behavior
Before adding custom parameters to a Custom behavior, you must apply the Custom behavior to an object in the Canvas.
For more information on saving behaviors, see Saving and Sharing Custom Behaviors.
Select the object you want to add a Custom behavior to, open the Add Behavior pop-up menu in the toolbar, then choose Parameter > Custom from the submenu.
In the Library, select the Behaviors category, select the Parameter subcategory, then drag the Custom icon to the object in the Canvas, Layers list, or Timeline.
The Custom behavior is applied to the object. The behavior has no effect until you add a parameter to the behavior.
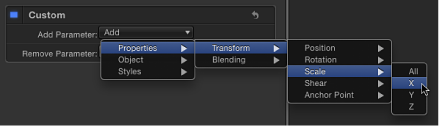
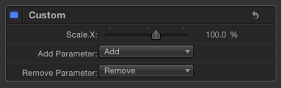
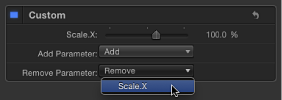
Choose a parameter to add to the Custom parameter list from the Add Parameter pop-up menu. This menu contains every animateable parameter.
The parameter appears in the Behaviors Inspector below the Custom behavior.
After you add the parameters to animate in your Custom behavior, you can keyframe them in the Keyframe Editor to create whatever animated effect you require. For more information on keyframing parameters to create animation, see Animating Behaviors.
Choose the parameter to remove from the Remove Parameter list.
That parameter no longer appears in the Custom parameter list. Any keyframes applied to that parameter are deleted.
After you animate the parameters you added, you can save the Custom behavior into the Library for future use. For more information about saving Custom behaviors to the Library, see Saving and Sharing Custom Behaviors.
When you apply a Custom behavior that you’ve saved in the Library to an object in a project, its keyframed animation is scaled to the duration of the object to which it is applied. This means that no matter how long the original Custom behavior was, you can apply it to any object, and the animated effect speeds up or slows down to accommodate the new object’s duration.
Exponential
The Exponential parameter behavior creates more natural animations when scaling objects, especially when using high values. For example, when an object scales from very small to very large, the animation appears to slow down as the object reaches its upper scale values. The Exponential parameter behavior works like the Ramp behavior, but applies a mathematical function to create an exponential curve (rather than linear) between the two values. This allows the animation to progress slowly when the scale values are small and speed up when the scale values are large.
Tip: When applied to parameters other than Scale, the Exponential parameter behavior creates more organic animations than other interpolation modes.
You can also change the interpolation modes of keyframes to Exponential. For more information, see Modifying Curves.
- End Offset: A slider that lets you offset the end of the behavior’s effect relative to the last frame of its position in the Timeline, in frames. Adjust this parameter to make the behavior stop before the actual end of the behavior in the Timeline. Using this slider to stop the effect, instead of trimming the end of the behavior in the Timeline, freezes the end of the effect for the remaining duration of the object. Trimming the end of the behavior resets the object to its original parameter.
The HUD lets you set the start and end values and change the parameter assignment.
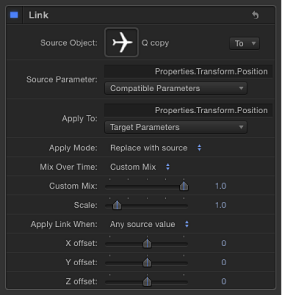
Link
The Link parameter behavior forces the value of one parameter to match that of another “linked” parameter. The source behavior can be within the same object or from another object. The linked parameters must contain numerical data. Parameters controlled by checkboxes, menus, and other non-numeric values cannot be linked. The linked parameters also must contain the same number of attributes. You cannot link a compound parameter such as Scale X-Y-Z to a parameter such as Opacity which has only one slider. You can however, link a compound parameter such as Scale X-Y-Z to Position X-Y-Z.
The values of the source parameter can be scaled to more accurately apply to the destination parameter. For example, a source parameter with a range of 1–100 can be scaled when applied to a parameter with a range of 0–1. The values can also be offset from the source, and the effect can be mixed with the destination value to create different effects.
The Link behavior can be applied to parameters animated with behaviors or keyframes; however, it does not affect the parameter when the Start Values or End Values are zero.
When using the Link behavior to control an object’s position parameter, the linked coordinates are based on the center point of the current group. So when an object is linked to another object in the same group, it will share an identical position. However, if the source object is in a different group, the coordinates might appear offset in space.
If your goal is to match an identical position across groups with different center points, you can create an invisible dummy object in the group containing the source, link it to the source object, then use the Match Move behavior to copy the dummy object’s position to that of the intended target. Match Move compensates for inter-group position offsets and provides the option to attach one object to another or to mimic the source object’s transformations. For more about Match Move, see Motion Tracking Behaviors.
You can also link to the group’s coordinates instead of the object’s, and use the Offset parameters in the Link behavior to obtain the position you want. However, if that group is subsequently added to another group, the linked object might not move as expected.
Note: When a link behavior is added, it is not enabled by default. To activate the behavior, click the activation checkbox beside the behavior name in the Behaviors Inspector.
- Source Parameter: The Source Parameter (Compatible Parameters) pop-up menu shows the parameter that serves as the source for the Link behavior and can be used to select a new source parameter. Only parameters with the same value type and number of attributes as the parameter selected in the Apply To (Target Parameters) pop-up menu appear here.
Note: When possible, Source Parameter defaults to the parameter chosen in the Apply To row (described below).
Important: Changing the Apply To (Target Parameters) setting changes which parameters appear in the Source Parameter pop-up menu. If you cannot find the parameter you are looking for, you might need to choose a Target Parameter to which you can link.
- Apply Mode: Pop-up menu to specify how the values from the source parameter affect the target parameter. The choices include:
- Add to source: Choosing this option will add the source parameter value to the existing value of the target parameter.
- Multiply by source: Choosing this option will multiply the source parameter value with the existing value of the target parameter.
- Replace with source: Choosing this option will replace the existing value of the target parameter with that of the source parameter.
- Mix Time Range: When the Mix Over Time is set to an Ease or Acceleration option, this slider controls over how many frames the ease or acceleration occurs.
Tip: Ease In and Accelerate begin at the In point of the Link behavior, and Ease Out and Decelerate end at the Out point of the Link behavior. Therefore, you can trim the Link behavior in the Timeline to specify where the ease or acceleration begins and/or ends.
- Apply Link When: Pop-up menu that enables you to limit when values from the source are applied to the target. There are five choices:
- Any source value: When this item is selected, no limits are placed on the source parameter values. An offset slider for each setting associated with the source parameter appears at the bottom of the Behaviors Inspector. If the source parameter has a single slider, such as Opacity, a single offset slider appears. If the source parameter has multiple sliders, such as Position X-Y-Z, offset sliders for each of those settings appear.
- Source value above minimum: When this item is selected, the link applies only when the source value exceeds a defined minimum value. If the source value falls below the defined minimum, the link behavior stops. When selected, the Clamp Source Values Within Range checkbox as well as offset and minimum sliders for each setting associated with the source parameter appear at the bottom of the Behaviors Inspector. If the source parameter has a single slider, such as drop shadow Blur, an offset and a minimum slider appear for that setting. If the source parameter has multiple sliders, such as Scale X-Y-Z, offset and minimum sliders appear for each of those settings.
- Source value below maximum: When this item is selected, the link applies only when the source value stays below a defined maximum value. If the source value exceeds the defined maximum, the link behavior stops. When selected, the Clamp Source Values Within Range checkbox as well as offset and maximum sliders for each setting associated with the source parameter appear at the bottom of the Behaviors Inspector. If the source parameter has a single slider, such as shape Roundness, an offset and a maximum slider appear for that setting. If the source parameter has multiple sliders, such as Rotation X-Y-Z, offset and maximum sliders appear for each of those settings.
- Source value between min and max: When this item is selected, the link applies only when the source value stays within a defined range. If the source value falls below the defined minimum, or exceeds the defined maximum, the link behavior stops. When selected, the Clamp Source Values Within Range checkbox as well as offset, minimum, and maximum sliders for each setting associated with the source parameter appear at the bottom of the Behaviors Inspector. If the source parameter has a single slider, such as shape Feather, one set of three sliders (offset, minimum, and maximum) appears for that setting. If the source parameter has multiple sliders, such as Fill Color (red, green, blue), sets of three sliders appear for each of those settings.
- Source value outside min and max: When this item is selected, the link applies only when the source value stays outside of a defined range. If the source value falls above the defined minimum, or below the defined maximum, the link behavior stops. When selected, the Clamp Source Values Within Range checkbox as well as offset, minimum, and maximum sliders for each setting associated with the source parameter appears at the bottom of the Behaviors Inspector. If the source parameter has a single slider, such as Outline Width, one set of three sliders (offset, minimum, and maximum) appears for that setting. If the source parameter has multiple sliders, such as Shear X-Y, sets of three sliders appear for each of those settings.
- (Parameter) min: When the Apply Link When pop-up menu is set to “Source value above minimum,” “Source value between min and max,” or “Source value outside min and max,” a “min” slider appears for each component of the source parameter. Adjusting this slider defines a minimum value to limit when the link behavior is active.
- (Parameter) max: When the Apply Link When pop-up menu is set to “Source value below maximum,” “Source value between min and max,” or “Source value outside min and max,” a “max” slider appears for each component of the source parameter. Adjusting this slider defines a maximum value to limit when the link behavior is active.
The HUD lets you set all parameters and change the parameter source and target.
Logarithmic
The Logarithmic parameter behavior is the inverse of the Exponential behavior. Like the Exponential behavior, it creates more natural animations when scaling objects, especially when using high values. The Logarithmic parameter behavior applies a mathematical function to create a logarithmic curve (rather than linear) between the two values—the effect ramps up quickly, and then the effect slows down. This allows the animation to progress slowly when the scale values are small and speed up when the scale values are large.
The Logarithmic behavior can be applied to parameters animated with behaviors or keyframes; however, Logarithmic does not affect the parameter unless the Start Values or End Values are nonzero.
Tip: When applied to parameters other than Scale, the Logarithmic parameter behavior creates more organic animations than other interpolation modes.
Note: You can also change the interpolation modes of keyframes to Logarithmic. For more information, see Modifying Curves.
- End Offset: A slider that lets you offset the end of the behavior’s effect relative to the last frame of its position in the Timeline, in frames. Adjust this parameter to make the behavior stop before the actual end of the behavior in the Timeline. Using this slider to stop the effect, instead of trimming the end of the behavior in the Timeline, freezes the end of the effect for the remaining duration of the object. Trimming the end of the behavior resets the object to its original parameter.
The HUD lets you set the start and end values and change the parameter assignment.
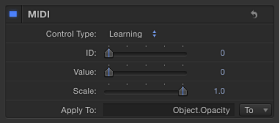
MIDI
The MIDI behavior allows you to edit and animate object parameters using standard MIDI devices, such as a synthesizer. For the true motion graphics mixmaster.
- Control Type: Specifies the mode of the MIDI controller. The three available control types are:
- Note: This mode is displayed when the control is a keyboard key on the MIDI device.
- Controller: This mode is displayed when the control is a knob, dial, key, slider, or foot pedal on the MIDI device.
- Learning: This mode is used to “teach” Motion which control (such as a knob, dial, or key) you want to use on the MIDI device to manipulate the parameter to which the MIDI behavior is applied. When in Learning mode, the first knob, dial, or key that you adjust on the MIDI device is set as the control.
Note: When the MIDI behavior is first applied, Learning is the default control type.
- Scale: Increasing the Scale value multiplies the Value parameter in the MIDI behavior. This means that when Scale is increased, the MIDI control has a larger range of value and a greater effect on the parameter it’s controlling. For example, when you use a knob to adjust an object’s rotation, the default rotation value range (when Scale is set to 1) for a full turn of the knob might only be 30 percent. When the Scale value is increased to 13, the rotation value of a full turn of the knob is increased to 370 degrees.
The HUD controls allow you to adjust the Control Type, ID, Value, and Scale parameters, as well as change the parameter assignment.
Applying the MIDI behavior
The MIDI behavior is applied in the same way as all other Parameter behaviors. In the following examples, the MIDI parameter behavior is used to adjust an object’s opacity and rotation.
Note: This behavior can only be used if you have a MIDI device correctly connected to your computer.
Select an object, then select the Opacity parameter in the Properties Inspector.
Control-click the parameter, then choose MIDI from the shortcut menu.
The MIDI parameters are displayed in the Behaviors Inspector. By default, Control Type is set to Learning.
Like all other Parameter behaviors, the Apply To field displays the parameter to which the behavior is applied.
On your MIDI device, tweak the control (such as the knob, dial, or key) you want to use as the controller for the Opacity parameter.
Note: When in Learning mode, the first control adjusted on the MIDI device is set as the control. To reset the selected controller, choose Learning from the Control Type pop-up menu, and adjust another control on the MIDI device.
The identification number of the MIDI control is displayed in the ID field. The value range of the control is 0 to 127, the default MIDI control value.
Because an object’s opacity can only fall between 0 (completely transparent) to 100 (completely opaque), the default MIDI values are sufficient to adjust the parameter.
Select an object, then select the Rotation parameter in the Properties Inspector.
Control-click the parameter, then choose MIDI from the shortcut menu.
On your MIDI device, tweak the control (knob, dial, key, and so on) you want to use as the controller for the Rotation parameter.
As mentioned above, the default Value range is 0 to 1. Because the Rotation value of an object can be much larger, you can use the Scale parameter to multiply the Value range.
To give the control more sensitivity, increase the Scale value.
Negate
Inverts the value of each keyframe and behavior effect in the parameter to which it’s applied by multiplying the parameter by –1. The Negate behavior basically flips each parameter value to its opposite. Animation paths are flipped, rotation is reversed, and any effect’s parameter is changed to its opposite.
For example, applying the Negate behavior to the Position parameter of an object with an animation path results in the animation path moving to the opposite quadrant of the Canvas.
Note: If you want to reverse the motion taking place on an animation path, rather than flipping the shape of the animation path itself, use the Reverse parameter behavior.
The HUD control allows you to change the parameter assignment.
Oscillate
The Oscillate behavior animates a parameter by cycling it between two values. You can customize how wide apart the high and low values are as well as the number of oscillations per minute. The Oscillate behavior can create all kinds of cyclical effects. For example, if you apply the Oscillate behavior to the rotation property of an object, it will rock back and forth. This happens because the rotation property cycles back and forth between the original rotation value plus and minus the Amplitude value that’s set in the Oscillate behavior.
Applying the Oscillate behavior to the X value of the Scale parameter instead causes the width of the object to cycle, and it repeatedly stretches and compresses for the duration of the behavior.
The Oscillate behavior is additive, meaning that the value generated by this behavior is added to the original value of the parameter to which it’s applied.
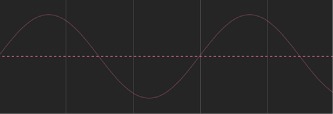
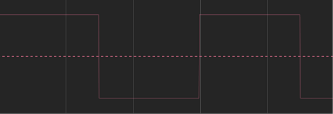
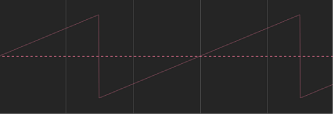
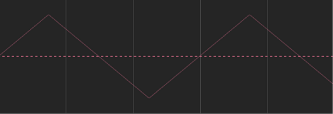
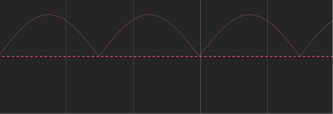
- Wave Shape: A pop-up menu that lets you choose the shape of the oscillation’s wave. The choices are Sine (default), Square, Sawtooth, and Triangle.
- Sine: The default wave shape, the sine wave creates a smooth animation between values. For example, if Oscillate is applied to an object’s Opacity parameter, and the Wave Shape is set to Sine, the object gracefully fades in and out.
- Square: The square wave creates abrupt changes in values. For example, when Oscillate is applied to an object’s Opacity parameter, and the Wave Shape is set to Square, the object flashes on and off (like turning a light switch on and off).
- Sawtooth: The Sawtooth wave ramps upward over time and then drops sharply. For example, when Oscillate is applied to an object’s Opacity parameter, and the Wave Shape is set to Sawtooth, the object fades in slowly and fades out abruptly (like using a light dimmer to fade up a light, and then flicking the power switch off).
- Triangle: Similar to the sine wave, a triangle wave creates a smooth animation between values but with sharper changes at the transitions. For example, when Oscillate is applied to an object’s Opacity parameter, and the Wave Shape is set to Triangle, the object fades in and out more acutely than the sine wave.
- Half Range: When this checkbox is selected, the sine wave (or other wave shape) is essentially cut in half and does not cross the value of 0. For example, when Amplitude is set to 100, the parameter oscillates between 100 and –100. When Half Range is selected, however, the parameter oscillates between 100 and 0. When Amplitude is set to –100, the parameter oscillates between –100 and 0.
Tip: When you are oscillating position parameters, set Wave Shape to Sine and enable Half Range to create a bouncing effect.
- End Offset: A slider that lets you offset the end of the behavior’s effect relative to the last frame of its position in the Timeline, in frames. Adjust this parameter to make the behavior stop before the actual end of the behavior in the Timeline. Using this slider to stop the effect, instead of trimming the end of the behavior in the Timeline, freezes the end of the effect for the remaining duration of the object. Trimming the end of the behavior resets the object to its original parameters.
The HUD lets you adjust the Phase, Amplitude, Speed, and Half Range parameters as well as change the parameter assignment of the Oscillate behavior.
Creating a Decaying Oscillation
When you are oscillating an object’s rotation or position, a common effect is to “decay” or “dampen” the animation over time. This means that the animation gradually slows or comes to a stop. You can achieve this effect using keyframes to slow the amplitude of the oscillation.
Go to the frame where you want the animation to begin, then enable Record (press A).
Set the Amplitude to the maximum value you want to use in your project.
Note: When Record is enabled, any value change to a parameter using the Inspector, HUD, or Canvas creates a keyframe.
Go to the frame where you want the animation to come to a stop and set the Amplitude value to 0.
When the object is selected, you can see the dampening of the animation—caused by the keyframed Amplitude parameter—in the Keyframe Editor (when Animated is chosen from the pop-up menu above the Keyframe Editor). The following illustration shows the keyframed Amplitude parameter of the Oscillate behavior superimposed over the resulting change to the Oscillate curve itself.
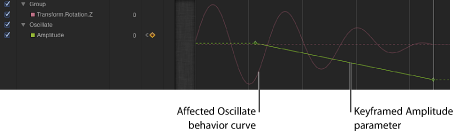
Note: The Oscillate behavior must be selected for its curve to be visible in the Keyframe Editor.
Quantize
The Quantize behavior lets you create an incremental animation in any keyframed or behavior-influenced parameter. For example, if opacity is animated so an object gradually fades in over time, you can add the Quantize behavior to make the object become opaque in steps.
Note: The Quantize behavior only works with animated parameters.
- Step Size: A value slider that defines the size of the steps, based on the units of the parameter to which it is applied. For example, when Quantize is applied to rotation, the steps are in degrees (even though it is not a dial control). When applied to position, the steps are in pixels.
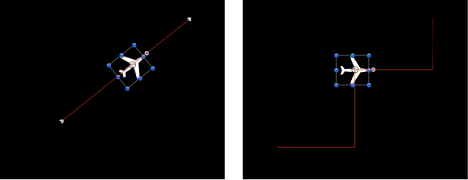
The following left screenshot shows the projected path (the red line) of a layer with an applied Throw behavior. The right image displays the same animation path after the Quantize behavior is added. In this example, the Step value is set to 90.
- Offset: A slider that offsets the steps. For example, when Quantize is applied to a Position parameter and Step Size is set to 100, an object “steps” in increments restricted to 100 pixels; thus, the step offset is 100, 200, 300, and so on. If Offset is set to 50, the step offset is restricted to 50, 150, 250, and so on.
The HUD lets you define the step size, offset, and parameter assignment.
Ramp
The Ramp behavior lets you create a gradual transition in any parameter that can be animated, from the Start Value to the End Value. The speed of the transition is defined by the length of the Ramp behavior in the Timeline, and by the behavior’s end value. Additional parameters allow you to define how the transition occurs, whether it’s at a single continuous speed, or whether it accelerates over time.
Ramp is a versatile behavior. If you apply it to the Scale property, it works like the Grow/Shrink behavior. If you apply it to the Opacity property, you can fade an object in or out in different ways. Although you can use the Ramp behavior to mimic other Motion behaviors, it can be applied to any parameter.
Note: This behavior is additive, meaning that the value it generates is added to the original value of the parameter to which it’s applied.
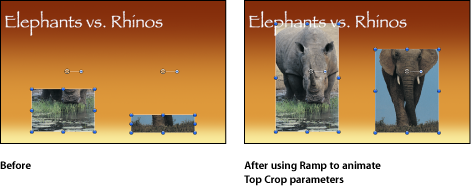
For example, to animate different segments of a bar graph so each segment grows to a specific length, apply the Ramp behavior to the each bar’s Crop parameter.
After you arrange the different bars with their starting Crop values, the Ramp behaviors move the Top Crop parameter up, giving the illusion that each bar is growing. Set the End Value parameter of each Ramp behavior to the length you want each bar to reach, and you’re done!
- Curvature: This parameter lets you ease the acceleration with which the Ramp behavior transitions from the Start Value to the End Value. Higher Curvature values result in an ease in/ease out effect, where the value slowly begins the transition, gradually speeds up as the behavior continues, then gradually slows down to a stop as it reaches the end. Because Curvature is defined by the length of the behavior in the Timeline, it does not affect the overall duration of the effect.
- End Offset: A slider that lets you offset the end of the behavior’s effect relative to the last frame of its position in the Timeline, in frames. Adjust this parameter to make the behavior stop before the actual end of the behavior in the Timeline. Using this slider to stop the effect, instead of trimming the end of the behavior in the Timeline, freezes the end of the effect for the remaining duration of the object. Trimming the end of the behavior resets the object to its original parameter.
The HUD lets you adjust the Ramp’s Start Value, End Value, and Curvature parameters, as well as change the parameter assignment.
Randomize
Creates a continuous sequence of randomly increasing and decreasing values, based on the parameters defining the range and type of values generated.
Although the values created with this behavior appear to be random, they’re predetermined by the parameter settings you’ve chosen. As long as you don’t change the parameters, the frame-by-frame values created by this behavior remain the same. If you don’t like the randomly generated values, click the Generate button in the Behaviors Inspector to pick a new random seed number. This number is used to generate a new sequence of values.
The Apply Mode parameter determines how values generated by this behavior are combined with other behaviors and keyframes that affect the same parameter. This provides you with different ways of using a Randomize behavior to modify a parameter’s preexisting values.
The Randomize behavior is useful for creating jittery effects, such as twitchy rotation, flickering opacity, and other effects requiring rapid and varied changes over time that would be time-consuming to keyframe. The Randomize behavior can be modified with other behaviors, such as Average and Negate, to exercise further control over the values generated.
- Apply Mode: A pop-up menu that determines how values generated by this behavior are combined with other behaviors and keyframes that affect the same parameter. This provides you with different ways of using a Randomize behavior to modify a parameter’s preexisting values. The options are Add, Subtract, Multiply, or Add and Subtract.
- End Offset: A slider that lets you offset the end of the behavior’s effect relative to the last frame of its position in the Timeline, in frames. Adjust this parameter to make the behavior stop before the actual end of the behavior in the Timeline. Using this slider to stop the effect, instead of trimming the end of the behavior in the Timeline, freezes the last random value generated by this behavior for the remaining duration of the object. Trimming the end of the behavior resets the parameter to its original value.
The HUD lets you adjust the Amount, Multiplier, Frequency, Noisiness, Link (for multidimensional parameters), Start Offset, and End Offset parameters, as well as parameter assignment.
Rate
This behavior increases a parameter’s value over time, with the rate of increase determined by the Rate slider. Unlike the Ramp behavior, this behavior has no end value, but continues to increase or decrease the parameter it’s applied to until the end of the parameter.
Note: To decrease a parameter over time, enter a negative value into the Rate parameter.
- Curvature: This parameter lets you ease the acceleration with which the Rate behavior transitions from the Start Value to the End Value. Higher Curvature values result in an ease in/ease out effect, where the value slowly begins the transition, gradually speeds up as the behavior continues, then gradually slows down to a stop as it reaches the end. Because Curvature is defined by the length of the behavior in the Timeline, it does not affect the overall duration of the effect.
- End Offset: A slider that lets you offset the end of the behavior’s effect relative to the last frame of its position in the Timeline, in frames. Adjust this parameter to make the behavior stop before the actual end of the behavior in the Timeline. Using this slider to stop the effect, instead of trimming the end of the behavior in the Timeline, freezes the last random value generated by this behavior for the remaining duration of the object. Trimming the end of the behavior resets the parameter to its original value.
The HUD has controls for Rate, Curvature, and parameter assignment.
Reverse
Unlike the Negate behavior, which inverts the value of the parameter to which it’s applied, the Reverse behavior reverses the direction of any animation that affects a parameter, whether it’s caused by behaviors or keyframes. For example, when you apply the Reverse behavior to path animation that begins at the left and moves to the right, the animation path won’t move, but the object instead begins at the right and moves to the left. The Reverse behavior basically switches the beginning and ending points of animated objects.
The HUD control allows you to change the parameter assignment.
Stop
The Stop behavior suspends parameter animation (created by keyframes or applied behaviors) of an object. For example, if you assign the Stop parameter behavior to the Position parameter of an object moving across the screen and rotating, the object ceases to move across the screen but continues to rotate.
Each behavior’s effect on the object is frozen at the first frame of the Stop behavior in the Timeline. Keyframes applied to that parameter cease to have any effect for the duration of the Stop behavior in the Timeline.
If the Stop behavior is shorter than the object to which it’s applied, all keyframes and behaviors affecting that channel immediately take effect after the last frame of the Stop behavior. For more information on using the Stop behavior, see Using the Stop Behavior.
The HUD control allows you to change the parameter assignment.
Track
This behavior allows you to apply tracking data to a parameter of an effect, such as the center point of the Light Rays filter. For more information on using the Track behavior, see Track Behavior.
Wriggle
This behavior works similarly to the Randomize behavior, but with a slower effect.
Tip: A Wriggle behavior applied to an Opacity parameter set to 100% does not have much effect. This is because there isn’t much room to “wriggle.” For a better result, set the Opacity to 0, or change the Apply Mode to Subtract.
- Apply Mode: A pop-up menu that determines how values generated by this behavior are combined with other behaviors and keyframes that affect the same parameter. This provides you with different ways of using a Wriggle behavior to modify a parameter’s preexisting values. The options are Add, Subtract, Multiply, or Add and Subtract.
- End Offset: A slider that lets you offset the end of the behavior’s effect relative to the last frame of its position in the Timeline, in frames. Adjust this parameter to make the behavior stop before the actual end of the behavior in the Timeline. Using this slider to stop the effect, instead of trimming the end of the behavior in the Timeline, freezes the last random value generated by this behavior for the remaining duration of the object. Trimming the end of the behavior resets the parameter to its original value.
The HUD lets you adjust the Amount, Multiplier, Frequency, Wriggle Offset, Noisiness, Link (for multidimensional parameters), Start Offset, and End Offset parameters, as well as change the parameter assignment.