Simulation Behaviors
These behaviors perform one of two tasks. Some Simulation behaviors, such as Gravity, animate the parameters of an object in a way that simulates a real-world phenomenon. Other Simulation behaviors, such as Attractor and Repel, affect the parameters of objects surrounding the object to which they’re applied. These behaviors allow you to create some very sophisticated interactions among multiple objects in your project with a minimum of adjustments. Like the Basic Motion behaviors, Simulation behaviors also affect specific object parameters. Examples include Attractor, Gravity, and Repel.
Important: Several Simulation behavior parameters contain object wells into which you drag target objects used as attractors, repellers, orbiters, and so on. Dragging an object to a well can be tricky—be sure to click the object name in the Layers list and immediately drag the object to the object well (without releasing the mouse button). The behavior must remain active even though you are dragging another object in the Layers list. If you click the object in the Layers list and release the mouse button, that object becomes selected, and the behavior’s parameters are no longer displayed. This applies to all wells, including mask source and image wells.
The following sections cover the Simulation behaviors:
Align To Motion
The Align To Motion behavior changes the rotation of an object to match changes made to its direction along an animation path. This behavior is meant to be combined with Simulation behaviors that animate the position of an object or with a keyframed animation path you create yourself.
Note: The Align to Motion behavior does not work on objects animated using the Motion Path behavior. Instead, use the Snap Alignment to Motion behavior (in the Basic Motion subcategory).
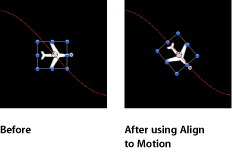
Unlike the Snap Alignment to Motion behavior, which produces absolute changes in rotation that precisely match changes in direction, Align To Motion has a springy reaction and creates a more lively effect.
In the above example, the fish travels along the keyframed animation path, but it isn’t aligned to the animation path (notice the rotation handle). Using the Align To Motion behavior, its angle of rotation moves so it points in the direction of the animation path. By adjusting the Drag parameter, you can make it careen wildly about its anchor point as it goes around curves in the animation path.
- Affect Subobjects: This parameter appears when this behavior is applied to an object that contains multiple objects, such as a group, a particle emitter, a replicator, or a text layer. When this checkbox is selected, all objects in the parent object are affected individually. When this checkbox is deselected, all objects in the parent object are affected by the behavior together.
- Drag: A slider that adjusts whether the change in rotation made by this behavior overshoots the new direction of the object. Low drag values result in springy changes in rotation, where the object rotates back and forth as it overshoots changes in direction. High drag values dampen this effect, making the object’s rotation stick more closely to the changes made in rotation. Higher values also cause the object’s rotation to lag behind the object’s change in position.
The HUD has controls for the Rotation Axis, Axis, Invert Axis, Spring Tension, and Drag parameters. When applied to a group or layer that contains multiple objects (such as particles, text, or a replicator), the Affect Subobjects checkbox also appears in the HUD.
Attracted To
This behavior is part of a group of Simulation behaviors that let you create complex animated relationships between two or more objects. These behaviors are extremely powerful and allow complicated effects to be created with a minimum of steps.
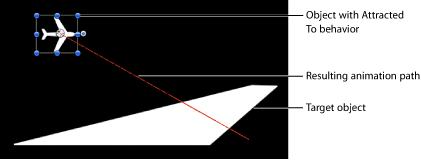
An object with the Attracted To behavior moves toward a single specified target, the object of attraction. Additional parameters allow you to adjust the area of influence that defines how close an object must be to move toward the object of attraction, and how strongly it is attracted.
The Drag parameter lets you define whether attracted objects overshoot and bounce about the attracting object, or whether they eventually slow down and stop at the position of the target object.
You can apply two or more Attracted To behaviors to a single object, each with a different object of attraction, to create tug-of-war situations where the object bounces among all objects it’s attracted to.
- Affect Subobjects: This parameter appears when this behavior is applied to an object that contains multiple objects, such as a group, a particle emitter, a replicator, or a text layer. When this checkbox is selected, all objects in the parent object are affected individually. When this checkbox is deselected, all objects in the parent object are affected by the behavior together.
- Falloff Rate: This value determines how quickly the force of attraction between objects affected by this behavior falls off. A low Falloff Rate value results in objects quickly getting up to speed as they move toward the object of attraction. A high Falloff Rate causes objects to accelerate much more slowly. When set to Exponential, the attraction falls off more quickly than when set to Linear.
- Drag: A slider that can be used to reduce the distance attracted objects overshoot the object of attraction. Lower Drag values result in the object overshooting the object of attraction, moving past and then careening back around toward the target object again and again. Higher Drag values result in the object coming to rest sooner.
The HUD has an Object well you can use to assign an object of attraction, as well as Strength, Falloff Type, Falloff Rate, Influence, Drag, and axis assignment parameters. When applied to an object that contains multiple objects (such as a group, particles, text, or the replicator), the Affect Subobjects checkbox also appears in the HUD.
Attractor
If you apply an Attractor behavior to an object, other objects that lie within the area of influence move toward it. You can manipulate the strength with which other objects are attracted, as well as the distance required for attraction to begin.
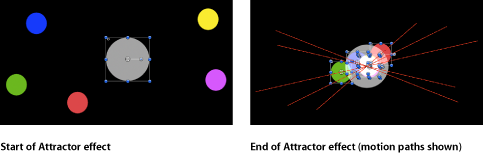
By default, objects overshoot the object of attraction and bounce around, never coming to rest. The Drag parameter lets you adjust this behavior, changing whether attracted objects overshoot and bounce around, or whether they eventually slow down and stop at the position of the target object.
The Attractor behavior can affect all objects in the Canvas that fall within the area of attraction, or you can limit its effect to a specific list of objects by using the Affect parameter.
The Attractor behavior can also be applied to objects in motion. If you animate the position of the target object to which you’ve applied the Attractor behavior, all other objects in the Canvas continue to be attracted to its new position.
- Affect: A pop-up menu that limits which objects in your project are affected by the Attractor behavior. There are three options:
- All Objects: All objects in the Canvas are affected by the Attractor behavior.
- Related Objects: The default setting. Only other objects in the same group as the object of attraction are affected.
- Specific Objects: Only objects appearing in the Affected Objects list are affected by the Attractor behavior.
- Affected Objects: A list that appears when Specific Objects is chosen in the Affect pop-up menu. Drag objects from the Layers list into this list to be affected by the Attractor behavior when the Specific Objects option is selected in the Affect pop-up menu. To remove an item from the list, select the item and click Remove.
- Falloff Rate: This value determines how quickly the force of attraction between objects affected by this behavior falls off. A low Falloff Rate value results in objects quickly getting up to speed as they move toward the object of attraction. A high Falloff Rate causes objects to accelerate much more slowly. When set to Exponential, the attraction falls off more quickly than when set to Linear.
- Drag: A slider that can be used to reduce the distance attracted objects overshoot the object of attraction. Lower Drag values result in the object overshooting the object of attraction, moving past and then careening back around toward the target object again and again. Higher Drag values result in the object coming to rest sooner.
The HUD lets you adjust the Affect, Strength, Falloff Type, Falloff Rate, Influence, Drag, and axis assignment parameters.
Drag
This behavior lets you simulate the force of friction on a moving object, slowing it down over time. Applying the Drag behavior is an easy way to decelerate objects with multiple behaviors that create complex motion.
- Affect Subobjects: This parameter appears when this behavior is applied to an object that contains multiple objects, such as a group, a particle emitter, a replicator, or a text layer. When this checkbox is selected, all objects in the parent object are affected individually. When this checkbox is deselected, all objects in the parent object are affected by the behavior together.
- Amount: Sliders that can be used to slow down an object over time, causing it to eventually come to a stop. Higher Drag values result in the object coming to rest sooner. Click the Amount disclosure triangle to adjust the drag applied to the X, Y, and Z values separately. An example of this is to create a situation where an object’s vertical speed slows down faster than its horizontal speed.
The HUD lets you adjust the amount of drag and axis assignment. When applied to an object that contains multiple objects, such as a group, particles, text, or the replicator, the Affect Subobjects checkbox also appears in the HUD.
Drift Attracted To
Similar to the Attracted To behavior, but by default an object moves toward the object of attraction and comes to rest, rather than overshooting the object of attraction and bouncing around.
- Affect Subobjects: This parameter appears when this behavior is applied to an object that contains multiple objects, such as a group, a particle emitter, a replicator, or a text layer. When this checkbox is selected, all objects in the parent object are affected individually. When this checkbox is deselected, all objects in the parent object are affected by the behavior together.
- Falloff Rate: This value determines how quickly the force of attraction between objects affected by this behavior falls off. A low Falloff Rate value results in objects quickly getting up to speed as they move toward the object of attraction. A high Falloff Rate causes objects to accelerate much more slowly. When set to Exponential, the attraction falls off more quickly than when set to Linear.
- Drag: A slider that can be used to reduce the distance attracted objects overshoot the object of attraction. Lower Drag values result in the object overshooting the object of attraction, moving past and then careening back around toward the target object again and again. Higher Drag values result in the object coming to rest sooner.
The HUD has an Object well you can use to assign an object of attraction, sliders for strength and drag, and axis assignment. When applied to an object that contains multiple objects (such as a group, particles, text, or the replicator), the Affect Subobjects checkbox also appears in the HUD.
Drift Attractor
Similar to the Attractor behavior, but by default objects within the area of influence move toward the object of attraction and come to rest, rather than overshooting the object of attraction and bouncing around.
- Affect: A pop-up menu that limits which objects in your project are affected by the Drift Attractor behavior. There are three options:
- All Objects: All objects in the Canvas are affected by the Drift Attractor behavior.
- Related Objects: The default setting. Only other objects in the same group as the object of attraction are affected.
- Specific Objects: Only objects appearing in the Affected Objects list are affected by the Drift Attractor behavior.
- Affected Objects: A list that appears when Specific Objects is chosen in the Affect pop-up menu. Drag objects from the Layers list into this list to be affected by the Attractor behavior when the Specific Objects option is selected in the Affect pop-up menu. To remove an item from the list, select the item and click Remove.
- Falloff Rate: This value determines how quickly the force of attraction between objects affected by this behavior falls off. A low Falloff Rate value results in objects quickly getting up to speed as they move toward the object of attraction. A high Falloff Rate causes objects to accelerate much more slowly. When Falloff Type is set to Exponential, the attraction falls off more quickly than when set to Linear.
- Drag: A slider that can be used to reduce the distance attracted objects overshoot the object of attraction. Lower Drag values result in the object overshooting the object of attraction, moving past and then careening back around toward the target object again and again. Higher Drag values result in the object coming to rest sooner.
The HUD has controls for Affect, Strength, Drag, and axis assignment.
Edge Collision
This is a good behavior to use if you’re setting up complex motion simulations and you don’t want your objects exiting the Canvas. Objects with the Edge Collision behavior applied come to a stop or bounce off after colliding with the edge of the Canvas frame. For example, if you apply the Throw behavior to an object and set the velocity to send the object toward the edge of the frame, then apply Edge Collision, the object will bounce off the edge of the frame according to the Bounce Strength parameter.
The angle at which the object bounces depends on the angle at which it hits the edge of the frame; the speed it travels after bouncing is set by the Bounce Strength parameter.
Note: Edge Collision has no effect on objects larger than the Canvas.
Important: By default, the Edge Collision behavior uses the size of the project and the bounding box to determine how the object collides with the edge of the Canvas. For example, in an NTSC Broadcast SD project (720 x 486 pixels), an object bounces off the right and left edges of the project at its bounding box. With groups (particles, text, and objects), only the object’s center is used. You can make the object travel further off the Canvas before it bounces by adjusting the Width and Height parameters. If you’re using this behavior with an object that has an alpha channel that’s smaller than its bounding box, adjust the Crop parameter in the object’s Properties Inspector to fit the bounding box as closely as possible to the edge of the image.
- Affect Subobjects: This parameter appears when this behavior is applied to an object that contains multiple objects, such as a group, a particle emitter, a replicator, or a text layer. When this checkbox is selected, all objects in the parent object are affected individually. When this checkbox is deselected, all objects in the parent object are affected by the behavior together.
- Bounce Strength: The speed at which objects travel after colliding with an edge. A value of 0 causes objects to come to a complete stop when colliding with an edge that’s perpendicular to the direction of motion. Higher values cause an object to move faster after bouncing. This parameter only slows the object in the direction perpendicular to the bounced edge.
The HUD has controls for Bounce Strength and Width, Height, and Depth. When applied to an object that contains multiple objects (such as a group, particles, text, or the replicator), the Affect Subobjects checkbox also appears in the HUD.
Gravity
This behavior causes an object, or the objects in a group (when Affect Subobjects is selected), to fall over time. The gravitational acceleration can be increased or decreased, resulting in a change to the rate of fall. Objects affected by the Gravity behavior continue to fall past the bottom edge of the Canvas (unless the Edge Collision behavior has been applied).
The following illustration shows an object affected by the Throw, Snap Alignment to Motion, and Gravity behaviors all at once.
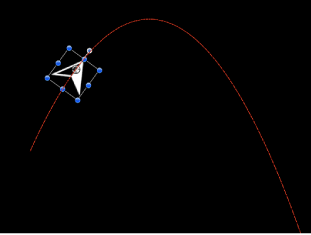
As you can see, the Gravity behavior can be used in conjunction with other behaviors that animate the position of objects to create natural-looking arcs and animation paths that simulate thrown objects falling to the ground. For example, apply the Throw behavior to an object to send it flying through the air, and then apply the Gravity behavior to it to make the object arc up and then fall down past the bottom of the Canvas.
You can also set the Acceleration parameter to a negative value, effectively applying “anti-gravity” to the object and making it fly up.
- Affect Subobjects: This parameter appears when this behavior is applied to an object that contains multiple objects, such as a group, a particle emitter, a replicator, or a text layer. When this checkbox is selected, all objects in the parent object are affected individually. When this checkbox is deselected, all objects in the parent object are affected by the behavior together.
The HUD lets you adjust the Acceleration parameter. When applied to an object containing multiple objects (such as a group, particles text, or a replicator), the Affect Subobjects checkbox also appears in the HUD.
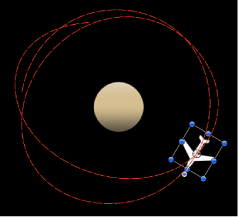
Orbit Around
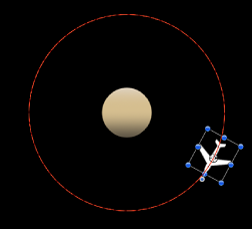
Similar to the Attracted To behavior, the Orbit Around behavior’s default parameter settings give the object sufficient initial velocity to orbit around another object in a perfect circle.
Note: Behaviors such as Attractor and Repel applied to nearby objects might disrupt an object with the Orbit Around behavior applied to it.
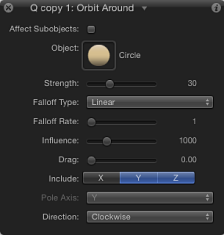
- Affect Subobjects: This parameter appears when this behavior is applied to an object that contains multiple objects, such as a group, a particle emitter, a replicator, or a text layer. When this checkbox is selected, all objects in the parent object are affected individually. When this checkbox is deselected, all objects in the parent object are affected by the behavior together.
- Falloff Rate: This value determines how quickly the force of attraction between objects affected by this behavior falls off. A low Falloff Rate value results in objects quickly getting up to speed as they move toward the object of attraction. A high Falloff Rate causes objects to accelerate much more slowly. When set to Exponential, the attraction falls off more quickly than when set to Linear.
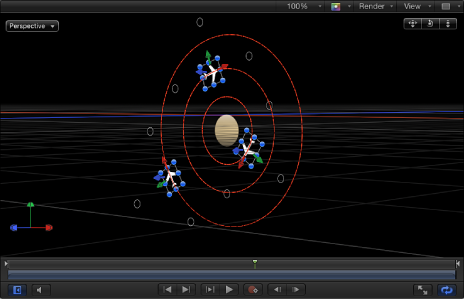
- Include X, Y, and Z: Buttons that allow you to specify the space in which the orbit occurs. For example, when X and Y are enabled, the object orbits in the XY plane. In the illustration below, X and Y are selected in the Include parameter. The yellow motion paths represent the motion of the white airplanes around the target object (the orange outlined star). The light gray box represents the boundary of the group.
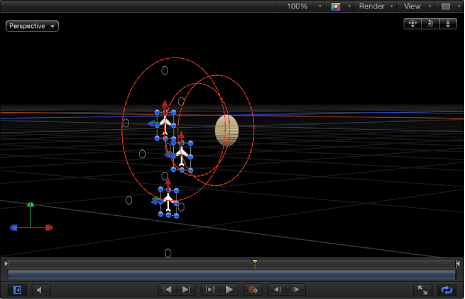
In the illustration below, Y and Z are turned on in the Include parameter. The white airplanes move around the target object in the YZ plane.
- Pole Axis: This parameter becomes available when the X, Y, and Z axes are enabled in the Include parameter. Because all points are at a fixed distance from the target or attractor object (the Pole Axis), the object can be visualized on a sphere of all possible orbits, with the target object at the center of the sphere. The Pole Axis defines the two points on the sphere that the orbit must pass through.
The HUD has an image well you can use to assign an object of attraction, as well as controls for Strength, Falloff Type, Falloff Rate, Influence, Drag, axis and Pole Axis assignment, and Direction. When applied to an object that contains multiple objects (such as a group, particles, text, or the replicator), the Affect Subobjects checkbox also appears in the HUD.
Random Motion
The Random Motion behavior animates the position of an object and makes that object move around the Canvas along a random path.
Although the motion created with this behavior appears to be random, it is predetermined by the group of parameters you’ve chosen. As long as you don’t change the parameters, the animation path created by this behavior remains the same. If you don’t like the path that was randomly generated, click the Generate button in the HUD or the Behaviors Inspector to pick a new random seed number. This number is used to generate a new path.
The Random Motion behavior is useful for creating varied animation paths for large numbers of objects you want to move at the same time. For example, you can create an arrangement of ten objects in the Canvas and apply the Random Motion behavior to them all.
You can also use the Random Motion behavior to add variation to the animation paths created by other behaviors that affect an object’s position. In the following example, adding Random Motion to an object with the Orbit Around behavior results in a more erratic animation path from orbit to orbit, although it still moves around the center as before.
- Affect Subobjects: This parameter appears when this behavior is applied to an object that contains multiple objects, such as a group, a particle emitter, a replicator, or a text layer. When this checkbox is selected, all objects in the parent object are affected individually. When this checkbox is deselected, all objects in the parent object are affected by the behavior together.
The HUD has controls for the Amount, Frequency, Noisiness, Drag, axis assignment, and Random Seed parameters. When applied to an object that contains multiple objects (such as a group, particles, text, or a replicator), the Affect Subobjects checkbox also appears in the HUD.
Repel
If you apply the Repel behavior to an object, that object pushes away all other objects within the area of influence in the Canvas. The strength with which objects are pushed away can be increased or decreased, as can the distance repelled objects travel.
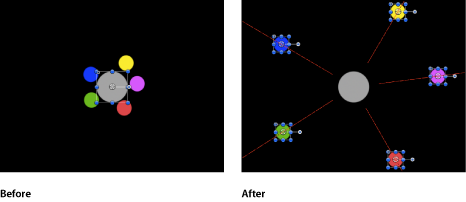
You can also specify which objects are affected by this behavior, creating an effect where only specific objects are moved, while others remain still.
The Repel behavior is the opposite of the Attractor behavior, and is part of a group of simulation behaviors that create complex animated relationships between two or more objects.
- Affected Objects: A list that appears when Specific Objects is chosen in the Affect pop-up menu. Drag objects from the Layers list into this list to be affected by the Attractor behavior when the Specific Objects option is selected in the Affect pop-up menu. To remove an item from the list, select the item and click Remove.
- Falloff Rate: This value determines how quickly the force of repulsion between objects affected by this behavior falls off. A low Falloff Rate value results in objects quickly getting up to speed as they move away from the object of repulsion. A high Falloff Rate causes objects to accelerate much more slowly. When set to Exponential, the attraction falls off more quickly than when set to Linear.
The HUD has controls for which objects are affected, as well as for Strength, Falloff Type, Falloff Rate, Influence, axis assignment, and Drag.
Repel From
Whereas the Repel behavior pushes other objects away, the Repel From behavior has the converse effect, making the object it’s applied to move away from a selected object in the Canvas.
- Affect Subobjects: This parameter appears when this behavior is applied to an object that contains multiple objects, such as a group, a particle emitter, a replicator, or a text layer. When this checkbox is selected, all objects in the parent object are affected individually. When this checkbox is deselected, all objects in the parent object are affected by the behavior together.
- Falloff Rate: This value determines how quickly the force of repulsion between objects affected by this behavior falls off. A low Falloff Rate value results in objects quickly getting up to speed as they move away from the object of repulsion. A high Falloff Rate causes objects to accelerate much more slowly. When set to Exponential, the attraction falls off more quickly than when set to Linear.
The HUD has an image well you can use to assign an object to move away from, as well as controls for Strength, Falloff Type, Falloff Rate, Influence, axis assignment, and Drag. When applied to an object that contains multiple objects (such as a group, particles, text, or the replicator), the Affect Subobjects checkbox also appears in the HUD.
Rotational Drag
This behavior is similar to the Drag behavior, except that it affects Rotation instead of position. Rotational Drag simulates friction affecting objects that are spinning due to keyframed or behavior-driven changes to the Rotation parameter. By setting higher Drag values, you can slow rotational changes to an eventual stop.
- Affect Subobjects: This parameter appears when this behavior is applied to an object that contains multiple objects, such as a group, a particle emitter, a replicator, or a text layer. When this checkbox is selected, all objects in the parent object are affected individually. When this checkbox is deselected, all objects in the parent object are affected by the behavior together.
The HUD lets you control the amount of drag. When applied to an object that contains multiple objects (such as a group, particles, text, or the replicator), the Affect Subobjects checkbox also appears in the HUD.
Spring
The Spring behavior creates a relationship between two objects, so an object with the Spring behavior applied to it moves back and forth around a second object. The Attract To parameter defines the object that serves as the target and center of the Spring behavior. Additional parameters let you adjust the speed of the behavior (Spring Tension) and the acceleration of the object at each change in direction (Relaxed Length).
If the Attract To object is at rest, the resulting motion is fairly simple and the springing object moves back and forth in a straight line. If the Attract To object is in motion, the springing object’s motion is much more complex, changing direction according to the velocity of the Attract To object.
- Affect Subobjects: This parameter appears when this behavior is applied to an object that contains multiple objects, such as a group, a particle emitter, a replicator, or a text layer. When this checkbox is selected, all objects in the parent object are affected individually. When this checkbox is deselected, all objects in the parent object are affected by the behavior together.
- Include X, Y, and Z: Buttons that allow you to specify the space in which the affected object moves back and forth around the assigned object. For example, when X and Y are enabled, the object moves back and forth in the XY plane; when Y and Z are enabled, the object moves back and forth in the YZ plane.
An image well in the HUD lets you set the Attract To object. You can also control the Spring Tension and Relaxed Length parameters and axis assignment. A checkbox lets you turn on the Repel parameter. When this behavior is applied to an object that contains multiple objects (such as a group, particles, text, or the replicator), the Affect Subobjects checkbox also appears in the HUD.
Vortex
The opposite of the Orbit Around behavior. Whereas the Orbit Around behavior causes one object to orbit around another target object, the Vortex behavior exerts a force on all objects surrounding the object to which the Vortex behavior is applied.
- Affected Objects: A list that appears when Specific Objects is chosen in the Affect pop-up menu. Drag objects from the Layers list into this list to be affected by the Attractor behavior when the Specific Objects option is selected in the Affect pop-up menu. To remove an item from the list, select the item and click Remove.
- Falloff Rate: This value determines how quickly the force of attraction between objects affected by this behavior falls off. A low Falloff Rate value results in objects quickly getting up to speed as they move toward the object of attraction. A high Falloff Rate causes objects to accelerate much more slowly. When set to Exponential, the attraction falls off more quickly than when set to Linear.
- Pole Axis: This parameter becomes available when the X, Y, and Z axes are enabled in the Include parameter. Because all points are at a fixed distance from the target or attractor object (the Pole Axis), the object can be visualized on a sphere of all possible orbits, with the target object at the center of the sphere. The Pole Axis defines the two points on the sphere that the orbit must pass through. For more information, see this parameter’s discussion in Orbit Around.
The HUD has a pop-up menu that lets you limit the objects affected by this behavior, as well as controls for Strength, Falloff Type, Falloff Rate, Influence, Drag, axis assignment, and Direction.
Wind
Apply the Wind behavior to an object to animate its position and move it in a specified direction. Unlike the Throw behavior, the velocity specified by the Wind behavior is a continuous force, and its parameters can be keyframed to achieve gradual changes in speed and direction.
The Wind behavior is better than the Throw behavior when you want to vary the speed of the affected object. You can apply another behavior (such as Randomize or Ramp) or keyframe the Velocity parameter of the Wind behavior to vary the speed and direction of the object. You cannot make gradual changes in speed or direction with the Throw behavior.
- Affect Subobjects: This parameter appears when this behavior is applied to an object that contains multiple objects, such as a group, a particle emitter, a replicator, or a text layer. When this checkbox is selected, all objects in the parent object are affected individually. When this checkbox is deselected, all objects in the parent object are affected by the behavior together.
- Air Thickness: A slider and value slider that adjust how fast the object accelerates on the X, Y, or Z axis when the speed is changed. Lower values (simulating thinner air) have less effect when pushing the object, so it takes longer to get up to speed. Higher values (thicker air) have more effect and push the object up to speed more quickly.
The HUD lets you specify the direction and speed of the Wind behavior by dragging an arrow in a circular region. The direction of the arrow defines the direction of movement in X and Y space, and the length of the arrow defines speed (velocity). A slider to the right lets you adjust the scale of the HUD control, increasing or decreasing the effect the control has over the object.
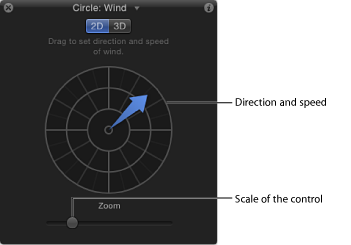
Press the Shift key while dragging the arrow to constrain it to 45 degree angles. Press the Command key to change the arrow’s direction without affecting its length.
When you click the 3D button, the HUD allows you to use the center arrow control to define the direction the object is “blown” by the wind in 3D. The Speed slider (on the left side of the HUD) lets you increase or decrease the velocity of the blown object.
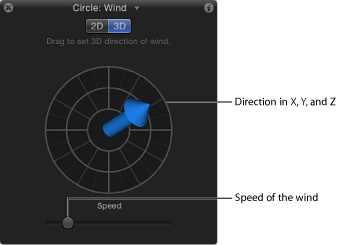
Note: The maximum speed you can define with the HUD is not the maximum speed possible. Higher values can be entered into the Velocity parameter in the Behaviors Inspector.