Changing the Timing of Behaviors
You can change a behavior’s timing to control when it starts, how long it lasts, and when it stops. There are several ways to do this. You can use the Stop parameter behavior to suspend a behavior’s effect on a single parameter. You can also trim each behavior in the Timeline. Finally, for some behaviors, you can change the Start Offset parameter to delay their beginning, and you can change the End Offset to stop the behaviors before the end of their object duration in the Timeline. These behaviors include Fade In/Fade Out, Grow/Shrink, and Snap Alignment to Motion.
Using the Stop Behavior
The easiest way to control behavior timing is to use the Stop behavior (in the Parameter category). The Stop behavior halts the animation occurring in any one parameter, whether the animation is based on keyframes in the Keyframe Editor or behaviors applied to that object.
As explained in Applying Parameter Behaviors, all Parameter behaviors can be applied to a parameter of an object (such as opacity or position) or to an object (such as text or an image). If the behavior is applied to an object, you must assign a specific parameter to the behavior (in the Behaviors Inspector).
Move the playhead to the frame where you want animation to stop.
Select the affected object, then open the Properties Inspector.
Control-click the parameter to stop, choose Add Parameter Behavior from the shortcut menu, then choose Stop.
If the behavior was applied to one dimension of a multidimensional parameter, open that parameter’s disclosure triangle and Control-click the dimensional parameter to access the same shortcut menu, then choose Stop.
The parameter is animated until the frame where the Stop behavior begins.
Note: When applied in this manner, the Stop behavior takes effect at the current frame (regardless of the Create Layers At Preference setting).
To assign the Stop behavior to a different parameter, choose a new parameter from the Apply To pop-up menu.
The Stop behavior halts the animation of all behaviors that affect the selected parameter of that object. For example, if the Gravity, Edge Collision, and Rotate behaviors are applied to a shape and you apply the Stop parameter to the shape layer’s Position parameter, the shape stops moving but continues rotating.
To control when animation affecting that parameter is stopped, trim the Stop behavior in the Timeline. For more information on trimming behaviors, see Trimming Behaviors.
For more information about applying Parameter behaviors, see Applying Parameter Behaviors.
Trimming Behaviors
When you apply a behavior to an object, the duration of the behavior in the Timeline defaults to the duration of the object to which it’s applied. However, a behavior can be modified to limit the duration of its effect. For example, if you apply the Spin behavior to a replicator layer, by default that replicator spins around for its entire duration. If you trim the Out point of the Spin behavior, the spinning stops at the new position of the Out point.
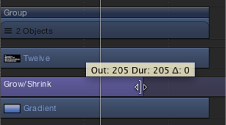
As you trim the behavior, a tooltip appears, indicating the new location of the Out point as well as the new duration of the behavior.
Move the pointer to the In or Out point of any behavior in the Timeline.
When the pointer changes to the trim pointer, do one of the following:
Drag the In point to delay the beginning of the behavior’s effect.
Drag the Out point to end the behavior’s effect before the end of the object.
Trimming the Out point of a behavior often sets the object to its original state beyond the Out point behavior. For many behaviors, using the Stop behavior to pause the object’s animation is a more efficient method than trimming its Out point. Another way to stop a behavior’s effect and leave the affected object in the transformed state is to adjust a behavior’s Start and End Offset parameters. See Changing the Offset of Parameter Behaviors for more information.
Note: The Simulation behaviors do not leave the object at the transformed state after the last frame of the trimmed behavior. For more information, see Controlling Simulation Behaviors.
Controlling Simulation Behaviors
The ideal use for behaviors (with the exception of Motion Tracking behaviors) is creating fluid motion graphics that do not require specific timing. This is especially true with the Simulation behavior group, which allows you to create some very sophisticated interactions among multiple objects in your project with minimal editing.
Unlike Basic Motion behaviors, you cannot stop or change the motion of a Simulation behavior in the Timeline. However, you can affect the rate of a Simulation behavior by modifying its duration in the Timeline. You can also change the starting frame of the behavior.
Because the Simulation behaviors simulate natural effects, such as Gravity, the laws of inertia apply: an external force sets the object in motion, and that object stays in motion even after the active force is no longer present. Changing the duration of a Timeline bar for a Simulation behavior does stop the “active” force on the object but does not stop the motion of the object. You can, of course, control Simulation behaviors by modifying their parameters.
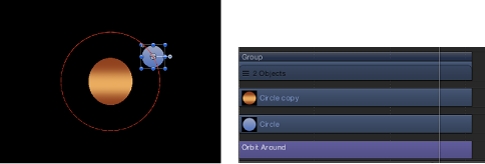
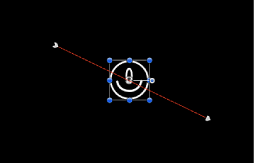
In the following image, the Orbit Around (Simulation) behavior is applied to the large circle. The center text is assigned as the object that the circle moves around. The red animation path represents the motion the circle travels over its duration. The Orbit Around behavior is the same duration (300 frames) as the large circle to which it is applied.
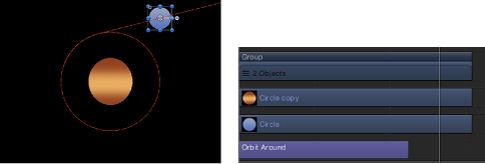
In the next image, the Orbit Around behavior is trimmed in the Timeline to a shorter duration (190 frames) than the object to which it is applied. Notice the change in the shape of the animation path: At frame 190, where the Orbit Around behavior ends, the object (the circle shape) stops moving around its target and continues moving off the Canvas. The Orbit Around behavior—the active force—is no longer present, but the motion of the circle does not stop.
Moving Behaviors in Time
In addition to changing a behavior’s duration, you can also move its position in the Timeline relative to the object under which it’s nested. This lets you set the frame where that behavior begins to take effect.
Click anywhere in the middle of a behavior’s bar in the Timeline.
Drag the behavior to the left or right to move it to another position in the Timeline.
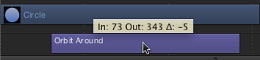
As you move the bar, a tooltip appears and displays the new In and Out points for the behavior. The tooltip also displays the delta value, which shows the number of frames you have moved the bar.
Changing the Offset of Parameter Behaviors
Many Parameter behaviors have two additional parameters, Start Offset and End Offset, which are used to change the frame where a Parameter behavior’s effect begins and ends.
The Start Offset parameter has a slider that lets you delay the beginning of the behavior’s effect, relative to the first frame of its position in the Timeline. You can adjust this parameter to make the Parameter behavior start later.
The End Offset parameter lets you offset the end of the behavior’s effect relative to the last frame of its position in the Timeline. Using this slider to stop the effect, instead of trimming the end of the behavior in the Timeline, lets you freeze the behavior’s effect on the object for its remaining duration.
The following example illustrates how to use the Start Offset and End Offset parameters with the Ramp behavior.
Select an object, such as a shape.
In the Properties Inspector, Control-click the Scale parameter, then choose Add Parameter Behavior > Ramp from the shortcut menu.
The Ramp behavior is applied to the Scale parameter of the object, and the Behaviors Inspector opens. The Ramp behavior lets you create a gradual transition in any animateable parameter.
Set the Start Value to 0 and the End Value to 200, then play the project.
The object scales from its original scale to twice its original size over the duration of the object.
Set the Start Offset to 90 and the End Offset to 90.
The object does not begin scaling until frame 90, and stops scaling 90 frames from its last frame in the Timeline.
Combining Behaviors with Keyframes
Any object can have behaviors and keyframes applied to it simultaneously. When this happens, the values generated by the behavior and the keyframed values applied to the parameter are combined to yield the final value for that parameter. This lets you combine the automatic convenience of behaviors with the direct control of keyframing to achieve your final result.
Note: Motion has a specific order of operations for keyframes and behaviors. For more information, see Behavior Order of Operations.
For example, if you create an animation path using keyframes, you can create a completely predictable and smooth movement.
However, if you apply the Randomize parameter behavior to the same object, its effect combines with the motion path you created. As a result, the animation path follows the general direction you want, with random variation in it to make it interesting.

Although this example shows how you can combine behaviors and keyframes to create animation paths, you can combine behaviors and keyframes for any parameter.
Combining Behaviors and Keyframes in the Keyframe Editor
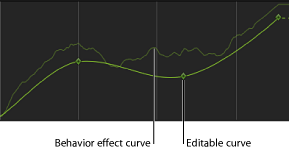
When you display a parameter that’s affected by a behavior in the Keyframe Editor, two curves appear for that parameter. A noneditable curve in the background displays the parameter as it is affected by the behavior. There are no keyframes over this first curve. Superimposed over the curve displaying the behavior’s effect is the parameter’s editable curve.
You can keyframe a parameter before or after applying a behavior to the object that affects it. When you keyframe a parameter already affected by a behavior, the value of the keyframed curve is combined with the value generated by the behavior at each frame, which raises or lowers the resulting value displayed by the background curve. The background curve doesn’t just display the behavior’s animated values, it displays the sum of all values affecting that parameter.
Raising or lowering a keyframe in the Keyframe Editor also raises or lowers the background curve, because the keyframe is modifying the values generated by the behavior.
Important: The value displayed in the Inspector for the affected parameter reflects the combined result of keyframes and behaviors applied to that parameter. Editing a parameter’s values in the Inspector only results in changes made to the underlying parameter value, whether keyframed or not. This parameter value is then combined with the behavior’s effect, yielding a final value that might differ from the value you entered.
For more information on how to use keyframes in the Keyframe Editor, see Keyframes and Curves.
Important: When you combine keyframes with multiple behaviors, the results can appear to be unpredictable, depending on the combination of behaviors applied.
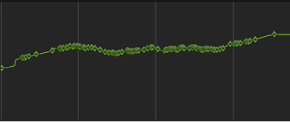
You can convert the behaviors that are applied to all parameters of an object into keyframes. Converting behaviors that have been combined with keyframes turns the sum of all behaviors and keyframes affecting that parameter into a thinned series of keyframes (a curve with fewer keyframes). This results in a final animation curve that closely replicates the shape of the background curve that appeared in the Keyframe Editor. These keyframes can then be edited in the Keyframe Editor.
The following screenshot shows the result of converting the behavior and keyframes in the previous example to a single keyframed channel that recreates the same motion, but in an editable fashion.
For more information on converting behaviors into keyframes, see Converting Behaviors to Keyframes.