Audio Parameter Behavior
Motion provides an easy and automated way for you to generate audio-driven animations in your projects, using the Audio parameter behavior. Where other behaviors are applied to an object as a whole (usually modifying multiple parameters at once), a Parameter behavior is applied to a parameter of an object. The Audio parameter behavior—available in the Parameter category in the Behaviors Library (and via the Add Behavior pop-up menu in the toolbar)—lets you make a particle system pulse to the beat of music, or have an audio track’s bass amplitude affect an object’s opacity.
In the Audio list or Media list of the Project pane, select the track.
In the toolbar, choose Parameter > Audio from the Add Behavior pop-up menu.

The Audio parameter behavior is added to the project. However, no Source Audio is yet applied.
Do one of the following:
In the Behaviors Inspector, click the To pop-up menu (in the Source Audio row) and choose a source audio track.
Drag the audio clip (or video clip with audio) from the Media list (in the Project pane) to the Source Audio well in the Behaviors Inspector.
In the Audio list, select the track.
In the Audio Track Inspector, control-click an audio parameter (such as Level), then choose Audio from the Add Parameter Behavior submenu of the shortcut menu.
The Audio parameter behavior is added to the project. However, no Source Audio is yet applied.
Do one of the following:
In the Behaviors Inspector, click the To pop-up menu (in the Source Audio row) and choose a source audio track.
Drag the audio clip (or video clip with audio) from the Media list (in the Project pane) to the Source Audio well in the Behaviors Inspector.
For more information on applying Parameter behaviors, see Applying Parameter Behaviors.
Audio
The Audio parameter behavior performs an analysis of a specific property of an audio track, then applies an animation curve to a parameter based on that analysis.
- Source Audio: Sets the audio track from which to read audio data. Can be set to any single audio track in the project, or the Master track. Drag an audio clip or a video clip with audio into the Source Audio well, or use the pop-up menu to choose a source for audio analysis.
Note: For the Audio parameter behavior to have an effect on an object, audio must be present in the Audio Timeline at the position of the behavior.
- Audio Graph: A graph displaying a visual representation of the Source Audio data analyzed by the behavior per frame.
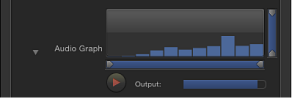
During playback initiated by the Play button beneath the Audio Graph, the selected Source Audio data appears. If audio analysis is being performed, a progress bar appears in the Audio Graph area.
The values of Low Frequency, High Frequency, Floor, and Ceiling can be set by dragging the small triangles along the bottom or right side of the graph. Or they can be set numerically using the four sliders underneath the graph to isolate specific frequencies and values for analysis.
- Smoothness: Sets the window size to smooth the result curve. Any value other than 0 triggers a keyframe reduction with an error tolerance of 1%. Values range from 0 to 10. This parameter is only available if Respond To is set to Amplitude.
Note: Depending on your audio file, Smoothness values greater than 7 may result in audio playing out of sync.
- Peaks: Sets the way the key points are linked when drawing the peak curves generated by the audio analysis. Value can be set to Sharp, Smooth, Square, or Continuous.
The different peak types are described in the list below.
Note: The examples below are for reference only. Because the audio behavior does not generate keyframes, you won’t see keyframes in the Keyframe Editor.
- Sharp: Each peak of the animation curve is described by three keyframes with a straight line drawn between them. A selected keyframe has no tangent handles.

- Smooth: Each peak of the animation curve is drawn by a single keyframe with a Bezier curve. A selected keyframe has a tangent handle to change the shape of the curve.

- Square: Each peak of the animation curve is drawn by four keyframes. A selected keyframe has no tangent handles.

- Continuous: The animation curve behaves like Smooth interpolation, but without access to Bezier handles, because they are calculated automatically from peak to peak.

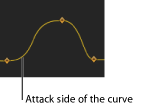
- Attack: The animation curve shows the amount of the offset in frames between the first keyframe of the curve and the peak of the curve generated by the Audio behavior. The number of frames that the curve takes to reach its peak from its initial value is called the Attack. This parameter is only available if Respond To is set to Transients.
- Release: The animation curve shows the amount of the offset in frames between the peak of the curve generated by the Audio behavior and the last keyframe of the curve. The number of frames that the curve takes to reach its final value from its peak is called the Release. This parameter is only available if Respond To is set to Transient.
The HUD contains the Source Audio, Respond To, Graph Range, Audio Graph, Scale, and Apply To controls.