Applying and Removing Behaviors
Behaviors are applied to objects in one of the following ways:
Dragging a behavior to an object in the Canvas, Layers list, or Timeline
To apply a behavior to an object in the Timeline, drag the behavior to the object in the Timeline layers list or the Timeline track area.
Note: It is usually easier to drag a behavior to a camera or light in the Layers list or Timeline than to such objects in the Canvas.
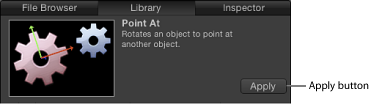
Selecting an object, selecting a behavior in the Library, and then clicking the Apply button in the preview area
Selecting an object, and then choosing a behavior from the Add Behavior pop-up menu in the toolbar
Clicking the pop-up menu arrow at the right of a parameter's row in the Inspector, then choosing a Parameter behavior from the menu
Control-clicking a parameter of an object (including the parameters of other behaviors), and choosing a Parameter behavior from the shortcut menu
Behaviors are removed by selecting the behavior in the Canvas, Layers list, Timeline, or Inspector and pressing Delete. For detailed information about applying and removing behaviors, see Applying Behaviors and Removing Behaviors.
Where Behaviors Appear
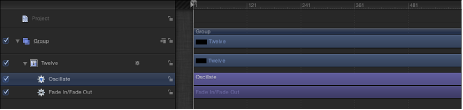
When you apply a behavior to an object, it appears nested underneath that object in the Layers list and in the Timeline.

A behavior icon (a gear) also appears to the right of the object name in the Layers list and Timeline. Clicking this icon enables and disables all behaviors applied to that object. The actual parameters that let you adjust the attributes of a behavior appear in the Behaviors Inspector.
New behaviors you apply to an object appear above behaviors applied previously.
Behaviors can be hidden from view in the Layers list using the Show/Hide Behaviors button in the lower-right corner of the Layers list. For more information, see Hiding and Showing Effects.
When any behavior is applied to an object in your project, a behavior icon (a gear) appears in the row of the affected parameter in the Properties, Behaviors, or Filters Inspector. This icon shows you that a behavior is influencing that parameter.
Animation Paths
When some behaviors are applied to an object, an animation path appears and displays the projected path of the object over time. Consider this path a “preview” of the animation created by the behavior. Unlike animation paths created using keyframes or the path created by the Motion Path behavior, animation paths for behaviors cannot be edited. To show or hide all types of paths, use the View pop-up menu above the Canvas.
Behavior Effects in the Keyframe Editor
If you open the Keyframe Editor and look at a parameter affected by a behavior, you see a noneditable curve that represents the behavior’s effect on that parameter. The noneditable curve (in this example, opacity channel animation that corresponds to the Fade In/Fade Out behavior) appears in addition to that parameter’s editable curve, which can be used in combination to keyframe that parameter.

Note: Use the pop-up menu above the Keyframe Editor to select which parameters are displayed and to create curve sets. For more information on curve sets, see Custom Parameter Sets.
For more information on combining behaviors and keyframes, see Combining Behaviors with Keyframes.
Applying Behaviors
You can apply behaviors to objects in the Canvas, Layers list, or Timeline. Some behaviors animate specific parameters of the layer to which they’re applied. For example, the Throw behavior affects only an object’s Position parameter, and the Grow/Shrink behavior affects only an object’s Scale parameter. Other behaviors animate the parameters of layers that surround the layer to which the behavior is applied. For example, the Attractor behavior causes other layers to move toward the affected layer by animating each of their Position parameters.
Important: Text, Particles, Replicator, Audio, Shape, and Camera behaviors should only be applied to their namesake objects.
Parameter behaviors can be applied to a parameter of an object (such as position). For more information, see Applying Parameter Behaviors.
You can also apply behaviors to groups in the Layers list or Timeline. Depending on the applied behavior, all objects nested in that group are affected in one of two ways: as if they were a single object or as individual elements. You can often change this result by adjusting the Affect or Affect Subobjects parameter in the Behaviors Inspector.
Tip: If you do not see the expected result when applying behaviors to objects, try turning the Affect Subobjects parameter on or off or choosing a different option from the Affect pop-up menu. These parameters determine whether the entire group or its components (such as the child objects nested in that group) are affected by the behavior and how an object interacts with surrounding objects, respectively. The Affect Subobjects checkbox only appears in the Inspector when the Throw and Spin behaviors, or the Simulation behaviors, are applied to a group or object that contains multiple objects, such as a particle emitter or text.
Drag a behavior from the Library to an appropriate object in the Canvas, Layers list, or Timeline.
To apply a behavior to an object in the Timeline, drag the behavior to the object in the Timeline layers list or the Timeline track area.
Note: It is usually easier to drag a behavior to a camera or light in the Layers list or Timeline than to the object in the Canvas.
An advantage to applying behaviors from the Library is the ability to preview the animation created by the behavior in the Library preview area.
Select an object in the Canvas, Layers list, or Timeline, then select a behavior from the Library stack and click Apply in the preview area.
Select an object in the Canvas, Layers list, or Timeline, then choose a behavior from the Add Behavior pop-up menu in the toolbar.

Select all objects to apply the behavior to.
In the Layers list, Canvas, or Timeline, Shift-click to select a contiguous set of objects, or Command-click to select individual, noncontiguous objects.
Do one of the following:
In the toolbar, choose a behavior from the Add Behavior pop-up menu.
Select a behavior in the Library, then click Apply in the preview area.
Important: Not all behaviors apply motion to an object. Some behaviors, such as Throw, require you to set the throw velocity (in the HUD or in the Inspector) before the object is “thrown.” Other behaviors, such as Orbit Around, require a source object to act as the central object for other objects to move around.
When a behavior is applied to an object, the object parameters affected by that behavior are animated based on the behavior’s default settings. For example, if you apply the Gravity behavior to an object in the Canvas, that object’s position is animated and it moves down, according to the Gravity behavior’s default setting.
Removing Behaviors
Because behaviors don’t add keyframes, removing a behavior instantly eliminates its animated effect. All types of behaviors are removed in the same way.
Select a behavior in the Layers list, Timeline, Behaviors Inspector, or pop-up menu in the title bar of the HUD.
Do one of the following:
Choose Edit > Delete.
Control-click the behavior in the Layers list or Timeline, then choose Delete from the shortcut menu.
Press Delete.
Applying Parameter Behaviors
Although all behaviors affect parameters of the objects to which they’re applied, Parameter behaviors are applied to specific parameters of your choosing.
This includes the parameters of filters, emitters and cells in particle systems, shapes, text, and so on. You can even apply Parameter behaviors to the parameters of other behaviors applied to an object.
Here’s a simple comparison of a behavior and a Parameter behavior. A Throw behavior is applied to a text layer and the text travels across the Canvas. The Throw behavior affects the Position parameter of the text layer. You can accomplish a similar effect by applying a Ramp parameter behavior to the Position parameter, but the Ramp behavior can also be applied to any other parameter such as Tracking or Opacity.
A Parameter behavior’s effect on an object depends on the parameter to which it is applied. For example, if you apply the Randomize parameter behavior to a particle emitter’s Position parameter, the emitter drifts randomly around the screen when the project plays. Applying the Randomize parameter behavior to a shape’s Scale parameter makes the shape randomly grow and shrink.
Important: Although you can apply a Parameter behavior to an object, the applied behavior does not affect the object until you select a parameter to apply the Parameter behavior to. A more direct way to apply a Parameter behavior is by using the shortcut menu in the Inspector.
Select the object to apply the Parameter behavior to.
Do one of the following:
Control-click a parameter’s name in the Inspector, choose Add Parameter Behavior, then choose an item from the submenu.
Click the parameter’s Animation menu, choose Add Parameter Behavior, then choose an item from the submenu.
Control-click a parameter in the HUD, choose Add Parameter Behavior from the shortcut menu, then choose an item from the submenu.
Control-click a parameter in the Keyframe Editor, then choose a Parameter behavior from the shortcut menu.
When you apply a Parameter behavior, the Behaviors Inspector opens.
Note: Use the pop-up menu above the Keyframe Editor to choose the parameters you want displayed in the Keyframe Editor. For more information, see Filtering the Parameter List.
Do one of the following:
Drag a Parameter behavior from the Library to an appropriate object in the Canvas, Layers list, or Timeline.
Note: It is usually easier to drag a behavior to a camera or light in the Layers list or Timeline than to the object in the Canvas.
Select an object in the Canvas, Layers list, or Timeline, open the Add Behavior pop-up menu in the toolbar, then choose an item from the Parameter submenu.
The behavior is applied to the object, but no parameter is assigned to the behavior.
To assign a specific parameter to the Parameter behavior, do one of the following:
Select the Parameter behavior, then choose a parameter from the Apply To pop-up menu in the HUD.
Select the Parameter behavior, then choose a Parameter behavior from the Apply To pop-up menu in the Behaviors Inspector.
The parameter to which the behavior is applied appears in the Apply To text field.
Note: If you save a Parameter behavior as a favorite, the parameter assignment is saved with the rest of that behavior’s settings. As a result, the saved behavior will affect the same parameters of any object it is applied to.
Where Parameter Behaviors Appear
Like other behaviors, Parameter behaviors appear nested underneath the objects they’re applied to in the Layers list and Timeline, along with any other behaviors applied to that object.
Note: Although Parameter behaviors appear nested under objects in the Layers list, each Parameter behavior is applied to a single parameter of an object, and not the object itself.
The Oscillate parameter behavior icon in the following screenshot includes an image similar to a funnel. The funnel represents the “channeling” of individual parameters.
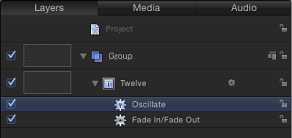
The same icon is used for the representation of Parameter behaviors in the Timeline.
Control-clicking a parameter’s name in the Inspector, or clicking the pop-up menu at the right of a parameter opens the Animation menu. The Animation menu displays the names of behaviors applied to that parameter. Choosing a behavior opens the Behaviors Inspector.
As with all other behaviors, when a Parameter behavior is applied to an object in your project, a behavior icon (a gear) appears over the Keyframe button of the affected parameter in the Properties, Behaviors, or Filters Inspector where it is applied.
Reassigning a Parameter Behavior to Another Parameter
After you apply a Parameter behavior, it remains assigned to that parameter unless you reassign it. This is possible using the Apply To pop-up menu, located at the bottom of the Parameter behavior controls in the HUD or Behaviors Inspector.
The Apply To pop-up menu displays all properties available for the object the behavior is applied to. If an object has other behaviors or filters applied to it, those parameters also appear in submenus of the Apply To pop-up menu.
In the Layers list, Timeline, or Behaviors Inspector, select the Parameter behavior to reassign.
In the HUD, choose a new parameter from the Apply To pop-up menu.
The Parameter behavior is applied to the newly chosen parameter and the Apply To field is updated to reflect the new assignment. In the Inspector, a behavior icon (a gear) now appears next to the new parameter.
Select the object containing the Parameter behavior to reassign.
In the Behaviors Inspector, choose a new parameter from the Apply To pop-up menu.
