2D Transform Tools
Before you transform a layer in the Canvas, make sure the pointer is set to the correct tool. These tools can be selected from the toolbar. Selecting a 2D transform tool in the toolbar activates a corresponding onscreen control in the Canvas; you modify layers by manipulating the active onscreen control.
There are eight 2D transform tools, available in a pop-up menu on the left side of the toolbar:
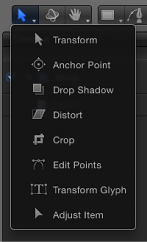
- Select/Transform: Scales, rotates, and repositions selected layers.
- Anchor Point: Offsets the anchor point used for all layer transforms.
- Drop Shadow: Manipulates layer drop shadows in the Canvas.
- Distort: Stretches a layer into polygonal shapes.
- Crop: Cuts off pixels from any of the layer’s four edges.
- Edit Points: Manipulates control points on shapes, paths, and curves.
- Transform Glyph: Transforms individual letters in a text layer. The Transform Glyph tool is also a 3D tool, using the same transform controls as the 3D Transform tool.
- Adjust Item: Moves onscreen controls such as gradients, center points of filters, emitter attributes, and so on.
Note: Some of the tools are activated when specific layers are selected. For example, the Edit Points tool is selected after you create a shape or mask layer, so you can immediately adjust the Bezier or B-Spline control points.
Click the Select/Transform tool in the toolbar, then, while holding down the mouse button, choose a tool from the pop-up menu.
With a layer in the Canvas selected, press Tab. Pressing Tab repeatedly cycles through the tools in order.
Note: When pressing Tab, the 3D Transform tool is activated between the 2D Select/Transform tool and the Anchor Point tool. For more information about 3D transform tools, see 3D Transform Tools.
Control-click any layer in the Canvas, then choose a tool from the shortcut menu.
The options in the shortcut menu vary depending on the type of layer selected. For example, a shape contains shape-specific options such as Stroke, Edit Gradient, and Edit Points. Those options do not apply to an image.
Note: Press Shift-Tab to cycle through the tools in reverse.
Moving Layers in the Canvas
The simplest thing you can do to start arranging the layers in your project is to move them around. Except for the Drop Shadow tool, all transform tools let you reposition layers, so this is the one operation you can perform regardless of the selected tool.
The easiest way to reposition a layer is to drag it in the Canvas. If you want to make more precise adjustments to a layer’s position, you can also change the numerical values of a layer’s X and Y Position parameters in the Properties Inspector. For more information on layer properties, see Parameters in the Properties Inspector.
Pressing Shift while dragging constrains movement to the X or Y axis, even when working in a 3D group.
You can move layers anywhere in the frame defined by the Canvas, but you can also drag layers past the edge of the frame. By default, when you move a layer past the edge of the frame, it becomes invisible, although you can still manipulate it using its bounding box.
Note: The bounding box that indicates the position of layers located offscreen only appears when those layers are selected.
You might need to move a layer past the edge of the frame when you plan on animating a layer flying onscreen. Before animating it, you need to move it to a position offscreen to achieve this effect.
Note: To make a layer that is partially or totally outside the Canvas visible, choose Show Full View Area from the View pop-up menu (above the right side of the Canvas).
Select layers.
Do one of the following:
Drag a layer to another location in the Canvas. If more than one layer is selected, dragging one layer moves them all.
Holding down the Command key, press the Right Arrow, Left Arrow, Up Arrow, or Down Arrow key to nudge the selected layers one pixel at a time.
Holding down the Command and Shift keys, press the Right Arrow, Left Arrow, Up Arrow, or Down Arrow key to nudge the selected layers ten pixels at a time.
Tip: When repositioning very small layers, zoom into the Canvas to get a better view. For information on zooming in the Canvas, see Canvas Zoom Level.
To move a layer in 3D space, you must select the 3D Transform tool or use the 3D onscreen controls. For more information on moving layers in 3D space, see 3D Transform Tools.
Select the layer to duplicate, then Option-drag the layer.
Control-click the layer, then choose Duplicate from the shortcut menu.
A duplicate is created in the Canvas.
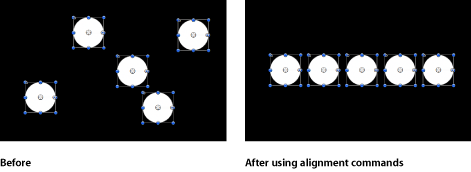
Using Object Alignment Commands
The Alignment submenu in the Object menu contains commands that let you reposition any number of simultaneously selected layers to align with one another in various ways. These commands make it easy to organize a jumble of layers into an even layout.
In each operation, the left, right, top, and bottom of the selected layers are defined by the bounding box that surrounds each layer. The position of the anchor point is ignored.
Each of the following commands affects the Position parameter of each layer:
- Align Left Edges: Layers are moved horizontally so their left edges line up with the leftmost layer in the selection.
- Align Right Edges: Layers are moved horizontally so their right edges line up with the rightmost layer in the selection.
- Align Top Edges: Layers are moved vertically so their tops line up with the topmost layer in the selection.
- Align Bottom Edges: Layers are moved vertically so their bottoms line up with the bottommost layer in the selection.
- Align Far Edges: Layers are moved in Z space so their far edges line up with the furthest layer in the selection.
- Align Near Edges: Layers are moved in Z space so their near edges line up with the closest layer in the selection.
- Align Horizontal Centers: Layers are moved horizontally so their centers line up along the center point between the leftmost and rightmost layers in the selection.
- Align Vertical Centers: Layers are moved vertically so their centers line up along the center point between the topmost and bottommost layers in the selection.
- Align Depth Centers: Layers are moved in Z space so their centers line up along the center point between the farthest and nearest layers in the selection.
- Distribute Lefts: Layers are moved horizontally so the left sides of all layers are evenly distributed, from right to left, between the leftmost and rightmost layers in the selection.
- Distribute Rights: Layers are moved horizontally so the right sides of all layers are evenly distributed, from right to left, between the leftmost and rightmost layers in the selection.
- Distribute Tops: Layers are moved vertically so the tops of all layers are evenly distributed, from top to bottom, between the topmost and bottommost layers in the selection.
- Distribute Bottoms: Layers are moved vertically so the bottoms of all layers are evenly distributed, from top to bottom, between the topmost and bottommost layers in the selection.
- Distribute Far: Layers are moved in Z space so the far edges of all layers are evenly distributed along the Z axis, from closest to furthest, between the closest and furthest layers in the selection.
- Distribute Near: Layers are moved in Z space so the near edges of all layers are evenly distributed along the Z axis, from closest to furthest, between the closest and furthest layers in the selection.
- Distribute Horizontal Centers: Layers are moved horizontally so the centers of all layers are evenly distributed, from left to right, between the leftmost and rightmost layers in the selection.
- Distribute Vertical Centers: Layers are moved vertically so the centers of all layers are evenly distributed, from top to bottom, between the topmost and bottommost layers in the selection.
- Distribute Depth Centers: Layers are moved in Z space so the centers of all layers are evenly distributed, from closest to furthest, between the closest and furthest layers in the selection.
Using the Select/Transform Tool
The default tool is the Select/Transform tool, which activates onscreen controls that enable you to adjust a layer’s scale, position, and rotation.
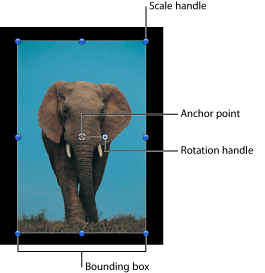
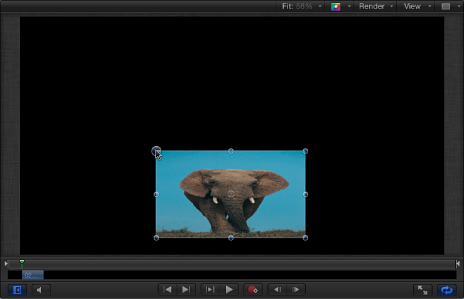
Scaling
When you select a layer, eight scale handles appear around the edge of the layer’s bounding box. Drag the handles to resize the layer. By default, the width and height of a layer are not locked together when you adjust scale handles. This means that the aspect ratio of a layer can be changed. (The aspect ratio of a layer is the ratio of its width to its height.) To preserve a layer’s aspect ratio, press Shift while dragging a scale handle. Changes made to the scale of a layer are applied to the Scale parameter in the Properties Inspector.
Note: The onscreen Select/Transform controls for Motion-created shapes include a roundness handle in the upper-left corner of the bounding box; this control is not present in the Select/Transform controls for other layers. For more information, see Editing Shapes.
Click to select the layer in the Canvas.
Note: If you have another tool selected, such as a Mask or Shape tool, pressing the S key returns you to the 2D transform tools.
A bounding box appears around the selected layer.
Note: You can also Control-click the layer in the Canvas, then choose Transform from the shortcut menu.
Do one of the following:
Drag a corner handle to resize the layer’s width and height at the same time. By default, you can resize the width and height independently, by any amount.
Press Shift, then drag a corner handle to resize the layer while locking its width and height together, maintaining the layer’s current aspect ratio.
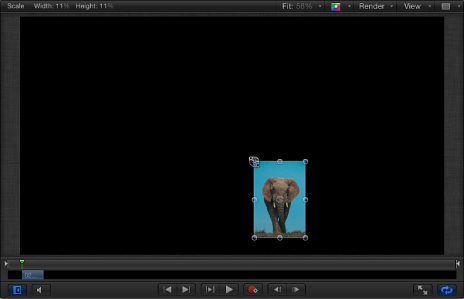
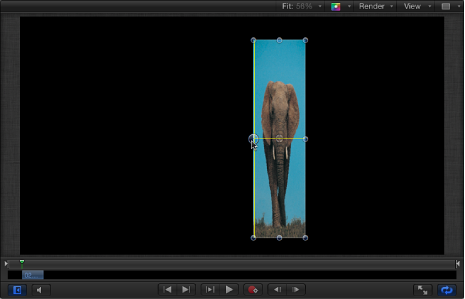
Drag the top or bottom scale handle to limit scale changes to the layer’s height, or drag the left or right scale handle to limit scale changes to the layer’s width.
Press Option while dragging any scale handle to resize a layer around its anchor point, rather than unilaterally.
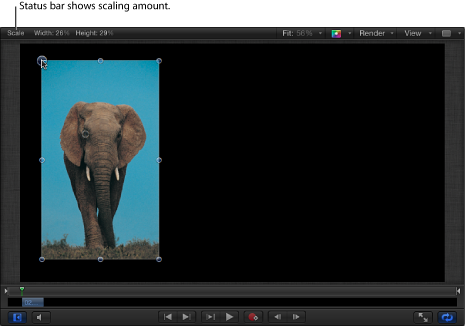
As you drag the scale handles, the new width and height percentages appear in the status bar above the Canvas.
Note: Scaling the width or height of a layer by a negative value reverses the image, flipping its direction.
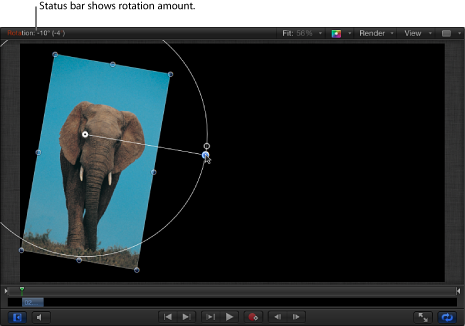
Rotating
The Select/Transform tool also activates a handle that allows you to rotate the image around its anchor point. For animation purposes, Motion keeps track of the number of times you’ve rotated the layer and stores this value in that layer’s Rotation parameter in the Properties Inspector.
Click to select the layer in the Canvas.
Note: The Select/Transform tool is the default mode when Motion opens. If the Select/Transform tool is not enabled, choose it from the 2D transform tools pop-up menu in the toolbar.
Do one of the following:
Drag the rotation handle to rotate the layer.
Press Shift while you drag the rotation handle to constrain the angle of the selected layer to 45-degree increments.
As you drag the rotation handle, the original angle of the layer is indicated by a small circle that appears on a larger circle surrounding the layer’s anchor point. Additionally, the status bar shows you the new angle of rotation.
Using the Anchor Point Tool
Using the Anchor Point tool, you can move any layer’s anchor point, changing the way different geometric transforms are performed.
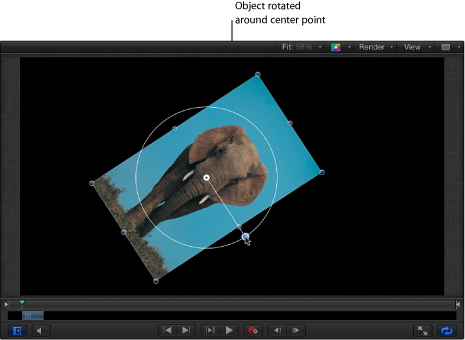
Layers rotate around the anchor point, but the anchor point also affects resizing operations. For example, the default anchor point for any layer is the center of the bounding box that defines its edges. If you rotate a layer, it spins around this central anchor point.
If you offset the anchor point, however, the layer no longer rotates around its own center, but instead rotates around the new anchor point.
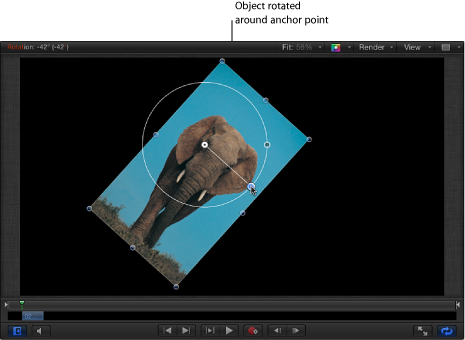
This not only affects the rotation of a layer, but any moving and scaling operations performed upon that layer as well. Changes made to a layer’s anchor point are stored in the Anchor Point parameter of the Properties Inspector.
Choose the Anchor Point tool from the 2D tools pop-up menu in the toolbar.

In the Canvas, the layer’s anchor point appears as a round target surrounded with three colored arrows representing the X, Y, and Z coordinate axes. For more information on coordinate axes, see 3D Transform Onscreen Controls.
Do one of the following:
Drag the white circle to move the anchor point vertically or horizontally.
Drag an arrow to move the anchor point along the corresponding axis.
As you drag the anchor point, a line stretches from the default position of the anchor point to its new position. Additionally, the status bar shows you the anchor point’s new coordinates and the delta (amount of change) between the anchor point’s new and old positions.
Note: If the anchor point is close to the center or edges of the layer, and both Snapping and Dynamic Guides are turned on, the anchor point snaps to that location.
Using the Drop Shadow Tool
The Drop Shadow tool activates onscreen handles that can be used to change the blur, angle, and distance of a layer’s drop shadow.
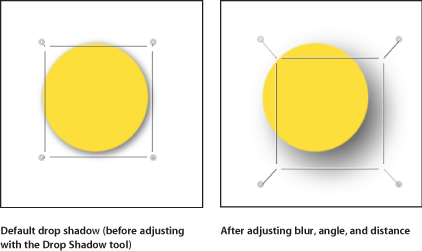
Choose the Drop Shadow tool from the 2D tools pop-up menu in the toolbar.

In the Canvas, drag a corner handle to adjust the blur of the drop shadow.
Drag in the shadow’s bounding box to adjust the distance and angle of the drop shadow.
For more information on working with drop shadows, see Drop Shadows.
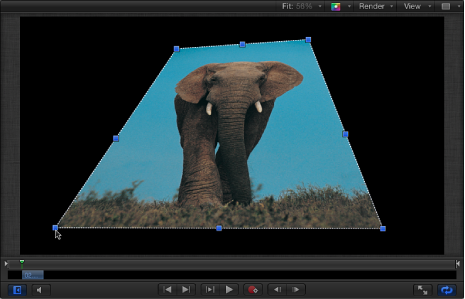
Using the Distort Tool
Using the Distort tool you can reposition a layer’s corner points independently, and slant or shear its midsection points horizontally or vertically.
Choose the Distort tool from the 2D tools pop-up menu in the toolbar.
In the Canvas, drag the four corner handles to stretch the layer into a shape.
After you distort a layer, you can revert to the layer’s original shape by deselecting the layer’s Four Corner checkbox in the Properties Inspector. Doing so resets the shape of the layer without resetting the shape you defined in the Four Corner parameters of the Properties Inspector.
Note: The Four Corner parameters can be used in combination with a tracking behavior to create a four-corner track on a foreground layer. For more information, see Option 2: Corner-Pin the Object Before Tracking.
Choose the Distort tool from the 2D tools pop-up menu in the toolbar.

In the Canvas, drag a shear handle to slant the layer. The top and bottom handles angle the layer horizontally. The left and right handles angle the layer vertically.
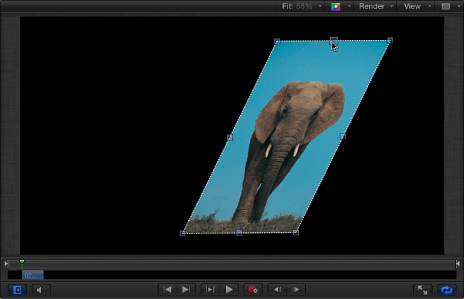
Note: Shearing a layer using the Distort tool does not affect the Shear parameter in the Properties Inspector. Instead, the Distort tool modifies the Four Corner parameters to simulate a Shear effect. You can still modify the Shear parameter, effectively shearing the shear simulation for interesting results.
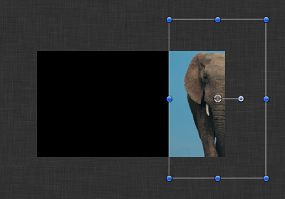
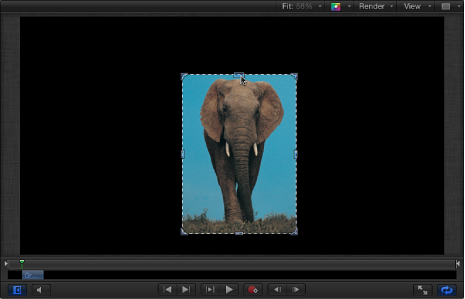
Using the Crop Tool
The Crop tool activates onscreen cropping handles that you can drag to resize the borders of a layer.
Cropping allows you to chop off any of the four edges of a layer to eliminate parts you don’t want to see in your composition. Common examples of layers you’d want to crop are video clips with a black line or unwanted vignetting around the edges. You can use the crop operation to remove these undesirable artifacts. You might also crop a layer to isolate a single element of the image.
Note: If you must isolate a more irregularly shaped layer, or you want to create a border of a specific shape, see Using Shapes, Masks, and Paint Strokes.
Choose the Crop tool from the 2D tools pop-up menu in the toolbar.

In the Canvas, drag any of the eight handles around the edge of the layer to crop the sides:
Drag the top, left, right, or bottom handle to only crop one edge.
Drag a four corner handle to crop two adjacent edges simultaneously.
Press Shift while you drag to constrain corner or edge cropping to the aspect ratio of the layer.
Note: If a layer is modified with the Distort tool, the Crop tool and its onscreen controls become disabled. However, you can still crop a distorted layer by adjusting its Crop parameter settings in the Properties Inspector.
Additionally, the crop area and the image can be manipulated separately.
Drag inside the crop area.
The crop area moves, allowing you to adjust the crop to a new location without changing its size or shape.
Press Command while you drag inside the crop area.
The crop area remains static, but the image underneath it moves, allowing you to change the visible area of the layer.
Using the Edit Points Tool
You can modify a shape or mask in the Canvas using the Edit Points tool.
After you create the shape or mask, choose the Edit Points tool from the 2D tools pop-up menu in the toolbar.
Note: You can also double-click the shape, or Control-click the layer, then choose Edit Points from the shortcut menu.

The layer’s control points become active.
In the Canvas, drag the points to modify the shape of the layer.
For more information on working with shapes and masks, see Using Shapes, Masks, and Paint Strokes.
Using the Transform Glyph and Adjust Item Tools
The Transform Glyph tool, available when a text layer is selected, activates onscreen controls that allow you to modify the position and X, Y, or Z rotation for individual characters (glyphs) in a text layer.
For information on using the Transform Glyph tool, see Adjusting Glyph Attributes.
The Adjust Item tool activates onscreen controls that allow you to manipulate filters, behaviors, generators, and other objects. For example, you can use the Adjust Item tool to adjust the center point of a blur filter, the shape of a particle emitter, or the settings of a gradient.