Match Move Workflows
This section provides a general overview of several behavior workflows, including four-corner pinning. For a full description of Match Move parameters, see Match Move Controls.
To use a Match Move behavior, you need at least two objects in your project: a background or source object and a foreground or destination object. The source object provides movement data based on a tracking analysis of its video or its animation attributes (keyframes or behaviors applied to a shape, for example). The movement from the source object is then applied to the destination object. The destination object can be a shape, text, particle emitter, and so on.
Using Match Move to Track a Background Element
In this typical workflow, the Match Move behavior tracks an element of a background video clip and then applies the resulting track data to a foreground element. As a result, the foreground element matches the movement of the tracked element in the background clip.
Create a Motion project containing a video clip and a shape or image object.
The video clip becomes the background element. The shape or image object serves as the foreground element.
Play the background clip several times to determine a good, clearly defined track analysis point.
Select the foreground object, then choose Motion Tracking > Match Move from the Add Behavior pop-up menu in the toolbar.
A single onscreen tracker (a red crosshair in a circle) is added to the Canvas. Because the default Match Move tracker records position data, it is known as an anchor tracker. (In the Behaviors Inspector, you can deactivate this tracker by deselecting the Anchor checkbox.)
Determine if you need to activate additional trackers for two- or four-point tracking.
For two-point tracking, select the Rotation-Scale checkbox in the Behaviors Inspector (under the Anchor checkbox).
For four-point tracking, choose Four Corners from the Type pop-up menu in the Behaviors Inspector and proceed to Four-Corner Pinning with Match Move.
Move the playhead to the frame where you want the track analysis to begin.
In the Canvas, drag the tracker (or trackers) to the reference area (or areas) to track.
As you drag the tracker in the Canvas, the region around the tracker becomes magnified to help you find a suitable reference pattern.
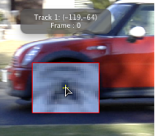
Click the Analyze button in the HUD or Behaviors Inspector.
The foreground element is tracked to the background element.
Match Move and Two-Point Tracking
If you use two-point tracking in a Match Move behavior, turn on (or off) the Position, Scale, or Rotation buttons (in the Adjust row of the Behaviors Inspector) to add or remove tracking parameters, thereby achieving different effects.
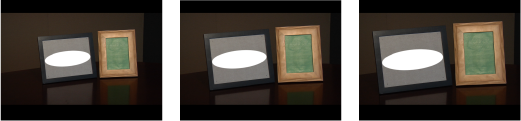
In the following example, an oval shape (the foreground object) is match-moved to a video clip of picture frames (the background object) using two-point tracking. In the first three images below, only Position is enabled in the Adjust row of the Behaviors Inspector. As a result, although the camera pushes in toward the picture frames, the white elliptical shape does not change its scale or rotation based on the position of the two trackers.

In the next example, Position, Scale, and Rotation are enabled in the Adjust row of the Behaviors Inspector. Consequently, the white elliptical shape changes its position, scale, and rotation based on the position of the two trackers, matching the camera’s push toward the picture frames and preserving the illusion that the shape is physically attached to the picture frame.
Note: When using four-point tracking, scale and rotation are applied to the corner-pinned object.
Using Match Move to Apply Animation Data to a Project Element
You can instantly apply the animation of a source object to a destination object via the Match Move behavior, without tracking analysis. The source object can be animated by behaviors or keyframes.
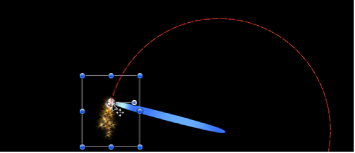
The following simple example uses a magic wand image (made up of a rectangle shape) animated using the Spin behavior. The animation of the wand is then tracked to a particle emitter to create the illusion of sparkles flying off the tip of the wand.
With the destination object selected, choose Motion Tracking > Match Move from the Add Behavior pop-up menu in the toolbar.
In this example, a Match Move behavior is applied to a nonanimated particle emitter.
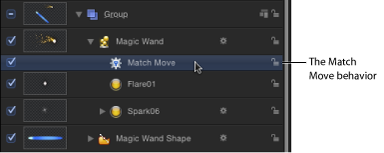
The closest animation data (such as position or rotation changes caused by keyframes or behaviors) beneath the Match Move behavior in the Layers list is applied as the source and appears in the Source well. In this example, the spinning Magic Wand Shape is the source animation.
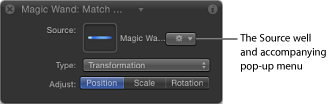
Important: Animated objects, tracking behaviors, and footage can be dropped in the Source wells.
Ensure that the Type parameter is set to Transformation in the Behaviors Inspector.
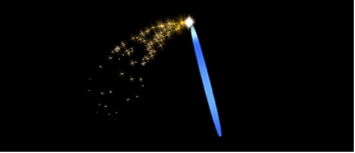
Position the destination object (the object to which you applied the Match Move behavior—in this case, the particle emitter) in the Canvas at the location you want.
In this example, the particle emitter is positioned at the tip of the wand. The motion path inherited from the source object appears in the Canvas, attached to the destination object.
As a result, the particle emitter and the wand now share the same animation path.
Play the project.
The particles match the movement of the wand.
Reordering Match Move Behaviors
When you add a Match Move behavior to a project, the closest active footage or animated object in the Layers list below the clip with the behavior is applied as the source animation. This source of animation appears in the Source well of the Match Move Behaviors Inspector. When you move Match Move behaviors in the Layers list, that data is reset. To retain the source animation data, rather than dragging to reorder layers, copy the Match Move behavior and paste it to another object.
Select the behavior to copy in the Layers list.
Choose Edit > Copy (Command-C).
Select the layer to apply the copied behavior to.
Choose Edit > Paste (Command-V).
The copied behavior is applied to another object.
Note: You can also Option-drag the behavior to copy and paste it to a different object.
Four-Corner Pinning with Match Move
The Match Move behavior allows you to track four points on a background clip and apply the recorded motion to the four corners of a foreground object. There are two basic four-corner pinning workflows. In the first example, a foreground object is pinned to a background element using the four-corner trackers. This workflow is useful when the pinned image is the same size as the background reference patterns to be tracked. In the second example, the foreground object is corner-pinned using onscreen controls before applying the Match Move behavior. This method allows you to position, resize, and rotate the foreground object to fit the background reference pattern.
Motion offers many tracking workflows because shots vary greatly, and tracking success is unpredictable. Several tracking attempts are often required before a satisfactory track is achieved.
Note: If one of the Match Move pinning options below doesn’t result in a successful track, try four-point tracking using the Analyze Motion behavior or the Stabilize behavior. For more information, see Using a Non-Match Move Four-Point Track for Corner-Pinning.
There are special considerations when corner-pinning groups. For more information, see Tracking and Groups.
Option 1: Pinned Image Is Locked to the Reference Points
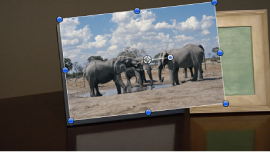
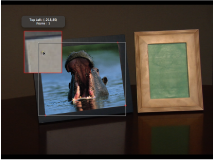
This workflow is ideal for a four-corner pin in which the transformed or pinned image is the same size as the background frame (or reference patterns) it is being tracked to. In the following example, a foreground image is pinned to a background clip of a picture frame.
Drag the playhead to the frame where you want to start the track analysis, then apply a Match Move behavior to the foreground object.
In the Behaviors Inspector, choose Four Corners from the Type pop-up menu.

Note: The Four Corners option is not available when Match Move is applied to a 3D group. To corner-pin a 3D group, select the Flatten checkbox in the Group Inspector.
In the Canvas, a tracker appears at each corner of the foreground object’s bounding box. In the Inspector, the default track list (Anchor and Rotation-Scale), is replaced with the Top Left, Top Right, Bottom Right, and Bottom Left trackers.
As with the Analyze Motion trackers, when you drag a tracker to a new position in the Canvas, a magnified inset appears to help you position each tracker.

In the Canvas, drag each tracker to a corner of the background element (in this example, the corners of the picture frame).
Click the Analyze button in the HUD or Behaviors Inspector.
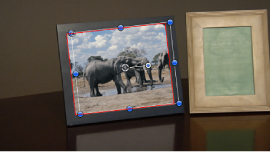
The foreground element is pinned to the background element; four motion paths show the transformation occurring at each corner.
Note: In this example, a reflection is created on the table using a duplicated and transformed copy of the tracked image.
To fine-tune the track (when Four Corners is chosen from the Type pop-up menu), you might need to make minor adjustments to the foreground element, such as modifying its scale or rotation. When you choose the Attach to Source option from the Transform pop-up menu in the Behaviors Inspector, you cannot transform the tracked object. To transform the tracked object, choose Mimic Source from the Transform pop-up menu.
To transform the foreground element after the tracking data is applied:
From the Transform pop-up menu in the Behaviors Inspector, choose Mimic Source.
Open the Properties Inspector and make any necessary adjustments to the foreground object using the Scale, Rotation, and other parameters.
For more information on the Mimic Source and Attach to Source transform options, see Match Move Controls.
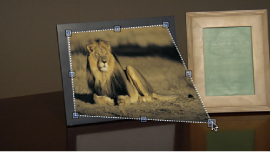
Option 2: Corner-Pin the Object Before Tracking
In this workflow, a foreground object is pinned to a background picture frame using the Four Corner parameter in the Properties Inspector before applying the Match Move behavior.
Select the foreground object to corner-pin.
In the toolbar, choose the Distort tool from the 2D transform tool pop-up menu.
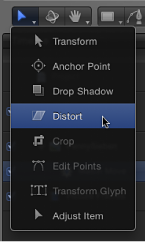
In the Canvas, drag each corner of the foreground object into the correct position.
You can fine-tune the corner positions by adjusting the Position, Rotation, Scale, and Four Corner parameters in the Properties Inspector.
When you drag a corner in the Canvas, the Four Corner checkbox is selected in the Properties Inspector.
Tip: You can lower the opacity of the foreground object to better see the reference points on the background clip. You may also want to disable snapping so the image you are adjusting does not snap to the Canvas guidelines. To turn snapping on or off, choose View > Snap or press N.
Move the playhead to the frame where you want to start the track analysis, then apply the Match Move behavior to the foreground object.
In the Canvas, a tracker appears at each corner of the foreground object. In the Inspector, the default track list (Anchor and Rotation-Scale) is replaced with the Top Left, Top Right, Bottom Right, and Bottom Left trackers.
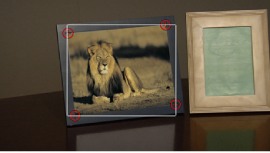
If necessary, drag each tracker in the Canvas to further fine-tune its position, watching the magnified view in the Tracker Preview area of the Inspector.
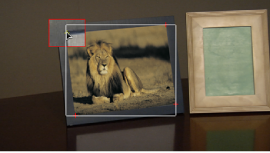
Important: To move the tracker positions independently of the foreground object, choose Mimic Source from the Transform pop-up menu in the Behaviors Inspector. When Attach to Source is chosen from the Transform pop-up menu, the foreground image is distorted when you drag the trackers in the Canvas.
Click the Analyze button in the HUD or Behaviors Inspector.
The foreground object is pinned to the background element.
Note: If you adjust the Four Corner parameter for a layer and then apply a Match Move behavior, the Four Corner parameter is applied in the behavior. If you delete the behavior, the four corner settings for the layer remain. If you reset the Match Move behavior, the four corner settings are reset.
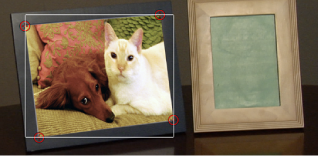
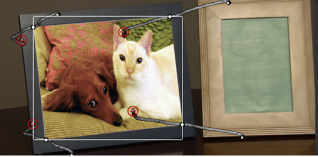
Masking and Tracking
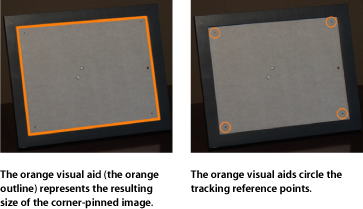
When a mask is added to an object with applied tracking data, the data is applied to the mask. In the following image, the foreground object is tracked to four points on the background clip, but still must be masked to fit into the picture frame.
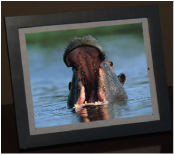
By masking the image being tracked, you can include only the portion of the image you want to fit in the frame.
Although the mask is attached to the foreground image, you might need to animate changes in the mask’s position and scale to accommodate changes in the background clip over time.
Note: As an alternative to using masks, you can also crop an object with applied tracking data using Crop controls in the Properties Inspector.
You can track the control points of a mask to a clip or apply existing tracking data to the control points of a mask. For more information, see Track Points Workflow.
Using Mimic Source for Four-Corner Pinning
Depending on your source footage, you might need to corner-pin an element using reference points that are in a different position from the final pinned size of the foreground element. You do this by offsetting the trackers using the Mimic Source option. In the basic example below, the reference patterns to be tracked (the dot markers) are located inside the picture frame, rather than at the corners.
Because the tracking reference points (the dot markers) are not flush with the inside edge of the frame, you must offset the image from the four trackers. Otherwise, the final corner-pinned image appears too small, as in the example below.
Note: In this example, you could track to the corners of the frame. However, the steps in the following section demonstrate a simple example of how to use the Mimic Source parameter to four-corner pin an object when your predefined tracking markers (markers placed on the objects in the physical set) are offset from the reference points to which you want to track.
Use one of the workflows described above (see Four-Corner Pinning with Match Move) to set up a four-corner pin using the Match Move behavior.
From the Transform pop-up menu in the Behaviors Inspector, choose Mimic Source.
In the Canvas, drag the trackers to the tracking markers.
The image is not affected and remains locked to its original placement.
Click the Analyze button in the HUD or Behaviors Inspector.
The foreground element is pinned on the background element.