Sequence Text Behavior
The Sequence Text behavior allows you to animate text attributes, such as scale, position, color, opacity, and glow in sequence through the text characters. For example, you can create a sequence in which the text characters fall vertically into place as they scale down, fade in, and rotate.
After applying the Sequence Text behavior to a text object, you must designate the parameters of the text you want to animate. You do this in the Behaviors Inspector. After you link the text parameters to the behavior, you can use the Sequence Text controls to adjust the animation’s direction, speed, number of loops, and other qualities.
Tip: Using the Transform Glyph tool, you can modify individual text characters independently of the influence of the applied sequence text behavior. For information on using the Transform Glyph tool, see Working with Text Glyphs.
Using the Sequence Text Behavior
Applying and activating a Sequence Text behavior is a two-step process: First, you add the Sequence Text behavior to a text object. Second, you assign the parameters of the text you want to animate, in the Behaviors Inspector or by manipulating the text object with the onscreen controls. After you link the text parameters to the behavior, you can use the Sequence Text controls in the Behaviors inspector to adjust the animation’s direction, speed, number of loops, and other qualities.
Select the text object to be animated, then choose Text Animation > Sequence Text from the Add Behavior pop-up menu.
The behavior is applied, and the first character of text is selected with the Adjust Item tool.

Important: Unless you use onscreen controls (via the Adjust Item tool) to create a sequence, you must add at least one parameter to the behavior in the Inspector before animation can occur. Until a parameter is added, adjustments made in the HUD have no effect.
With the Sequence Text behavior selected, display the Behaviors pane in the Inspector.
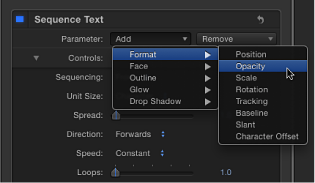
The upper area of the Sequence Text controls contains Add and Remove pop-up menus, which are used to select text parameters to be sequenced, or to remove parameters after they are added. The second group of parameters are sequence controls, which include options for setting the direction and speed of the animation, whether the animation is applied per character, per word, per text object, and so on.
In this simple example, Opacity, Scale, and Glow scale are sequenced.
In the Parameter row, choose Format > Opacity from the Add pop-up menu.
The Opacity parameter is added in the Behaviors Inspector above the Add and Remove menus.
In the Inspector, set Opacity to 0 and play the project (press Space bar).
Because the Sequencing parameter is set to From by default, the opacity sequences from the value set in the behavior (0%) to original value of the text (100%).
In the Behaviors Inspector, choose To from the Sequencing pop-up menu.
Now when you play the project from the beginning, the opacity fades to the value set in the behavior (0%) from the original value of the text (100%).

Choose Format > Scale from the Add pop-up menu, then choose Glow > Scale from the same menu.
The Scale and Glow Scale parameters are added to the Behaviors Inspector.
In the Behaviors Inspector, set Scale to 250%, set Glow Scale to 250%, then set Spread (in the Controls group) to 4.
The opacity sequences to the values defined in the behavior from the original values. The increased spread value softens the sequence between the characters.

Note: Although the style effects created in the Sequence Text behavior (Face, Outline, Glow, and Drop Shadow) are independent of parameters in the Style pane of the Text Inspector (Face, Outline, Glow, and Drop Shadow), changes made in the Style pane affect the sequenced text. For example, if you select the Glow checkbox in the Style pane after adding Glow to the Sequence Text behavior, the appearance of the glow may alter. This is because the Glow settings in the Style pane are additive to the sequence behavior (the glow may appear brighter or more blurred). In the following illustration, the glow is scaled and offset in the Style pane.

The above example covers only a portion of the options in the Sequence Text behavior. Using the behavior’s parameters, you can create a nearly endless variety of sequences. You can define the speed in which the sequence moves through the text, as well as whether the sequence moves through the text per character, word, or line. You can also change the direction of the sequence and define the number of times the sequence loops over its duration. Variance and randomization can also be added to values defined in the behavior. For more information on these controls, see Sequence Text Controls.
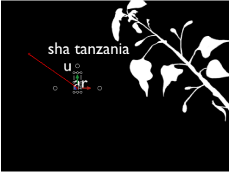
With the Sequence Text behavior applied and the first letter (glyph) selected (with the Adjust Item tool), do one of the following:
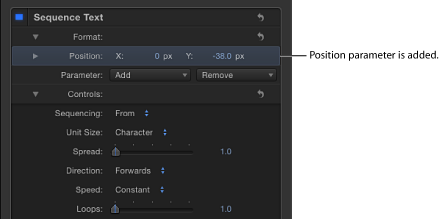
To sequence the position of the text, drag the character in the Canvas to a new position.

In the Behaviors Inspector, the Position parameter is added to the Format category (above the Add and Remove pop-up menus). The values in the Position parameter can be modified in the Inspector (using the Position value sliders) as well as in the Canvas (by dragging the glyphs of the text object).
To sequence the rotation of the text, rotate the selected glyph in the Canvas. To display the rotation controls, hold the Command key down. For more information on using onscreen transform controls, see 3D Transform Onscreen Controls.

In this example, the text is rotated on its Y axis. In the Behaviors Inspector, the Rotation parameter is added to the Format category (above the Add and Remove pop-up menus).
To sequence the scale of the text, scale the selected glyph in the Canvas by dragging a scale handle. (To scale the text uniformly, press Shift while dragging the scale handle in the Canvas.)
In the Behaviors Inspector, the Scale parameter is added to the Format category (above the Add and Remove pop-up menus).
Play the project (press Space bar).
Note that in the Controls section of the Behaviors Inspector, the Sequencing pop-up menu is set to From, the default setting. As a result, upon playback, the text in your project moves from the value in the Position parameter to the original value (the position of the text before you dragged it in the Canvas).
For more information on Sequence Text parameters, see Sequence Text Controls.
Note: When using the Sequence Text behavior, glyphs are selected with the Adjust Item tool rather than the Transform Glyph tool. For more information on the Transform Glyph tool, see Working with Text Glyphs.
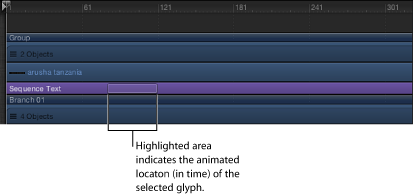
When a glyph is selected with the Adjust Item tool, a section of the Timeline becomes highlighted. This area shows when the selected glyph is affected by the sequence behavior.
In the Parameter row of the Behaviors Inspector, choose a parameter from the Remove pop-up menu.
The parameter is removed from the behavior.
In the Behaviors Inspector, drag the Spread slider to the right (or click the value field, type a number, then press Return).

Using the Text Style Pane with the Sequence Text Behavior
Parameters you want to include in a sequence animation are assigned in the Sequence Text behavior. Attributes modified in the Style pane of the Text Inspector (Face, Glow, Outline, or Drop Shadow) do not sequence. Therefore, to modify a parameter but keep it unchanged over the course of a sequence animation, modify that parameter in the Style pane of the Text Inspector. For example, you can create a sequence in which the text glow scales and fades (by setting Glow > Scale and Glow > Opacity in the Sequence Text behavior), but where the text outline remains constant (by setting the Outline parameters in the Style pane of the Text Inspector).
Note: Because parameters set in the Sequence Text behavior are independent of parameters set in the Style pane, you may see changes in the appearance of some attributes when you select parameter checkboxes in the Style pane. For example, if you create a sequence that animates text glow and then select the Glow checkbox in the Style pane of the Text Inspector, the effect is additive. The glow in the Style pane is added to the glow created in the Sequence Text behavior.
With a text object selected, open the Style pane in the Text Inspector.
In the Face controls, change the color of the text to something other than white.
For more information on using color controls, see Color Controls.
Select the Outline checkbox and modify some Outline parameters.
From the Add Behavior pop-up menu in the toolbar, choose Text Animation > Sequence Text.
In the Behaviors Inspector, choose Face > Color from the Add pop-up menu.
The text turns default white. When the Sequencing pop-up menu is set to the default From, the sequence behavior animates from the values defined in the Sequence Text behavior to the original values of the text. Before you applied the Sequence Text behavior, the text color was defined in the Style pane, so this is considered the original color.
Play the project.
The text color sequences from the color defined in the Sequence Text behavior to the original color of the text. The outline does not sequence.
Using the Custom Sequencing Option
By choosing Custom from the Sequencing pop-up menu, you can create a sequence by keyframing parameters. The following example creates a position sequence.
Select the text object to be animated, then choose Text Animation > Sequence Text from the Add Behavior pop-up menu in the toolbar.
In the Behaviors Inspector, choose Custom from the Sequencing pop-up menu.
Drag the playhead to the frame where you want to begin the animation, then click the Record button (or press A) to turn on keyframing.
When keyframing is enabled, the values in the Inspector for parameters that can be animated turn red.
Note: You can also animate parameters by manually adding an initial keyframe. After a keyframe is added to a parameter, any further adjustment to that parameter adds a keyframe at the current playhead position, independent of the Record button state. For more information, see Keyframing Methods.
Do one of the following:
In the Behaviors Inspector, choose Format > Position from the Add pop-up menu, then use the Position value sliders to define the beginning (or ending) position of the text.
In the Canvas, drag the selected text character to its beginning (or ending) position.
A keyframe is added to the Position parameter.
Go to the next frame where you want to set a position keyframe, and do one of the following:
In the Behaviors Inspector, enter a Position value.
In the Canvas, drag selected text to a new position.
A second position keyframe is created.
Repeat Step 5 until you add all of your keyframes.
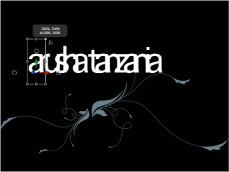
In the image below, an editable animation path appears in the Canvas. An animation path appears only when Custom is selected from the Sequencing pop-up menu.
For more information on working with animation paths, see Manipulating Animation Paths in the Canvas.
Note: If you change the Sequencing parameter to another option, such as Through Inverted or To, and then change Sequencing back to Custom, the custom animation path is retained.
Sequencing the Distortion of Style Attributes
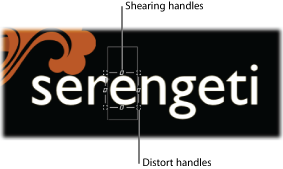
In addition to using the value fields and sliders in the Inspector, you can use onscreen controls to sequence the Four Corner parameter, creating warp effects that manipulate the text Face, Outline, Glow, or Drop Shadow parameters. In the following simple examples, text Glow, Outline, and Drop Shadow parameters are sequenced.
Select the text object to be animated, then choose Text Animation > Sequence Text from the Add Behavior pop-up menu in the toolbar.
In the Parameter row of the Behaviors Inspector, choose Glow > Four Corner from the Add pop-up menu.
In the Inspector, the Glow Four Corner parameter is added to the sequence above the Add and Remove pop-up menus. The Four Corner parameter is used to distort the text’s glow attribute, allowing you to use onscreen controls to pull the glow around the text.
In the lower portion of the Behaviors Inspector, choose Glow from the Attribute pop-up menu.
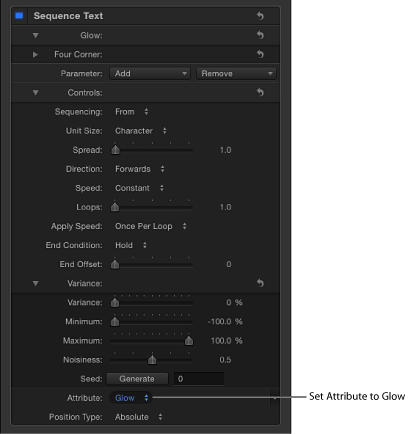
The onscreen controls appear. Drag them to distort the attribute.
Do one of the following:
To distort the glow, drag a distort handle.

Note: Some characters may not appear affected when you drag in the Canvas. However, when you play the project, all characters are affected.
To shear the glow, drag a shearing handle.

You can also use the value sliders in the Four Corner parameters in the Behaviors Inspector. Click the Four Corner disclosure triangle to show the individual Bottom Left, Bottom Right, Top Right, and Top Left controls.
Play the project.
The glow distortion is sequenced through the text, based on the settings in the Sequence Text behavior parameters.
The following task describes an optional workflow in which you can distort text face, glow, outline, or drop shadow using the above steps, but without using the Add pop-up menu.
With the Sequence Text behavior applied to a text object, choose Glow from the Attribute pop-up menu In the lower portion of the Behaviors Inspector.
Onscreen controls appear that allow you to distort the text attribute. No parameters are added to the Inspector (above the Add pop-up menu) until the onscreen controls are adjusted.
Do one of the following:
To shear the glow, drag a shearing handle.
To distort the glow, drag a corner handle.
After you adjust a handle, the Four Corner parameter is added to the sequence above the Add and Remove pop-up menus.
Note: You can also adjust the value sliders in the Four Corner parameter in the Behaviors Inspector. Click the Four Corner disclosure triangle to show the Bottom Left, Bottom Right, Top Right, and Top Left controls.
Play the project.
The glow distortion is sequenced through the text, based on the settings in the Sequence Text behavior parameters.
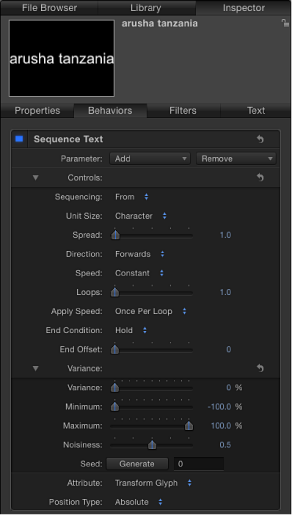
Sequence Text Controls
The Sequence Text behavior has the following parameter controls in the Behaviors Inspector.
- Parameter (Add and Remove): Use the Add and Remove pop-up menus to add and remove text format and style parameters to the sequence. After a parameter is chosen, its controls appear above the Add and Remove pop-up menus. There are five Add pop-up menu items—Format, Face, Outline, Glow, and Drop Shadow—each of which invokes additional submenu items.
- Format: Choose any of eight Format parameters from the submenu: Position, Opacity, Scale, Rotation, Tracking, Baseline, Slant, or Character Offset. Except for Character Offset, these parameters are also found in the Format pane of the Text Inspector. (For more information on text format parameters, see Editing Text Format.)
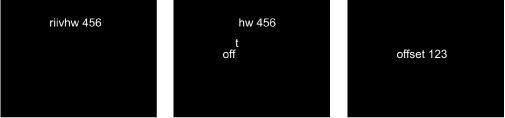
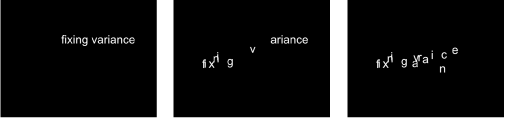
Choose the Character Offset option to offset characters alphabetically or numerically. The amount of the offset is determined by the value set in the parameter. In the following illustrations, Character Offset and Position are sequenced. The Character Offset Value is 3. The words move in sequence from the character offset value to form the original words, “offset 123.”
When you choose Format > Character Offset from the Add pop-up menu, the Character Set pop-up menu appears in the Behaviors Inspector. There are two menu options: Preserve Case & Digits and Full Unicode. Choose Preserve Case & Digits to ensure that offset characters respect the case and number of the original text. For example, with this option selected, an uppercase letter remains uppercase as other letters cycle through its position.
Note: Using the onscreen controls to manipulate the scale, position, or rotation of the text unit adds Format parameters to the Sequence Text behavior. For more information on using onscreen controls to sequence text, see Using the Custom Sequencing Option.
- Face: Choose any of four Face parameters for sequencing: Color, Opacity, Blur, or Four Corner. For more information on text face parameters, see Text Face Controls in the Style Pane.
- Outline: Choose any of six Outline parameters for sequencing: Color, Opacity, Blur, Width, Layer Order, or Four Corner. For more information on text outline parameters, see Text Outline Controls in the Style Pane.
- Glow: Choose any of eight Glow parameters for sequencing: Color, Opacity, Blur, Radius, Scale, Offset, Layer Order, or Four Corner. For more information on text glow parameters, see Text Glow Controls in the Style Pane.
- Drop Shadow: Choose any of seven Drop Shadow parameters for sequencing: Color, Opacity, Blur, Scale, Distance, Angle, and Four Corner. For more information on text drop shadow parameters, see Text Drop Shadow Controls in the Style Pane.
- Sequencing: This pop-up menu sets how the sequence animation moves through the text unit. (A text unit can be a character, word, line, or an entire text object, as set in the Unit Size pop-up menu, described below.) There are five items in the Sequencing pop-up menu:
- To: Specifies that the animation begins at the original parameter value and moves to the value set in the sequence behavior. For example, if the original opacity value is 100% and opacity is set to 0% in the Sequence Text parameters, the text unit begins completely opaque and becomes completely transparent.
- From: Specifies that the animation moves from the value set in the sequence behavior to the original parameter value. For example, if the original opacity value is 100% and opacity is set to 0% in the Sequence Text parameters, the text unit begins completely transparent and becomes completely opaque. This is the opposite of the To option in the Sequencing pop-up menu.
- Through: Specifies that the sequence goes through a full animation cycle starting at the original value of the parameter, moves to the value set in the sequence behavior, and then returns to the original value of the parameter. For example, if the original opacity value is 100%, and opacity is set to 0% in the Sequence Text parameters, the text unit begins completely opaque, becomes transparent, and then becomes completely opaque again.
- Through Inverted: Specifies that the sequence goes through an inverted animation cycle starting from the value set in the sequence behavior, moves to the original value, and then returns to the value set in the sequence behavior. For example, if the original opacity value is 100% and opacity is set to 0% in the Sequence Text parameters, the text unit begins completely transparent, becomes opaque, and then becomes completely transparent. This is the opposite of the Through Sequencing option.
- Custom: Allows you to keyframe how the animation moves through the values set in the Sequence Text parameters. When Custom is selected from the Sequencing pop-up menu, the Minimum and Maximum parameters in the Variance controls (see description below) are replaced with the Amount parameter, and the Fix pop-up menu appears.
- Unit Size: This pop-up menu specifies whether the animation is sequenced by Character (the default setting), Character (without spaces), Word, Line, All, or Custom (a keyframed range).
- Character: Sequences the animation by single characters of text (including spaces).
- Character (without spaces): Like the Character setting, sequences single characters of text, but does not treat spaces as characters (spaces are ignored).
- Word: Sequences the animation by word.
- Line: Sequences the animation by lines of text.
- All: Sequences the animation through the entire text object.
- Custom: Allows you to customize the size of the sequenced text unit. When Custom is selected from the Unit Size pop-up menu, the Start and End parameters become available. These parameters define the size of the selection.
- Direction: This pop-up menu sets the direction of the sequencing to Forwards (default), Backwards, Center to Ends, Ends to Center, or Random.
- Forwards: Sequences in the direction of the letters (typically left to right).
- Backwards: Sequences in the reverse direction, (typically right to left).
- Center to Ends: Sequences from the center of the text outwards.
- Ends to Center: Sequences from the outer edges of the text inwards.
- Random: Randomizes the direction of the sequencing. When Random is selected from the Direction pop-up menu, the Random Seed parameter becomes available.
- Speed: This pop-up menu tat sets the action of the sequence behavior to Constant, Ease In, Ease Out, Ease Both, Accelerate, Decelerate, or Custom.
Note: By default, the sequence animation lasts for the duration of the text object to which it is applied. You can speed or slow the behavior by adjusting its bar in the mini-Timeline or Timeline. For more information, see Changing the Speed of Text Behaviors.
- Constant: The sequence animation moves from one end of the text to the other at a constant rate. The sequence moves in the direction specified in the Direction pop-up menu.
- Ease In: The sequence animation begins slowly and increases to normal speed as it moves through the text.
- Ease Out: The sequence animation begins at normal speed and slows toward the end of the text.
- Ease Both: The sequence animation begins slowly, increases to normal speed as it moves toward the middle of the duration of the text, and slows as it reaches the end of the text.
- Accelerate: The rate of the sequence animation increases as it moves through the text.
- Decelerate: The rate of the sequence animation decreases as it moves though the text.
- Custom: Allows you to keyframe how the selection (the animation) moves through the text. When Custom is selected from the Speed pop-up menu, the Custom Speed parameter becomes available.
- Apply Speed: This pop-up menu controls the speed of the sequencing over multiple loops. There are three menu options:
- Once Per Loop: The setting chosen in the Speed pop-up menu is applied one time for each loop. For example, if Speed is set to Accelerate, the rate of the sequence animation increases as it moves through the text for every loop.
- Over Entire Duration: The setting chosen in the Speed pop-up menu is applied one time for the length of the behavior. For example, if Speed is set to Accelerate, the rate of the sequence animation increases as it moves through the text over the entire duration of the behavior, regardless of the number of loops.
- Per Object: The setting chosen in the Speed pop-up menu is applied one time for each object for every loop. For example, if Speed is set to Accelerate, the rate of the sequence animation increases as it moves through each text object for every loop.
- End Condition: This pop-up menu specifies how the animation is applied to the end of the sequence animation. There are three options:
- Hold: Completes the sequence animation cycle one time, then starts it over from the beginning (after the last text unit in the sequence completes its animation).
- Wrap: Treats the sequence animation as a continuous loop so the spread wraps from the last text unit in the sequence to the first text unit.
- Ping-Pong: Completes the sequence animation cycle forward, then completes the animation backward, then forward, and so on.
- End Offset: A slider that offsets the end of the effect of the sequence behavior. By default, the sequence animation is in effect until the end of the behavior. For example, to stop the sequencing 60 frames from the end of the text object (or project), drag the End Offset slider to 60 or enter 60 in the value field. Using this slider to stop the effect, rather than trimming the end of the behavior in the Timeline, freezes the end of the effect for the remaining duration of the object. Trimming the end of the behavior resets the text to its original settings.
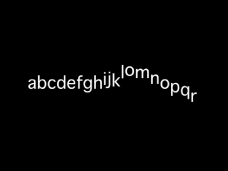
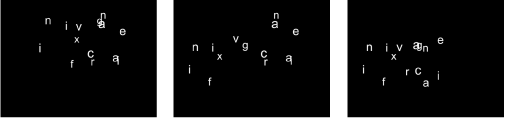
- Variance: This group of controls allows you to randomize the attributes assigned to sequence through the text. For example, if you add variance to a scale sequence, the text scale is randomized rather than moving from the original Scale value to the Scale value defined in the sequence behavior. These sliders control the frequency of the randomness. When sequencing is set to To, From, Through, or Through Inverted, it is useful to see how the Variance numbers affect the randomness. The following image shows a sequence animation in which the Y Position is offset. When a low variance value (frequency) is applied, the randomness is very smooth along the line of text—like the text is riding a very slow and smooth wave.
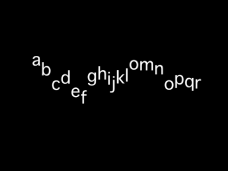
As the variance is increased, the randomness increases across the line of text. Because the text is riding on very short and frequent waves, the letters are offset in the Y axis with more randomness.
When Custom is chosen from the Sequencing pop-up menu, the same principle applies, so a low variance value causes the text to offset from its animation with a smooth path, while a high variance causes more randomness.
Note: Because the Variance parameters are sensitive, low values are necessary for smooth animation results.
- Variance: A slider that allows you to fluctuate the values of the attributes assigned to sequence through the text. For example, if you add variance to an opacity sequence, the text opacity is randomized rather than moving strictly from the original Scale value to the Scale value defined in the sequence behavior.
- Minimum: A slider that defines the lower boundary of the variance for the sequenced parameter value. For example, if you set Minimum to 25% for a sequence animating text scale, the minimum size that the text unit will scale to is 25% of the Scale value set in the behavior.
Note: When Custom is selected from the Sequencing pop-up menu, the Minimum and Maximum parameters are replaced with the Amount parameter.
- Maximum: A slider that defines the upper boundary of the variance for the sequenced parameter value. For example, if you set Maximum to 75% for a sequence animating text scale, the maximum size that the text unit scales to is 75% of the Scale value set in the behavior.
Note: When Custom is chosen from the Sequencing pop-up menu, the Maximum and Minimum sliders are replaced with the Amount slider.
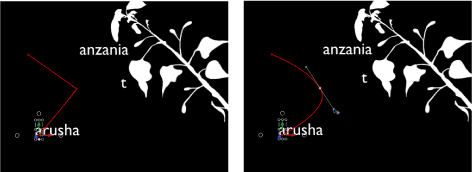
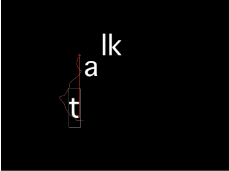
- Amount: A slider that becomes available when Custom is chosen from the Sequencing pop-up menu, and defines the maximum amount that the animated parameter can deviate from its animation value. For example, the following image shows a custom animation of a glyph in the positive Y direction. When Amount is set to 50, the glyph deviates no more than 50 pixels to the left or right of the animation path. The bold red line shows the animation path, and the thinner red line displays the randomized path.
- Noisiness: A slider that adds an additional overlay of random variance. Higher Noisiness values result in more erratic variations in the affected parameter.
- Seed: Click the Generate button to create an initial random seed for creating randomness in the Variance parameters. To change the randomness results after you click Generate, click the button again or enter a value in the field.
- Fix: Available when Sequencing is set to Custom, this pop-up menu fixes the values defined in the behavior to the start, end, or start and end of the behavior. There is also an option to not fix the values. Variance must be greater than 0 for this parameter to have any effect.
- Start Point: When variance is applied, the values defined in the Sequence Text behavior (above the Add and Remove pop-up menus in the Behaviors Inspector) at the start and end of the behavior are fixed to the first frame of the behavior.
In the following images, the text position is sequenced. Fix is set to Start Point.
- End Point: When variance is applied, the values defined in the Sequence Text behavior (above the Add and Remove pop-up menus) at the start and end of the behavior are fixed to the last frame of the behavior.
In the following images, the text position is sequenced. Fix is set to End Point.

- Both: When variance is applied, the values defined in the Sequence Text behavior (above the Add and Remove pop-up menus) at the start and end of the behavior are fixed to the first and last frames of the behavior.
- Neither: When variance is applied, the values defined in the Sequence Text behavior (above the Add and Remove pop-up menus) at the start and end of the behavior are not fixed to the first or last frames of the behavior.
In the following images, the text position is sequenced. Fix is set to Neither.
- Attribute: In addition to sequencing text attributes such as outlines, glows, and drop shadows, you can sequence the warping of those attributes. Use the Attribute pop-up menu to select the attribute you want to modify. There are five options:
- Transform Glyph: Displays the glyph onscreen controls, allowing for the selection of characters of a text object for direct manipulation.
For more information about sequencing using the glyph onscreen tools, see Using the Custom Sequencing Option.
- Face: Displays onscreen controls that allow you to modify the shape, size, and position of the face (color fill) of text characters.
- Outline: Displays onscreen controls that allow you to modify the shape, size, and position of the outline of text characters.
- Glow: Displays onscreen controls that allow you to modify the shape, size, and position of the glow of text characters.
- Drop Shadow: Displays onscreen controls that allow you to modify the shape, size, and position of the drop shadow of text characters.
For more information about sequencing the warping of text attributes, see Sequencing the Distortion of Style Attributes.
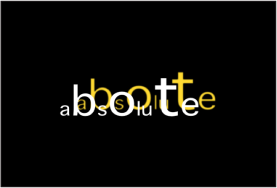
- Position Type: When offsetting text attributes such as glows and outlines from text objects that contain characters of different sizes, this pop-up menu specifies whether an attribute is offset from the text uniformly (choose Absolute), or offset based on the size of text characters (choose Relative).
- Absolute: When offsetting attributes, such as glows, shadows, and so on from text objects, choose Absolute to create an even offset regardless of the size of the text characters.
In the following image, the yellow glow is uniformly offset from the white text because Absolute is chosen from the Position Type pop-up menu.
- Relative: When offsetting attributes, such as glows, shadows, and so on from text objects, choose Relative to create an offset based on the size of the text characters.
In the following image, the yellow glow is offset from the white text based on the size of the text characters because Relative is chosen from the Position Type pop-up menu.