Applying Movement to an Object in the Canvas
The easiest way to apply keyframes is to manipulate objects directly in the Canvas while the Record button is active. Using this method, you can animate changes to basic parameters such as Scale, Rotation, Position, Distort, Anchor Point, Drop Shadow, Crop, and Four Corner. Although you can create similar object animations using behaviors, keyframing gives you the added flexibility to set specific parameter values on precise frames.
When the Record button is on and you move the playhead to a new frame, any change you make to an object generates new keyframes. When animating an object’s position, an animation path is created.
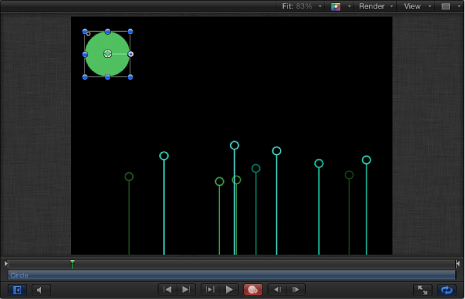

Note: To view the animation paths of keyframed objects, ensure that Animation Path is selected in the View pop-up menu (in the upper-right corner of the main window, above the Canvas).
If the playhead is positioned on a previously set keyframe, changes you make modify that keyframe rather than the curve, regardless of whether the Record button is on or off.
Click the Record button (or press A) to turn on keyframe recording.
Place the playhead at the starting frame.
Place the object in a starting position.
Move the playhead forward.
Drag the object to the ending position.
Click the Record button (or press A) to turn off keyframe recording.
When you play back your project, the object flies from position one to position two over the interval you set. You can see the path the object travels by turning on the Animation Path setting in the View pop-up menu above the Canvas.
Manipulating Animation Paths in the Canvas
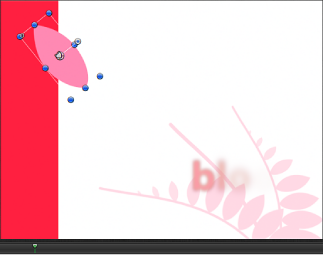
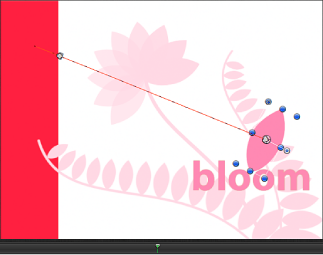
You can modify an animation path by adding keyframes to or deleting keyframes from the path, by dragging keyframes on the path, or by dragging a path segment between two adjacent keyframes.

Additionally, you can set the keyframe type to curved or angled, changing the shape of the path.
Note: When you drag a keyframe in the Canvas, the frame number corresponding to that keyframe and its X, Y, and Z position values are displayed in the status bar (above the Canvas).
To manipulate an object in the Canvas at a frame where no keyframe exists, use the following guidelines:
To reposition the object as well as its bounding keyframes without setting a new keyframe for the object, drag the object’s center onscreen control (or anywhere on the object’s animation path).
To reposition the object and create a new keyframe, drag the object but not its center onscreen control or animation path.
To move the object and its entire animation path together, hold down Command-Option and drag the object’s center onscreen control or any keyframe on the animation path.
Double-click or Option-click the path.
A new keyframe point is added. By default, keyframe points are curved Bezier points.
After a keyframe is added to an animation path, you can change its location on the path.
Click the keyframe on the animation path, then drag it to its new position.
You can convert Bezier keyframe points into Linear keyframe points to create an angled path, or you can turn Linear keyframe points into Bezier keyframe points to make the path curved again.
To convert a keyframe point to be sharply angled, Control-click the keyframe and choose Linear from the shortcut menu.
The handles of the keyframe disappear, leaving a linear keyframe.
To quickly convert the keyframe back to a curved Bezier point with handles, Command-drag the keyframe.
To convert a keyframe point from sharply angled to smoothly curved, Control-click the keyframe and choose Smooth from the shortcut menu.
Bezier handles appear on the Smooth keyframe, and the animation path becomes curved.
To quickly convert a curved Bezier point back to an angled linear point, Command-click the keyframe.
Note: The Very Smooth option is not available for animation paths and remains dimmed in the shortcut menu.
Bezier handles are modified in the same manner as with shape or mask Bezier points. For more information on manipulating Bezier splines, see Shape and Mask Drawing Tools.
The keyframe points can also be deleted, locked, or disabled.
Control-click a keyframe and choose Delete Point from the shortcut menu.
Select the keyframe, then press Delete.
The keyframe point is deleted from the path.
You can also lock an animation path keyframe.
Control-click a keyframe and choose Lock Point from the shortcut menu.
The keyframe is locked and can no longer be edited. To unlock the keyframe, Control-click the locked keyframe and choose Unlock Point from the shortcut menu.
You can also disable an animation path keyframe.
Control-click a keyframe and choose Disable Point from the shortcut menu.
The keyframe is disabled and no longer influences the shape of the animation path. To enable the keyframe, Control-click the disabled keyframe, then choose Enable Point from the shortcut menu.
You can also move the entire animation path, affecting the entire animation globally.
Press Command-Option, then drag a keyframe on the animation path.
Press Command-Option, then drag a portion of the animation path between two keyframes.
You can also move selected segments of the animation path by selecting adjacent keyframes.
Drag the path segment between the two selected keyframes.
Note: You can also Shift-select the keyframes that bound the path segment or segments you want to move, then drag one of the selected keyframes (or the segment between two adjacent keyframes).
You can quickly select an adjacent keyframe, adding additional segments to your current selection.
Click the path segment immediately to the right or to the left of a selected keyframe.
The adjacent keyframe is selected. Drag the path segment between the two selected keyframes to move the segment.
Animating with the HUD
Parameters that appear in the HUD can be keyframed using the Record button or by setting an initial keyframe. For example, when an object is selected in the Canvas, the HUD gives quick access to the object’s opacity. To make a custom effect such as a temporary dip to black, keyframe the opacity parameter in the HUD.
Place the playhead where you want to begin the fade.
Do one of the following:
Click the Record button (or press A) to turn on keyframe recording, then click the Opacity slider handle in the HUD.
Even if you don’t change the slider’s value, clicking it sets an Opacity keyframe at that point. This way, the object remains at its previous opacity from the beginning of the clip until that keyframe, then begins the interpolation toward the next keyframe.
With the Record button off, click the Opacity slider handle in the HUD, then press Control-K.
Move the playhead forward to a new time.
Change the Opacity value.
Move the playhead forward again.
Change the Opacity slider again.
If keyframe recording is on, click the Record button (or press A) to turn off keyframe recording.