Replicators and the Properties Inspector
As with any other layer in Motion, a replicator’s properties (such as its position, scale, blend mode, or drop shadow) can be modified in the Properties Inspector or by using the onscreen transform controls. These properties are separate from the replicator parameters in the Replicator and Replicator Cell Inspectors, which control the shape and size of the replicator, as well as all aspects of its pattern and cells.
The following sections briefly discuss using replicator-related parameters in the Properties Inspector. For more information on the Properties Inspector, see Parameters in the Properties Inspector.
Note: When a replicator cell is selected (as opposed to the replicator, itself), only the Timing controls appear in the Properties Inspector. The Timing controls allow you to adjust the In and Out points of the replicator cell.
Important: Some operations performed in the Properties Inspector, such as turning on Crop or Drop Shadow, or the application of some filters or a mask, cause a group to be rasterized. When a group is rasterized, it is converted into a bitmap image. Because all replicators live in groups, rasterization affects how replicators interact with other objects in your project. For more information, see Particles, Replicators, and Rasterization.
The following sections cover replicator properties that can be adjusted in the Properties Inspector:
Transform Controls
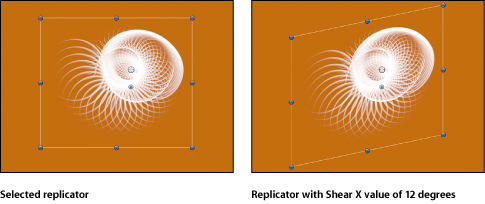
Because all elements in a replicator are attached to the control points of the replicator pattern, changing the replicator’s position, rotation, scale, shear, or anchor point attributes using the controls in the Properties Inspector changes every element in the replicator. This results in the entire pattern being transformed at once. Modifying the anchor point moves the anchor point for the entire pattern—it does not change the anchor point for the elements in the pattern.

Note: The Scale parameter resizes the replicator, affecting the size of the pattern elements in X, Y, or Z space. To modify the size of the pattern without changing the size of its elements, use the parameters in the Replicator Inspector.
Blending
Changes you make to the opacity or blend-mode parameters for a replicator are applied to the replicator as a whole—the replicator pattern is blended into the scene. For more information about blend modes, see Using Blend Modes. For more information about the Preserve Opacity setting, see Preserve Opacity Option.
Note: In the replicator, pattern elements can be blended additively or normally (by selecting or deselecting the Additive Blend checkbox in the Replicator Inspector).
Lighting (3D Project)
This parameter group is available only for 3D projects. As with all layers, the Shading pop-up menu (in the Lighting section of the Properties Inspector) must be set to On or Inherited for lights to affect the replicator. For more information on using lights, see Lighting.

Note: A 2D or 3D replicator can interact with lights in a 3D project.
Shadows (3D Project)
This parameter group is available only for 3D projects. The Shadows group determines whether an object casts a shadow if positioned between a light source and another object; whether neighboring objects’ shadows affect the current object; and whether an object blocks light and casts a shadow when the object itself does not appear in the scene. As with all layers, Shadows must be turned on in the Light Inspector for the replicator to cast a shadow. For more information on shadows, see Shadows.
Note: This parameter does not affect drop shadows.
Reflection (3D Project)
This parameter group is available only for 3D projects. The Reflection controls adjust simulated reflectivity based on the object’s shininess, the brightness and proximity of the reflected object, and the angle of view. For more information, see Reflections.
Note: The Reflection parameter group is not available for 3D replicators (that is, replicators with the 3D checkbox turned on in the Replicator Inspector).
Drop Shadow
A drop shadow can be applied to a 2D replicator (a replicator with the 3D checkbox turned off in the Replicator Inspector). The drop shadow affects layers composited behind the replicator. If the replicator pattern contains overlapping elements, the shadow does not appear on individual elements. However, when the Drop Shadow parameter is enabled for the source layer (in the Properties Inspector), overlapping pattern elements appear with a drop shadow.

For more information on working with drop shadows, see Drop Shadows.
Four Corner
Available for 2D replicators (replicators with the 3D checkbox turned off in the Replicator parameters), the Four Corner controls in the Properties Inspector allow you to stretch a replicator into polygonal shapes. Move a corner point, leaving the other three corners locked into place. Adjusting the corners of the replicator affects the pattern as a whole.
Crop
Available for 2D replicators (replicators with the 3D checkbox turned off in the Replicator parameters), the Crop controls in the Properties Inspector allow you to hide portions of a replicator pattern. You can also use the onscreen cropping controls by choosing the Crop tool from the toolbar, then dragging any replicator object’s edges or corners.
Timing
After you create a replicator, its duration can be as long or short as necessary, regardless of the duration of the original sources used for the pattern cells. The duration of a replicator is defined by the duration of the replicator track in the Timeline. Changing the In or Out points of a replicator in the Properties Inspector, Timeline, or mini-Timeline changes the duration of the replicator.
Although the duration of source layers has no affect on the replicator, the duration of each cell affects how long the elements created from that cell are visible in the project. You can change a cell’s duration by dragging its In and Out points in the Timeline. In this way, you can adjust the timing that defines when each cell type appears. For example, to create a pattern in which three types of elements appear at different times in the animation, you can offset the cells in the Timeline. In the following image, the crosshair cells appear first. One second later, the drop cells appear. One second after that, the soft circle cells appear.

Tip: You can animate the opacity of each cell so it fades in; you do this by keyframing the Opacity parameter in the Replicator or the Replicator Cell Inspector.
For more information on adjusting the timing of layers in the Timeline, see Using the Timeline.