Editing Opacity and Blending Parameters
The opacity and blending controls for each layer appear in the Properties Inspector and in the default HUD for any selected layer.
Opacity
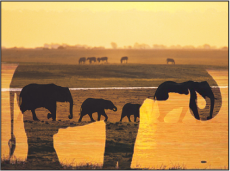
By layering together layers with varying opacities, you can merge them together in ways not otherwise possible. For example, if you have two full-screen background images you want to use together, you can set the opacity of the layer in front to 50%, allowing the layer in back to show through.
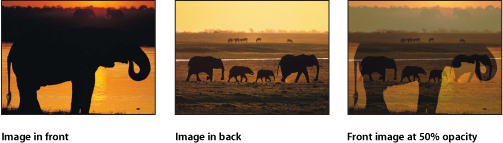
You can overlap as many layers as you want, and by varying their opacities, selectively reveal layers in the back.
Adjust the Opacity slider in the Blending section of the Properties Inspector.
Adjust the Opacity slider in the HUD.
Note: Some layers, such as text and shapes, have additional opacity parameters in their respective panes in the Inspector. For example, setting a shape’s Opacity value in the Properties pane and setting its Opacity value in the Style pane require separate controls that have multiplicative effects. In other words, if Opacity is set to 50% in the Properties pane, then set to 50% in the Shape Style pane, the resulting opacity for the text is 25%.
Blend Modes
While the Opacity parameter defines a uniform level of transparency for a layer, the blend modes allow you many more creative options to control how the overlapping images interact, based on the colors in each layer. By default, each layer’s blend mode is set to Normal, so changes to a layer’s opacity uniformly affect every part of the image equally.
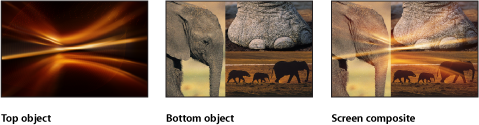
Blend modes can create transparency in a layer regardless of the setting of its Opacity parameter. This is because the pixels of an image with a selected blend mode are combined with the pixels of any layers lying immediately below in the Canvas. For example, if you overlap two layers, then set the blend mode of the top one to Screen, the darker areas of the screened image become transparent, while the lighter areas remain more solid, resulting in the following image:
Important: The transparency created by most of the available blend modes only affects how a layer combines with overlapping layers underneath. These blend modes do nothing to affect a layer’s alpha channel. For information about blend modes that do affect a layer’s alpha channel, see Blend Modes That Manipulate Alpha Channels.
Each blend mode combines layers in different ways. For example, setting the top layer’s blend mode to Multiply yields a result opposite to that of the Screen blend mode, as the darker areas of the image remain solid, and the lighter areas become transparent.
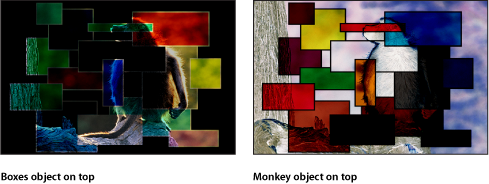
Blend modes only affect the combination of a layer with the layers below it. Any layers appearing above have no effect on this interaction, even if the layer is transparent. In the following example, the text layers on the top level have no effect on the blended images below.

For overlapping layers with different blend modes, the bottommost pair of layers is combined first, and that combination then interacts with the next layer up, and so on until all overlapping layers are combined for the final image. In this case, each layer with a specified blend mode only interacts with the image below it, whether that image is a single layer or a pair of layers blended together.
Each of Motion’s blend modes works in conjunction with the Opacity parameter to alter the interaction between the foreground and background layers. Adjusting a layer’s opacity lessens the blending effect assigned to it, even as it reduces that layer’s visibility. This allows you to customize any blend mode to better suit your needs.
Blend modes only affect overlapping layers, and have no interaction with your project’s background color (unless the background is set to Environment). If you specify a blend mode for a layer that doesn’t overlap anything, that layer remains as it was before.
Choose an option from the Blend Mode pop-up menu in the HUD.
Choose an option from the Blend Mode pop-up menu in the Properties Inspector.
Choose Object > Blend Mode, then choose an option from the submenu.
Display the Blend Mode column in the Layers list (choose View > Layers Columns > Blend Mode), then choose an option from a layer’s Blend Mode pop-up menu.
Control-click a layer in the Canvas, then choose an option from the Blend Mode submenu in the shortcut menu.
Control-click a layer in the Layers list or Timeline, then choose an option from the Blend Mode submenu in the shortcut menu.
Preserve Opacity Option
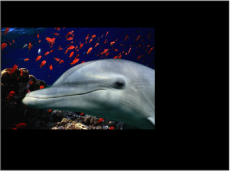
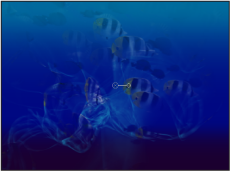
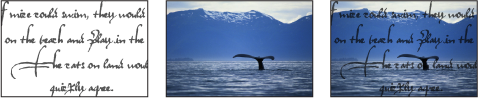
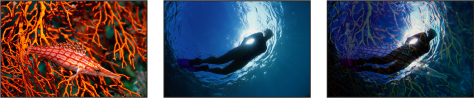
The Preserve Opacity checkbox in the Properties Inspector allows you to limit a layer’s visibility to areas of the Canvas where the layer overlaps nontransparent regions of other layers. For example, you might place two overlapping layers into your project, as shown below:
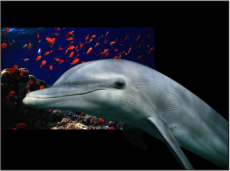
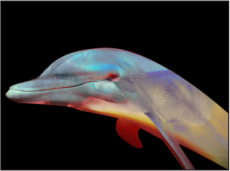
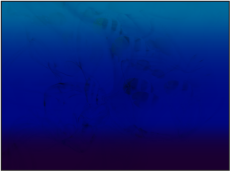
If you select Preserve Opacity for the Dolphin layer in front, the result is this:
The only area of the Dolphin layer visible is the area that overlaps the sea life picture layer behind it. At first, this might not appear to be very exciting, but the Preserve Opacity checkbox can be used in combination with the opacity and blend mode to create some very interesting effects.
Note: The layer with the enabled Preserve Opacity parameter takes the opacity value of the layer beneath it in the composite stack.
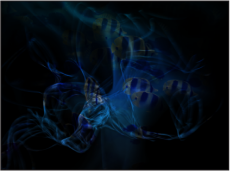
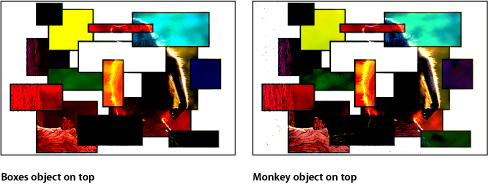
Preserve Opacity is an easy way to selectively reveal part of a layer. In this example, by setting the blend mode of the top color wash layer to Exclusion, you get the resulting image:
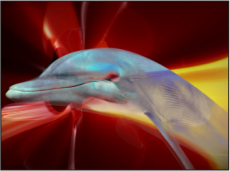
By selecting the Preserve Opacity checkbox for the color wash layer on top, only the overlapping parts are displayed, and the superimposed image only affects the Dolphin layer.
With a layer selected in the Canvas, Layers list, or Timeline, select the Preserve Opacity checkbox in the Properties Inspector.
Using Blend Modes
Each blend mode presents a different method for combining two or more images together. Blend modes work in addition to a layer’s alpha channel and opacity parameter.
To understand the descriptions of each blend mode in this chapter, it’s important to understand that blend modes mix colors from overlapping images based on the brightness values in each color channel in an image. Every image consists of red, green, blue, and alpha channels. Each channel contains a range of brightness values that define the intensity of each pixel in the image that uses some of the channel’s color.
The effect that each blend mode has on overlapping layers depends on the range of color values in each layer. The red, green, and blue channels in each overlapping pixel are mathematically combined to yield the final image.
These value ranges can be described as blacks, midrange values, or whites. These regions are loosely illustrated by the chart below.

For example, the Multiply blend mode renders color values that fall into the white areas of an image transparent, while the black areas of the image are left alone. All midrange color values become translucent, with colors in the lighter end of the scale becoming more transparent than the colors in the darker end of the scale.
Group Blend Modes
Blend modes work differently depending on whether they’re used with groups or layers. In particular, the Pass Through blend mode is available only for groups.
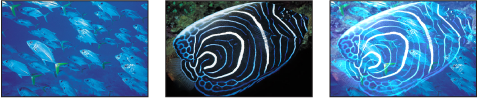
When a group is set to Pass Through, each layer is blended with all layers and groups that appear underneath it in the Layers list. In this example, the Swirls layer is set to Stencil Luma, and the Fishes layer is set to Add.
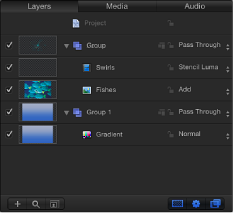
With the enclosing group set to Pass Through, the Swirls layer stencils all other layers underneath it, including the Gradient layer in the bottom group. The result is that all layers are stenciled against the background color. The Fishes layer is likewise added to the combined stack of layers.
When a group is set to Normal, the layers nested in that group can only be blended with one another. Layers nested in that group do not blend with layers in other groups beneath it in the Layers list.
In this example, the Fishes and Swirls layers in the topmost group are blended only with themselves when the topmost group is set to Normal.

The Gradient layer in the bottom group is left unaffected, although the transparency in the top group caused by the combination of the Add and Stencil Luma blend modes reveals it in the background.
When you set a group to an available blend mode, each layer nested in that group is blended according to its blend mode. The resulting image is then blended with the groups underneath, according to the selected blend mode for that group. In this example, the topmost group is set to Multiply. As a result, the combination of the Added Fishes and the Stenciled Swirls layers is multiplied with the Gradient layer in the bottommost group.
Layer Blend Modes
The following section describes how blend modes affect individual layers. All blend modes are presented in the order in which they appear in the Blend Mode pop-up menu.
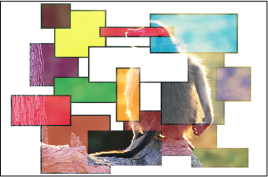
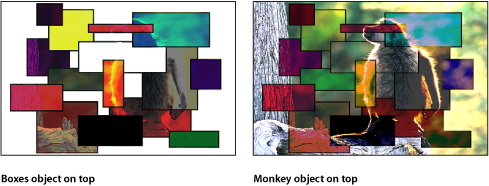
About the Examples in This Section
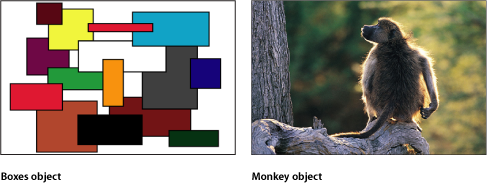
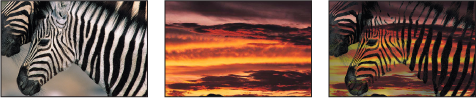
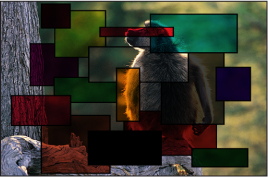
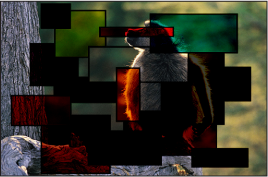
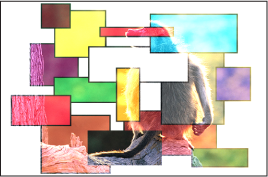
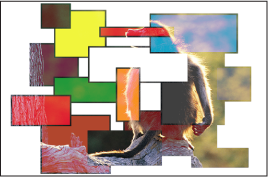
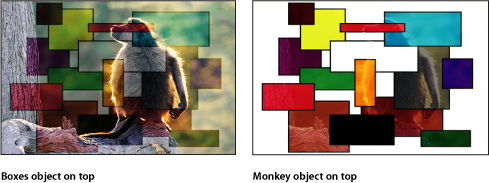
Most of the examples in this section are created using the following two reference images. The resulting “Mondrian Monkey” illustrates how differently the color values from each image interact when using each blend mode. When examining the results, pay attention to the white and black areas of the colored squares, as well as the highlights and shadows in the monkey. These show you how each blend mode treats the whites and blacks in an image.
The other brighter and darker colors serve to illustrate each blend mode’s handling of overlapping midrange color values. The yellow, gray, orange, and blue squares, in particular, all have very different color and luminance values that contrast sharply from example to example.
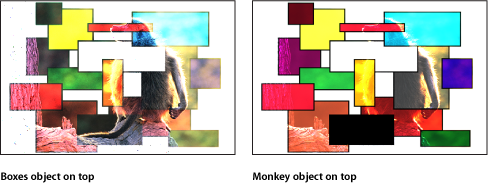
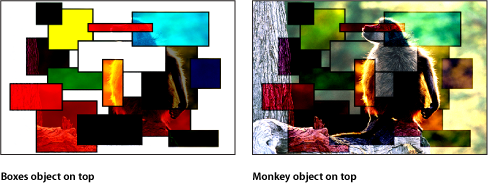
Important: Depending on the blend mode, layer and group ordering may or may not be important. Some blend modes behave differently depending on which image is on top.
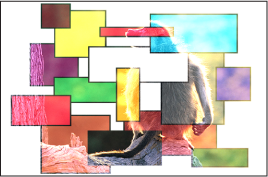
The default for layers. The only transparency in a layer set to Normal is caused by its Opacity parameter or by an alpha channel assigned to it.
Subtract darkens all overlapping colors. Whites in the foreground image go black, while whites in the background image invert overlapping color values in the foreground image, creating a negative effect.
Blacks in the foreground image become transparent, while blacks in the background image are preserved.
Overlapping midrange color values are darkened based on the color of the background image. In areas where the background is lighter than the foreground, the background image is darkened. In areas where the background is darker than the foreground, the colors are inverted.
The order of two layers affected by the Subtract blend mode is important.
Darken emphasizes the darkest parts of each overlapping image. Whites in either image allow the overlapping image to show through completely. Lighter midrange color values become increasingly translucent in favor of the overlapping image, while darker midrange color values below that threshold remain solid, retaining more detail.
The order of two layers affected by the Darken blend mode does not matter.

Suggested uses: The Darken blend mode is useful for using one image to texturize another selectively, based on its darker areas. You can also use Screen, Color Burn, and Linear Burn for variations on this effect.
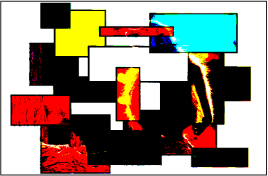
Like Darken, Multiply emphasizes the darkest parts of each overlapping image, except that midrange color values from both images are mixed together more evenly. Progressively lighter regions of overlapping images become increasingly translucent, allowing whichever image is darker to show through. Whites in either image allow the overlapping image to show through completely. Blacks from both images are preserved in the resulting image.
The order of layers affected by the Multiply blend mode does not matter.
Suggested uses: The Multiply blend mode is useful in situations where you want to knock out the white areas of a foreground image and blend the rest of the image with the colors in the background. For example, if you superimpose a scanned sheet of handwritten text over a background image using the Multiply blend mode, the resulting image becomes textured with the darker parts of the foreground.
Color Burn intensifies the dark areas in each image. Whites in the background image replace the foreground image, while whites in the foreground image become transparent. Midrange color values in the background image allow midrange color values in the foreground image to show through.
Lighter midrange color values in the background image allow more of the foreground image to show through. Darker midrange values in all visible overlapping areas are then mixed together, resulting in intensified color effects.
The order of two layers affected by the Color Burn blend mode is important.

Similar to Multiply, except that darker overlapping midrange color values are intensified, like Color Burn. Progressively lighter color values in overlapping images become increasingly translucent, allowing darker colors to show through. Whites in either image allow the overlapping image to show through completely.
The order of two layers affected by the Linear Burn blend mode does not matter.
Add emphasizes the whites in each overlapping image and lightens all other overlapping colors. The color values in every overlapping pixel are added together. The result is that all overlapping midrange color values are lightened. Blacks from either image are transparent, while whites in either image are preserved.
The order of two layers affected by the Add blend mode does not matter.
Suggested uses: The Add blend mode is useful for using one image to selectively texturize another, based on its lighter areas such as highlights. You can also use Lighten, Screen, Color Dodge, and Linear Dodge to create variations of this effect.
Lighten emphasizes the lightest parts of each overlapping image. Every pixel in each image is compared, and the lightest pixel from either image is preserved, so the final image consists of a dithered combination of the lightest pixels from each image. Whites in both images show through in the resulting image.
The order of two layers affected by the Lighten blend mode does not matter.
Like Lighten, Screen also emphasizes the lightest parts of each overlapping image, except that the midrange color values of both images are mixed together more evenly.
Blacks in either image allow the overlapping image to show through completely. Darker midrange values underneath a specific threshold allow more of the overlapping image to show. Whites from both images show through in the resulting image.
The order of two layers affected by the Screen blend mode does not matter.
Suggested uses: The Screen blend mode is useful for knocking out the blacks behind a foreground subject, instead of using a Luma Key. It’s mainly useful when you want the rest of the foreground subject to be mixed with the background image, based on its brightness. It’s good for glow and lighting effects and for simulating reflections. You can also use the Add, Lighten, and Color Dodge blend modes to create variations of this effect.
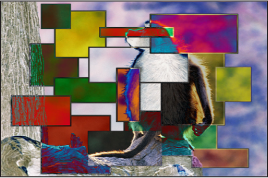
Whites in either the foreground or background image are preserved in the final image. Blacks in the background image replace the foreground image, while blacks in the foreground image become transparent.
Midrange color values in the background image allow midrange color values in the foreground image to show through. Darker values in the background image allow more of the foreground image to show through. All overlapping midrange color values are mixed together, resulting in interesting color mixes.
Reversing the two overlapping images results in subtle differences in how the overlapping midrange color values are mixed together.
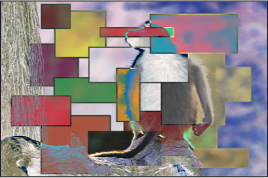
Similar to Screen, except that lighter midrange color values in overlapping regions become intensified. Blacks in either image allow the overlapping image to show through completely. Whites from both images show through in the resulting image.
The order of two layers affected by the Linear Dodge blend mode does not matter.
Whites and blacks in the foreground image become translucent and interact with the color values of the background image, causing intensified contrast. Whites and blacks in the background image replace the foreground image.
Overlapping midrange values are mixed together differently depending on the brightness of the background color values. Lighter background midrange values are mixed by screening. Darker background midrange values are mixed by multiplying.
The visible result is that darker color values in the background image intensify the foreground image, while lighter color values in the background image wash out overlapping areas in the foreground image.
The order of two layers affected by the Overlay blend mode is important.

Suggested uses: The Overlay blend mode is useful for combining areas of vivid color in two images.

Soft Light is similar to the Overlay blend mode. Whites and blacks in the foreground image become translucent, but interact with the color values of the background image. Whites and blacks in the background image replace the foreground image. All overlapping midrange color values are mixed together, creating a more even tinting effect than the Overlay blend mode.
The order of two layers affected by the Soft Light blend mode is important.
Suggested uses: The Soft Light blend mode is useful for softly tinting a background image by mixing it with the colors in a foreground image.
Whites and blacks in the foreground image block the background image. Whites and blacks in the background image interact with overlapping midrange color values in the foreground image.
Overlapping midrange color values are mixed together differently depending on the brightness of the background color values. Lighter background midrange values are mixed by screening. Darker background midrange values are mixed together by multiplying.
The visible result is that darker color values in the background image intensify the foreground image, while lighter color values in the background image wash out overlapping areas in the foreground image.
The order of two layers affected by the Hard Light blend mode is important.

Vivid Light is similar to the Hard Light blend mode, with two exceptions. The first is that midrange color values are mixed together more intensely. The second is that whites and blacks from either overlapping image are preserved in the end result.
Note: Dithering can cause overlapping areas of solid white and solid black.
Overlapping midrange color values are mixed together differently depending on the brightness of the background color values. Lighter midrange values become washed out, while the contrast of darker midrange color values is increased. The overall effect is more pronounced than with the Hard Light blend mode.
Reversing the two overlapping images results in subtle differences in how the overlapping midrange color values are mixed together.
Linear Light is similar to the Hard Light blend mode, except that overlapping midrange color values are mixed together with higher contrast. Whites and blacks in the foreground image block the background image. Whites and blacks in the background image interact with overlapping midrange color values in the foreground image.
Overlapping midrange color values are mixed together. Lighter background colors brighten the foreground image, while darker colors darken it.
The order of two layers affected by the Linear Light blend mode is important.
Pin Light is similar to the Hard Light blend mode, except that overlapping midrange color values are mixed together differently based on their color value. Whites and blacks in the foreground image block the background image. Whites and blacks in the background image interact with overlapping midrange color values in the foreground image.
The methods used by the Pin Light blend mode to mix two images are somewhat complex. Overlapping midrange color values are treated differently depending on which of the four regions of the luminance chart they fall into.
Lighter and darker areas of the foreground image falling close to the whites and blacks are preserved.
Areas of the foreground image falling near the center of the midrange are tinted by the background color.
Darker areas of the foreground image between the blacks and center of the midrange are lightened.
Lighter areas of the foreground image between the whites and the center of the midrange are darkened.
The end result might appear alternately tinted or solarized, depending on the lightness or darkness of the overlapping values. This blend mode lends itself to more abstract effects.
The order of two layers affected by the Pin Light blend mode is important.
Hard Mix is similar to the Hard Light blend mode, except that the saturation of overlapping midrange color values is intensified, resulting in extremely high-contrast images. Whites and blacks are preserved.
Although the order of two layers doesn’t affect the overall look of two images blended using the Hard Mix blend mode, there might be subtle differences.
Blend Modes That Manipulate Alpha Channels
The Stencil and Silhouette blend modes let you use a single layer’s alpha channel or luma values to isolate regions of background layers and groups.
Note: Similar effects can be accomplished using shape and image masks. In addition, masks might provide you with a greater degree of control, depending on your needs. For more information, see Using Shapes, Masks, and Paint Strokes.
Stencil modes crop out all non-overlapping parts of layers underneath the layer used as the stencil. Silhouette modes do the opposite, punching holes in overlapping layers underneath in the shape of the layer used as the silhouette.
When working in a 3D group, changes in depth order affect the Stencil and Silhouette blend modes differently. For example, if you have two layers in a 3D group and the upper layer is set to Stencil Alpha or Stencil Luma, the blend mode remains in effect when the upper layer is moved behind the lower layer in Z space. If you have two layers in a 3D group and the upper layer is set to Silhouette Alpha or Silhouette Luma, the blend mode does not remain in effect when the upper layer is moved behind the lower layer in Z space.
Limiting the Effect of Stencil and Silhouette Blend Modes
When you use the Stencil or Silhouette blend modes in a group set to the Pass Through blend mode, the resulting effect carries down through every layer in every group that lies underneath it in the Layers list, unless the group that contains it is rasterized. This is a powerful, but not always desired effect, because it prevents you from placing a background group to fill the transparent area.
You can limit the Stencil or Silhouette blend mode to affect only those layers in the same enclosing group by setting the group’s blend mode to anything other than Pass Through.
For example, if you set the enclosing group of the two layers in the Silhouette Alpha example to Normal, then add a group underneath containing additional layers, those layers show through the transparent areas created by the silhouetted group.
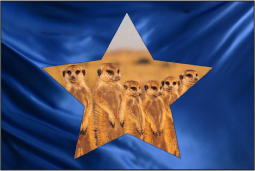
The Stencil Alpha blend mode uses the alpha channel of the affected layer to crop out all non-overlapping parts of layers and groups underneath it in the Layers list.
The Stencil Luma blend mode does the same thing as the Stencil Alpha blend mode, but uses the affected layer’s luma value to define transparency. Stencil Luma is useful if the layer you want to use for cropping has no alpha channel of its own.
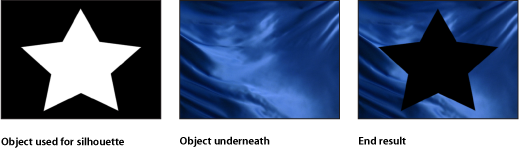
Silhouette Alpha is the reverse of the Stencil Alpha blend mode and is useful for cutting holes in layers underneath.
The Behind blend mode forces the layer to appear behind all other layers and groups, regardless of its position in the Layers list and Timeline.
If multiple layers or groups are set to Behind, they appear behind all other groups not set to Behind, in the order in which they appear in the Layers list.
The Alpha Add blend mode works similarly to the Add blend mode, but instead of adding the color channels of overlapping layers, it adds their alpha channels together. Try using this blend mode instead of Motion’s default method of alpha channel compositing for a different treatment of overlapping areas of translucency.
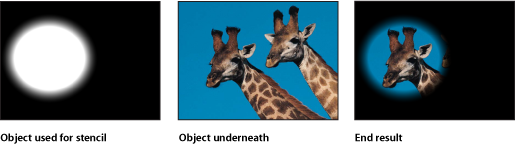
This mode takes bright areas from the background layer at the edge of the matte and blurs them into the foreground layer.
This is intended to create a more organic, seamless composite, where light from the background appears to bleed onto the foreground layer as would occur in a natural, non-composited image. To adjust the parameters that affect the Light Wrap, such as the Amount, Intensity, Opacity, and Mode, apply the Keyer filter and make those adjustments in the Filters Inspector. For more information, see Keyer.
Note: Motion applies the Light Wrap effect at the end of the rendering process. When you add other filters to the layer, such as color correction effects, they are rendered before the Light Wrap.