Creating Projects
Creating a project is the first step in the Motion workflow. There are three ways to start a project:
Open one of the supplied templates.
Open a blank project using a project preset.
Open a blank project using your own settings (for example, if you need an unusual frame size or frame rate not included in the project presets).
Note: Previous versions of Motion allowed multiple open projects, each appearing in its own window. Motion 5 allows only one open project at a time. If you have one project open and attempt to create or open another, Motion prompts you to save, then closes the current project before opening the next project.
Motion is resolution-independent, which means it supports projects using a range of frame sizes and frame rates. You can create small movies for streaming on the web, standard-definition and high-definition movies for broadcast, and even film-resolution files for large-screen display. Regardless of the resolution you choose, the Motion workflow is the same (although high-resolution projects using large media files can have higher memory and graphics card requirements than projects with smaller resolutions).
Motion is hardware-dependent. This means that the type of graphics card installed on your computer affects performance and determines the maximum file size you can import into Motion. For most recommended cards, the image size limit is 4K or 8K. However, other factors affect performance, including the amount of VRAM on your computer and the number of monitors connected to your graphics card. For the best results, resize very large images to the largest size required in the project, but no larger. For more information, visit the Motion website at http://www.apple.com/finalcutpro/motion.
Note: Because of hardware limitations and differences, the appearance of projects shared between computers with different installed graphics cards may vary.
Each project in Motion has a single group of project properties that define the duration of the project, the size of the Canvas, the frame rate of playback, and other details that affect how the composition is formatted. Later, when you finish the project and are ready to export it, these project properties define the media file that is created. Although you can change these settings later, it’s best to choose the settings that match your final planned output format before you begin the project.
Regardless of the project settings, Motion lets you import nearly any kind of media file supported by QuickTime. Further, you can mix media files with different properties in the same project. For example, you can combine video clips of different frame sizes with graphics files. In the end, the file you output uses the frame size and frame rate specified by the project properties.
The Project Browser
The easiest way to open a new or saved project is to use the Project Browser window. When you open Motion, the Project Browser appears, giving you access to Motion projects, new and old.
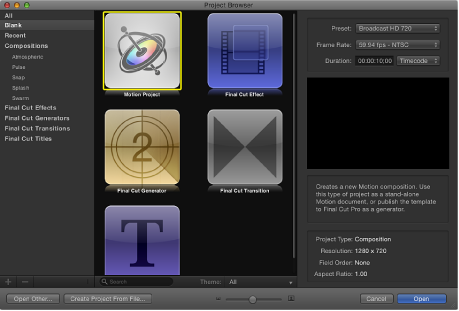
The Project Browser contains three columns: a sidebar with a list of project categories, a project stack in the center displaying thumbnails of available projects based on the sidebar selection, and an information column on the right listing file format details.
To filter available projects by type, select an item from the list in the sidebar. The categories include:
All: Displays all available projects in the project stack: blank projects, recently opened projects, Motion templates, and Final Cut Pro X templates.
Blank: Displays the five blank project types: Motion Project, Final Cut Effect, Final Cut Generator, Final Cut Transition, and Final Cut Title. When starting a project, choose one of these items. For more information, see Creating a Blank Motion Project and Creating Templates for Final Cut Pro X.
Recent: Displays a list of recently opened Motion projects.
Compostions: Displays a list of preset templates in several categories, including Atmospheric, Pulse, Snap, Splash, and Swarm.
Final Cut Effects: Displays a list of saved effect templates for use in Final Cut Pro X.
Final Cut Generators: Displays a list of saved generator templates for use in Final Cut Pro X.
Final Cut Transitions: Displays a list of saved transition templates for use in Final Cut Pro X.
Final Cut Titles: Displays a list of saved title templates for use in Final Cut Pro X.
The project stack at the center of the File Browser displays thumbnails of available projects (blank and saved) in the category selected in the sidebar.
You can further filter the contents of the stack by entering a word in the search field or using the Theme pop-up menu at the bottom of the stack. Choosing a theme limits the display to projects assigned to that theme.
You can control the size of the thumbnails in the project stack by dragging the scale slider at the bottom of the window, which lets you view more items without scrolling.
When you select an item in the stack, the right column of the Project Browser displays file settings and a video preview, if one is available.

Before opening a new project, you can modify its preset resolution, frame rate, and duration using the pop-up menus above the preview area.
Opening a Project
There are several ways to locate and open a Motion project from the Project Browser.
Select a category of content in the sidebar to limit which items are displayed in the project stack.
Select an item from the project stack.
A video preview, if available, plays in the preview area on the right.
Modify the resolution, frame rate, and default duration if needed using the pop-up menus above the preview area.
Click Open.
The Project Browser closes and the project you selected opens in the Motion workspace. If you selected an existing project, that project opens to its last saved state. if you select a blank project type, preset project type, or Final Cut Pro X template, a new, unsaved project is opened. Saving that project does not overwrite the preset project or template.
Using the buttons at the bottom of the Project Browser, you can also open a specific project that doesn’t appear in the Project Browser, but is accessible through the Finder. Alternatively, you can open a specific media file or group of files—movies, still images, and so on—and create a Motion project containing those files.
In the Project Browser, click Open Other or press Command-O.
The Open dialog appears.
In the Open dialog, navigate to the Motion project file to open, select it, then click Open.
In the Project Browser, click Create Project From File.
The Import Files as Project dialog appears.
Navigate to and select the one or more media files, Shift-clicking to select contiguous items or Command-clicking to select noncontiguous items.
As you select files, format settings at the bottom of the dialog become available. Settings inherent to the selected files remain dimmed, but propagate to the new project.
For example, because movie files have an inherent frame rate, aspect ratio, and field order, those settings are dimmed in the Import Files as Project dialog. Because still images do not have a frame rate or a field order, those settings are enabled in the dialog, allowing you to choose a frame rate and field order for the new Motion project.
If needed, set the Frame Rate, Aspect Ratio, Field Order, and Audio mix settings.
If you selected an item from an image sequence, select the Image Sequence checkbox to have Motion use each image as a frame in a movie clip. For more information, see Image Sequences.
Except for Frame Rate, these settings can be modified after the project is created, in the Properties Inspector. For more information, see Project Properties.
Click Import as Project.
The file opens in a new Motion project window.
Creating Projects from Templates
An easy way to create a project in Motion is to open and modify an existing template. Motion templates—shown in the Compositions category in the sidebar—are premade, royalty-free projects that you can customize. Each template contains graphics, text objects, and backgrounds.
You can also create templates for frequently used layouts, customizing them with updated text and graphics.
Choose File > New (or press Command-N).
When the Project Browser appears, select a template category from the Compostions section in the sidebar.
The templates for that category appear in the project stack.
Click a template to see an animated preview in the preview area, along with additional information, including resolution, duration, and frame rate.
To create a project from the selected template, click Open a Copy.
A new project opens in the Motion workspace. You can customize the project by editing the text or exchanging the graphic elements with your own. The changes you make to projects created using templates are not saved to the source template file.
For more information about using, modifying, and creating templates, see Customizing and Creating Templates.
Creating Final Cut Pro X Templates
A special set of templates in the Project Browser lets you create special effects, animated titles, editing transitions, and graphics generators for use in Final Cut Pro X. Available in the Blank category of the Project Browser sidebar, the Final Cut templates contain placeholders designed to simplify customization.
When Motion 5 and Final Cut Pro X are installed on the same computer, saving a Final Cut template in Motion sends the custom effect to the Final Cut Pro X effects browsers, where it can be applied to clips in the editing Timeline. For more information on using Final Cut templates, see Creating Templates for Final Cut Pro X.
Creating a Blank Motion Project
To create a project from scratch, select the Motion Project object in the Blank category of the Project Browser, choose a video resolution, and click Open. A new, empty project opens in the workspace, ready for you to add objects.
Choose File > New (or press Command-N).
If an unsaved project is open, Motion prompts you to save that project, or close it without saving.
The Project Browser appears.
Select the Blank category in the sidebar, then click the Motion Project icon in the stack.
Choose a resolution from the Preset pop-up menu and a frame rate from the Frame Rate pop-up menu in the right column, then click Open.
A new, untitled Motion project opens. The project is not saved to disk until you choose a save command from the File menu. For more information on saving project files, see Saving Projects.
Creating Blank Projects with Custom Settings
If none of the options in the Presets pop-up menu of the Project Browser meet your needs, you can create a project with custom settings from the same window.
Choose File > New (or press Command-N).
The Project Browser appears.
Select the Blank category in the sidebar, then click the Motion Project icon in the stack.
Choose Custom from the Preset pop-up menu above the preview area.
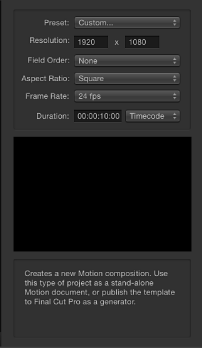
Additional settings controls appear.
Choose the resolution (width and height), field order, aspect ratio, frame rate, and default duration for your custom project.
Click Open.
A new Motion project opens using the settings you specified.
Bypassing the Project Browser
If you consistently create projects with a specific preset, template, or other starting project, you can bypass the Project Browser. This way, when you create a project, it is opened in the Motion workspace with the settings you established.
These settings are controlled in the Project pane of Motion Preferences.
Choose Motion > Preferences (or press Command-Comma).
The Motion Preferences window appears.
Click the Project icon to open the Project pane.
In the For New Documents setting, click Use Project.
Note: If you haven’t assigned a preset project, the setting reads: Use Project: Nothing Selected. When you choose a project, the text updates to reflect the name of the selected project.
Click Choose.
A window opens containing the contents of the Project Browser.
In the Project Browser window, select a category in the sidebar and a project type from the center stack, then choose a preset from the right column.
Click Open.
The selected project is assigned to the Use Project option in the Project pane of the Preferences window.
From now on, the Project Browser does not appear when you choose File > New (or press Command-N). Instead, a new project opens in the format set in Motion Preferences.
Creating, Editing, and Deleting Presets
If you commonly create projects using custom settings that don’t match any available preset, you can create a preset with these settings for future use. Presets are created, modified, and deleted in the Presets pane of Motion Preferences.
Note: The Default checkbox in the Presets pane of Motion preferences has no effect. To set a default project preset, see Bypassing the Project Browser.
Choose Motion > Preferences (or press Command-Comma).
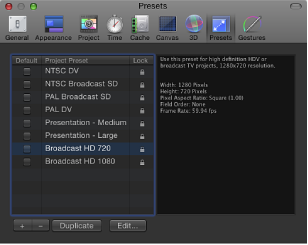
Open the Presets pane.
Click the Add button (+) beneath the presets list.
The Project Preset Editor appears.
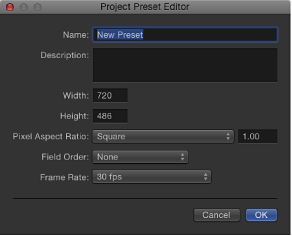
In the Project Preset Editor, do the following:
In the Name field, enter a descriptive name for the preset.
In the Description field, enter a brief description of what that preset is for. Include significant characteristics of that preset, such as frame size and frame rate.
Enter a frame size into the Width and Height fields.
Choose a Pixel Aspect Ratio, Field Order, and Frame Rate from the corresponding pop-up menus.
Click OK.
The new preset appears in the Presets pane and in the Presets pop-up menu in the Project Browser.
If you’re done creating project presets, close Motion Preferences.
Note: For more information on industry-standard frame sizes, pixel aspect ratios, field order, and frame rates, see Supported File Formats.
In Motion Preferences, select a preset in the Presets pane.
Click Duplicate.
The duplicated preset appears underneath the original preset with “copy” appended to its title.
In Motion Preferences, select a preset in the Presets pane.
Click Edit.
When the Project Preset Editor appears, make your changes, then click OK.
Note: You cannot edit or delete locked project presets.
In Motion Preferences, select a preset in the Presets pane.
Click the Delete button (–) underneath the presets list.
Note: You cannot edit or delete locked project presets. You cannot unlock a preset that is built into Motion. When the preset is double-clicked, an alert appears stating that the preset cannot be modified. To create a copy of the preset that you can customize, click OK.
Moving Presets Between Computers
Each preset you create is saved as a separate file. If you create custom presets that you rely on, you can move them to other computers that have Motion installed. All user-created presets are stored in the /Users/username/Library/Application Support/Motion/Presets/Project/ folder.
Copy your custom preset files to that computer’s /Users/username/Library/Application Support/Motion/Presets/Project/ folder.