Tracking Behavior Parameters
The following section provides a detailed description of the parameters available in the different tracking behaviors.
Note: Cloned objects cannot be tracked.
Analyze Motion Controls
The Analyze Motion behavior is designed for use with footage (a movie or image sequence). This behavior can be thought of as a traditional correlation tracker—you position an onscreen tracker on a reference pattern on a clip. The movement of the clip at the specified reference point is analyzed, and the analyzed data is saved in the behavior. The recorded data can then be applied to other objects in the project.
The Analyze Motion behavior does not transform the input image. It is used to generate tracks that can be referenced by the Match Move, Stabilize, Track Parameter, and Track Shape behaviors.
For information on using the Analyze Motion behavior, see General Motion Tracking Workflow.
Note: Analyze Motion cannot reference other tracking behaviors.
Important: The Analyze Motion behavior can only be applied to footage objects (a QuickTime movie or image sequence).
- Movement: The Movement parameters contain the Analyze and Reverse controls.
- Analyze: This button, when clicked, begins the motion tracking analysis. When you click Analyze, a status window appears and displays the tracking progress. To stop the analysis, click the Stop button in the status window or press Esc.
The start of the track is based on the current playhead position, rather than the start of the behavior in the Timeline.
- Tracker Preview: This preview area provides a magnified view of the tracking reference area for the selected tracker. The preview updates as you adjust the position of the tracker in the Canvas. You can drag in the preview area to adjust the position of the tracker. When dragging in the preview area, the image moves around the red crosshair that represent the tracker, while the tracker moves in the Canvas. You can also Option-drag left or right to decrease or increase pattern size. (You can also adjust the Track Size slider to achieve the same result.)
- Offset Track: This checkbox lets you select a new reference point when the original reference point becomes temporarily hidden or goes off the screen. Motion uses the new tracking point to continue the same tracking path as the original reference point. For more information on offset tracking, see Tracking Obscured or Off-Frame Points Using Offset Tracking.
- Auto-Zoom Mode: This pop-up menu lets you set the display of the auto-zoomed tracker in the Canvas. There are three choices:
- Normal: Displays a normal pattern.
- Contrast: Displays the tracker pattern with contrast detection.
- Edge: Displays the tracker pattern with edge detection.
The Auto-Zoom Mode applies to trackers in the Canvas and does not appear in the Tracker Preview in the Behaviors Inspector.
Note: When None is chosen from the Auto-Zoom pop-up menu, the Auto-Zoom Mode setting has no effect.
- Look Ahead Frames: This slider and value slider allow you to specify the number of future frames to be analyzed by the tracker. In other words, you can direct the tracker to look in a specific location for its reference point. This is useful for footage that contains fast-moving objects, because the reference point can quickly get away from the tracker. For more information on using Look Ahead Frames, see Giving Motion a Hint by Looking Ahead.
- Track list: This list displays the trackers in the behavior. In the Analyze Motion behavior, the trackers in this list are called Track 1, Track 2, and so on.
To disable a tracker, deselect its checkbox. To remove a tracker, click the Remove button. A tracker that is turned off is not analyzed.
Click the disclosure triangle next to the track name to reveal additional parameters:
- Track Size: This slider adjusts (in pixels) the pattern search size for the tracker. As you adjust the tracker size, the Tracker Preview is updated to show the new tracker size. There is no visual change in the Canvas tracker.
To adjust the Track Size without exposing its parameters, Option-drag left in the Tracker Preview area to reduce the tracker size; Option-drag right to increase the tracker size.
- Search Size: This slider increases or reduces the tracker’s search area size. In Motion, you do not specify the size of a search area when setting up trackers in the Canvas. To change the default search size, use the slider or value slider. If Search Size is set to 200 percent, the tracker’s search area is twice the default search area size.
- Fail Tolerance: This parameter defines the amount of tolerance for error, or confidence value, of the tracker. In other words, it defines at what score the tracker determines it can match a reference feature. When above the score, the tracker accepts the match. When below the score, the tracker rejects the match. When the match is rejected, the Fail Behavior kicks in.
- Fail Behavior: This pop-up menu specifies what happens if the track confidence value falls below the Fail Tolerance amount. The following options are available:
- Smart Retry: The tracker attempts to find the reference pattern in a larger search area. If the pattern cannot be found, the tracker switches to the Predict option. Smart Retry is the default fail behavior.
- Stop: The analysis stops when the tracker loses the reference pattern. You can also click the Stop button in the tracking progress dialog or press Esc to stop an analysis.
- Predict: The tracker predicts a new search area without creating keyframes until it finds a match for the reference pattern. This is excellent for tracked objects that pass behind foreground objects.
- Predict and Key: If a failure is detected, the tracker predicts the location of the keyframe based on a vector of the last two keyframes, and continues tracking in the new area.
- Don’t Predict: The tracker remains in its position and searches for subsequent matches as the clip’s frames progress. While searching for a match, the tracker does not create keyframes.
- Use Existing Keyframes: The tracker uses keyframes you have manually created as a guide. After manually adding keyframes, return to the start frame and start the tracking analysis. If the tracker has difficulty locating the track pattern, the manually created tracking keyframes are referenced to guide the tracker.
- Color: This color control sets a new color for the onscreen tracker. The default tracker color is red. When a tracker is selected, its center point is yellow and the border of its magnified inset is the color set in the color well. To adjust individual color channels, including the tracker’s opacity, click the disclosure triangle.
The Analyze Motion HUD contains controls to start the motion track (the Analyze button), reverse the direction of the track (the Reverse checkbox), and to specify an offset track (the Offset Track checkbox). Offset tracking allows you to reposition the tracker at a new reference pattern.
Match Move Controls
The Match Move behavior can be applied to many object types, including groups, cameras, shapes, particle emitters, and so on.
Important: When applying the Match Move behavior to a group, make sure the footage being analyzed resides outside of the group being tracked.
To use Match Move (and access its parameters), your project must contain a foreground and a background object. For information on using the Match Move behavior, see Match Move Workflows.
- Source: Drag the source object for the match move into this well. The source object can be another tracking behavior, an animated object, or a footage object. When a Match Move behavior is added to an object, the nearest animated object, recorded track, or footage object beneath the behavior in the Layers list appears in this well. To clear a Source well, drag the item away from the well and release the mouse button.
When any nonfootage object (such as a shape or mask) is dropped in the Source well, the trackers are no longer available in Match Move.
Note: When the Match Move behavior is applied to a mask, the masked object is selected as the source.
- Movement: The Movement parameters contain the Analyze and Reverse controls, which appear when there is a tracking source (footage) in the source well.
- Analyze: Click the Analyze button to begin the motion tracking analysis. When you click Analyze, a status window appears and displays the tracking progress. To stop the analysis, click the Stop button in the status window or press Esc.
The start of the track is based on the current playhead position, rather than the start of the behavior in the Timeline.
- Type: This pop-up menu allows you to choose between one-point, two-point, or four-point tracking. There are two options:
- Transformation: This option allows one-point or two-point tracking, transforming the destination object.
- Four Corners: This option enables four-point tracking, corner-pinning the destination object. When this option is chosen, the Direction and Adjust parameters are no longer available.
Important: The Four Corners option is not available when Match Move is applied to a 3D group or a mask. To corner-pin a 3D group, select the Flatten checkbox in the Group Inspector.
- Transform: This pop-up menu sets how the destination object (the object to which the Match Move behavior is applied) moves. There are two options:
- Attach to Source: This option anchors the foreground object to the recorded track or animation source. Use Attach to Source when the source object is scaling or rotating, and you want the destination object to stick to a spot on the source object. Any animation that existed on the destination object before applying the track can be preserved by using the Adjust parameters (Position, Scale, and Rotation), available when Transformation is chosen from the Type pop-up menu.
Note: Although the destination object is attached to the movement of the source object, the position of the destination object can be changed (offset from the source object).
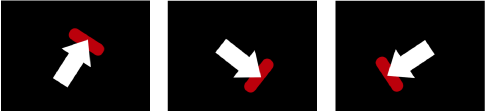
In the following example, Match Move is applied to the red pill shape and uses the animated white arrow as the source object. The white arrow has an applied Spin behavior and is spinning in a clockwise direction. Additionally, the arrow’s anchor point is positioned at the bottom of the arrow (at the opposite end from the tip).
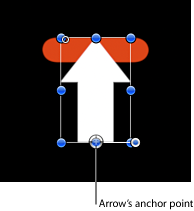
When Attach to Source is chosen from the Transform pop-up menu and Position and Rotation are selected in the Adjust parameter row, the red shape is anchored to one spot on the arrow (the tip, in this example) as it matches the movement of the arrow.
- Mimic Source: This option allows the destination object to mimic the recorded track or animation source. Any animation that existed on the foreground object before applying the track can be added to the track by selecting Position, Rotation, or Scale in the Adjust parameters.
Note: As with Attach to Source, the position of the destination object can be changed (offset from the source object). Additionally, the destination object can be scaled and rotated.
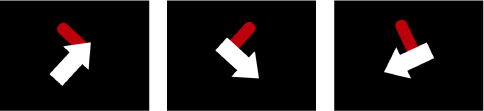
In the following images, Mimic Source is chosen from the Transform pop-up menu and Position and Rotation are selected in the Adjust parameter row. The red shape is not locked to one spot on the white arrow, but rather mirrors the arrow’s animation.
Mimic Source allows you to transform a tracked object in the Properties Inspector. For example, you can change the scale, position, or rotation of a corner-pinned object. Also when using Four Corners, Mimic Source allows you to adjust the trackers without adjusting the foreground image.
- Adjust: This parameter sets the type of transformation applied to the destination object.
- Position: When enabled, the position of the source (or background) object is applied to the destination (or foreground) object, and the Anchor (position) tracker is turned on.
- Scale: When enabled, the scale of the source (or background) object is applied to the destination (or foreground) object. The source track must include scale data for this parameter to have any effect. When Scale is enabled, the Rotation-Scale tracker is turned on.
- Rotation: When enabled, the rotation of the source (or background) object is applied to the destination (or foreground) object. The source track must include rotation data for this parameter to have any effect. When Rotation is enabled, the Rotation-Scale tracker is turned on.
- Tracker Preview: This preview area appears only when there is a tracking source (footage) in the source well. Use the preview to see a magnified view of the tracking reference area for the selected tracker. The preview updates as you adjust the position of the tracker in the Canvas. You can also drag in the preview area to adjust the position of the tracker. When dragging in the preview area, the image moves around the red crosshairs in the preview and the tracker moves in the Canvas.
- Offset Track: This parameter appears only when there is a tracking source (footage) in the source well. If a tracker’s reference point becomes temporarily hidden or goes off the screen, this parameter allows you to select a different reference point that continues the same tracking path as the original reference point. For more information on offset tracking, see Tracking Obscured or Off-Frame Points Using Offset Tracking.
- Auto-Zoom: This parameter appears only when there is a tracking source (footage) in the source well. Choose an option from this pop-up menu to set the magnification level when positioning the tracker in the Canvas. This allows you to zoom in on the Canvas when searching for an ideal tracking reference pattern. There are four choices: None, 2x, 4x, and 8x.
- Auto-Zoom Mode: This parameter appears only when there is a tracking source (footage) in the source well. Choose an option from this pop-up menu to set the display of the auto-zoomed tracker in the Canvas. There are three choices:
- Normal: Displays a normal pattern.
- Contrast: Displays the tracker pattern with contrast detection.
- Edge: Displays the tracker pattern with edge detection. The Auto-Zoom Mode applies to trackers in the Canvas and does not appear in the Tracker Preview in the Behaviors Inspector. When None is chosen from the Auto-Zoom pop-up menu, the Auto-Zoom Mode setting has no effect.
- Look Ahead Frames: This parameter appears only when there is a tracking source (footage) in the source well. This slider and value slider allow you to specify the number of future frames to be analyzed by the tracker. In other words, you can direct the tracker to look in a specific location for its reference point. This is useful for footage that contains fast-moving objects, because the reference point can quickly get away from the tracker. For more information on using Look Ahead Frames, see Giving Motion a Hint by Looking Ahead.
- Anchor/Rotation-Scale: Available when one-point or two-point tracking is enabled (when Transformation is chosen from the Type pop-up menu), these checkboxes turn the Anchor and Rotation-Scale trackers on or off. The anchor tracker records position data. When Position is enabled in the Adjust parameters, the Anchor tracker is turned on. Rotation and scale data are recorded by using the relationship between the Anchor and Rotation-Scale trackers. When Scale or Rotation is enabled in the Adjust parameters, the Rotation-Scale tracker is turned on.
When the Match Move behavior references another behavior, such as Analyze Motion, the Anchor tracker becomes the Anchor pop-up menu. Likewise, the Rotation-Scale tracker (if there is one) becomes the Rotation-Scale pop-up menu.
Click the Anchor or Rotation-Scale disclosure triangles to reveal additional parameters:
- Track Size: Use this slider to adjust (in pixels) the pattern search size for the tracker. As you adjust the track size, the Tracker Preview is updated to show the new track size. There is no visual change in the Canvas tracker.
To adjust the Track Size without exposing its parameters, Option-drag left in the Tracker Preview area to reduce the track size; Option-drag right to increase the track size.
- Search Size: Use this slider or value slider to increase or reduce the tracker’s search area size. In Motion, you do not specify the size of a search area when setting up trackers in the Canvas. To change the default search size, use the slider or value slider. If Search Size is set to 200 percent, the tracker’s search area is twice the default search area size.
- Fail Tolerance: This parameter defines the amount of tolerance for error, or confidence value, of the track. In other words, it defines at what score the tracker determines it is able to match a reference feature. When above the score, the tracker accepts the match. When below the score, the tracker rejects the match. After the match is rejected, the Fail Behavior kicks in.
- Fail Behavior: This pop-up menu specifies what happens if the track confidence value falls below the Fail Tolerance amount. The following options are available:
- Smart Retry: The tracker attempts to find the reference pattern in a larger search area. If the pattern cannot be found, the tracker switches to the Predict option. Smart Retry is the default fail behavior.
- Stop: The analysis stops when the tracker loses the reference pattern. You can also click the Stop button in the tracking progress dialog or press Esc to stop an analysis.
- Predict: The tracker predicts a new search area without creating keyframes until it finds a match for the reference pattern. This is excellent for tracked objects that pass behind foreground objects.
- Predict and Key: If a failure is detected, the tracker predicts the location of the keyframe based on a vector of the last two keyframes, and continues tracking in the new area.
- Don’t Predict: The tracker remains in its position and searches for subsequent matches as the clip’s frames progress. While searching for a match, the tracker does not create keyframes.
- Use Existing Keyframes: The tracker uses existing keyframes. Use this option if you manually create track position keyframes to guide the tracker. After manually adding keyframes, return to the start frame and start the tracking analysis. If the tracker cannot locate the track pattern, the manually created tracking keyframes are referenced to guide the tracker.
- Color: Click or Control-click the color well to set a color for the onscreen tracker. You can also click the eyedropper and select a color in the Canvas. The default tracker color is red. When a tracker is selected, its center point is yellow and the border of its magnified inset is the color set in the color well. To adjust the individual color channels, including the tracker’s opacity, click the disclosure triangle.
- Rotation-Scale (pop-up menu): When the Match Move behavior references another behavior, such as Analyze Motion, the Rotation-Scale tracker becomes the Rotation-Scale pop-up menu. The tracker’s subparameters are replaced with a pop-up menu that allows you to select the tracker from the referenced behavior you want to apply as the Rotation-Scale tracker. By default, Track 2 is applied as the Scale-Rotation tracker. If there is only one tracker in the referenced behavior, Track 1 is applied to both Anchor and Rotation-Scale.
- Anchor (pop-up menu): When the Match Move behavior references another behavior, such as Analyze Motion, the Anchor tracker checkbox becomes the Anchor tracker. The tracker’s subparameters are replaced with a pop-up menu that allows you to select the tracker from the referenced behavior you want to apply as the Anchor tracker. By default, Track 1 from the referenced behavior is applied as the Anchor tracker. If there is only one tracker in the referenced behavior, Track 1 is applied to both Anchor and Rotation-Scale.

When Match Move references another behavior, the trackers from the referenced behavior are applied to the Match Move trackers.
- Top Left: Available when four-point tracking is enabled (when Four Corners is chosen from the Type pop-up menu) and the Match Move behavior references another behavior (such as Analyze Motion), this pop-up menu allows you to select the tracker from the referenced behavior you want to apply as the top left tracker.
- Top Right: Available when four-point tracking is enabled (when Four Corners is chosen from the Type pop-up menu) and the Match Move behavior references another behavior (such as Analyze Motion), this pop-up menu allows you to select the tracker from the referenced behavior you want to apply as the top right tracker.
- Bottom Right: Available when four-point tracking is enabled (when Four Corners is chosen from the Type pop-up menu) and the Match Move behavior references another behavior (such as Analyze Motion), this pop-up menu allows you to select the tracker from the referenced behavior you want to apply as the bottom right tracker.
- Bottom Left: Available when four-point tracking is enabled (Four Corners is chosen from the Type pop-up menu) and the Match Move behavior references another behavior (such as Analyze Motion), this pop-up menu allows you to select the tracker from the referenced behavior you want to apply as the bottom left tracker.
The Match Move HUD contains controls to load an animated object or tracking data from another tracking behavior (via the Source well or the tracking behaviors pop-up menu), to start the motion analysis (via the Analyze button), to reverse the direction of the track (via the Reverse checkbox), to offset the track (the Offset Track checkbox), to specify whether the destination object is four-corner pinned (the Type pop-up menu), and to choose what transform is applied to the destination object (via the Adjust parameter).
Stabilize Controls
The Stabilize behavior uses a different method to analyze movement in a clip than the Match Move and Analyze Motion behaviors. Generally, you do not use trackers to stabilize a clip. The behavior’s sophisticated method of motion estimation tracks every pixel in one frame to the subsequent frame. A motion vector is calculated based on this analysis. The analysis can be performed on the entire clip, or on a track region. A track region is a user-defined area of a clip that is analyzed.
If the result of the analysis requires additional correction, you can perform manual tracking on noncontiguous time regions of the clip. For example, if an additional camera bump affects frames 350 to 380, you can add a tracker to analyze that portion of the clip. The data recorded from the analysis is added to the data recorded by the tracking to further smooth the clip.
In addition to considering horizontal, vertical, or horizontal and vertical movement in the clip, the Stabilize behavior also looks at position, scale, and rotation.
Note: The Stabilize behavior can only be applied to footage objects (a QuickTime movie or an image sequence).
For information on using the Stabilize behavior, see Stabilize Workflow.
Note: When Smooth is chosen from the Method pop-up menu, additional parameters become available in the HUD and Inspector.
- Movement: Click the Analyze button to begin the motion tracking analysis. When you click Analyze, a status window appears and displays the tracking progress. To stop the analysis, click the Stop button in the status window or press Esc.
When using the Stabilize behavior (without trackers), the track begins at the start of the clip, rather than the current playhead position.
- Track Region: Select this checkbox to define a subject or area to be analyzed. A red overlay appears in the Canvas. The area outside this overlay ignored. The track region’s onscreen controls are similar to a shape’s onscreen controls.
For more information on using the Track Region, see Adjusting the Stabilize Behavior’s Track Region.
Important: The Track Region must include some area in which the motion can be extracted. It should not be used as a mask for the object to track.
- Method: This pop-up menu defines how the stabilization is applied to the clip. There are two options:
- Stabilize: This method attempts to lock the motion of the principal subject in the shot to eliminate motion. As a result, the background appears to move around the subject being tracked.
- Smooth: This method smoothes the apparent motion of the camera, while allowing the general movement in the frame to proceed. It’s useful for removing jitter from a camera move. When enabled, this mode has three sliders for each dimension that can be smoothed.
- Adjust: This parameter allows you to choose the transformation to which the stabilization is applied. There are three Adjust buttons:
- Position: When enabled, stabilize is applied to the position of the analyzed image.
- Scale: When enabled, stabilize is applied to the scale of the analyzed image.
- Rotation: When enabled, stabilize is applied to the rotation of the analyzed image.
- Tracker: Click the Add button to add trackers to the Stabilize behavior. By default, trackers are added at the center of the Canvas. A maximum of two trackers can be added to the Stabilize behavior. When added, Track 1 is used as the anchor (for position) and Track 2 is used for rotation-scale.
After a tracker is added to a Stabilize behavior, the following occurs:
The Track Region parameter is no longer available.
The Reverse checkbox becomes available, allowing you to track a clip backwards.
The Tracker Preview, Offset Track, Auto-Zoom, Auto-Zoom Mode, Look Ahead Frames, and track list controls become available. For more information, see Analyze Motion Controls.
Note: When another behavior is used as the source for the stabilization, you cannot add trackers to the Stabilize behavior.
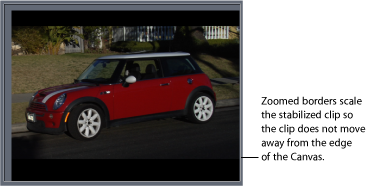
The Stabilize HUD contains controls to load another stabilize track into the behavior (via the Source well or the tracking behaviors pop-up menu), to start the motion analysis (via the Analyze button), to specify whether the clip is stabilized or smoothed (via the Method pop-up menu), to define how the stabilize clip is sized (via the Borders pop-up menu), and to choose what transform is applied to the analyzed clip (via the Adjust parameter).
Unstabilize Controls
The Unstabilize behavior is used to apply movement tracked in a Stabilize behavior applied to another object. This behavior does not perform tracking analysis. The Unstabilize behavior can be applied to many object types, including groups, cameras, shapes, particle emitters, and so on.
For information on using the Unstabilize behavior, see Unstabilize Workflow.
- Source: Drag a Stabilize behavior to this well to load the data into the Unstabilize behavior. To clear a Source well, drag the item away from the well and release the mouse button.
Note: Dragging other objects (such as footage) to the source well has no effect on the tracker.
- Action pop-up menu: Choose from a list of tracking data (from other tracking behaviors) in the project.

Note: The Unstabilize behavior can be converted to keyframes. For more information, see Converting Tracks to Keyframes.
The Unstabilize HUD contains two controls to load a stabilize track into the behavior: the Source well and the tracking behaviors pop-up menu. These controls are identical to the controls in the Inspector.
Track Points Controls
The Track Points behavior allows you to link the control points of a shape or mask (including paint strokes) to reference features on a source clip. This behavior also allows you to apply tracking data recorded by the Analyze Motion, Match Move, or Stabilize tracking behaviors to the control points of a shape or mask.
The Track Points behavior can be found in the Behaviors’ Shape subcategory in the Library, or by choosing Shape > Track Points from the Add Behavior pop-up menu in the toolbar.
For information on using the Track Points behavior, see Track Points Workflow.
- Source: Use to drag a source object for the track points to this well. The source object can be another tracking behavior, an animated object, or a footage object. To clear a Source well, drag the item away from the well and release the mouse button.
- Action pop-up menu: Choose from a list of tracking data (from other tracking behaviors) in the project.
- Transform: Use this pop-up menu to choose how the destination object moves. There are two options:
- Attach to Source: This option anchors the foreground object to the recorded track or animation source. Use Attach to Source when the source object is scaling or rotating, and you want the destination object to “stick” to a specific spot on the source object. Any animation that existed on the destination object before applying the track can be preserved by using the Adjust parameters (Position, Scale, and Rotation), available when Transformation is chosen from the Type pop-up menu.
Note: Although the destination object is attached to the movement of the source object, the destination object can be offset from the source object.
- Mimic Source: This option allows the destination object to “mimic” the recorded track or animation source. Any animation that existed on the foreground object before applying the track can be added to the track by selecting Position, Rotation, or Scale in the Adjust parameters.
Note: As with Attach to Source, the destination object can be offset from the source object.
- Movement: The Movement parameters contain the Analyze and Reverse parameters. This parameter appears only when there is a tracking source (footage) in the source well.
- Analyze: Click the Analyze button to begin the motion tracking analysis. A status window appears and displays the tracking progress. To stop the analysis, click the Stop button in the status window or press Esc.
The start of the track is based on the current playhead position, rather than the start of the behavior in the Timeline.
- Tracker Preview: This preview area appears only when there is a tracking source (footage) in the source well. Use the preview to see a magnified view of the tracking reference area for the selected tracker. The preview updates as you adjust the position of the tracker in the Canvas. You can also drag in the preview area to adjust the position of the tracker. When dragging in the preview area, the image moves around the red crosshairs in the preview and the tracker moves in the Canvas.
- Offset Track: This parameter appears only when there is a tracking source (footage) in the source well. If a tracker’s reference point becomes temporarily hidden or goes off the screen, this parameter allows you to select a different reference point that continues the same tracking path as the original reference point. For more information on offset tracking, see Tracking Obscured or Off-Frame Points Using Offset Tracking.
- Auto-Zoom: This parameter appears only when there is a tracking source (footage) in the source well. Choose an option from this pop-up menu to set the magnification level when positioning the tracker in the Canvas. This allows you to zoom in on the Canvas when searching for an ideal tracking reference pattern. There are four choices: None, 2x, 4x, and 8x.
- Auto-Zoom Mode: This parameter appears only when there is a tracking source (footage) in the source well. Choose an option from this pop-up menu to set the display of the auto-zoomed tracker in the Canvas. There are three choices:
- Normal: Displays a normal pattern.
- Contrast: Displays the tracker pattern with contrast detection.
- Edge: Displays the tracker pattern with edge detection. The Auto-Zoom Mode applies to trackers in the Canvas and does not appear in the Tracker Preview in the Behaviors Inspector. When None is chosen from the Auto-Zoom pop-up menu, the Auto-Zoom Mode setting has no effect.
- Look Ahead Frames: This parameter appears only when there is a tracking source (footage) in the source well. This slider and value slider allow you to specify the number of future frames to be analyzed by the tracker. In other words, you can direct the tracker to look in a specific location for its reference point. This is useful for footage that contains fast-moving objects, because the reference point can quickly get away from the tracker. For more information on using Look Ahead Frames, see Giving Motion a Hint by Looking Ahead.
- Track list: Tracks appear only when there is a tracking source (footage) in the source well. The Track List shows the trackers in the behavior as Track 1, Track 2, and so on. The number of trackers is determined by the number of control points on the shape with the applied Track Points behavior. For example, when a Track Points behavior is added to a shape with 12 control points, 12 trackers appear in the track list.
When another track is referenced, the track list is replaced with Control Point pop-up menus.
To disable a tracker, deselect its checkbox. To remove a tracker, click the Remove button. A tracker that is turned off is not analyzed with the track.
Click the disclosure triangle next to the track name to reveal additional parameters:
- Track Size: Use this slider to adjust (in pixels) the pattern search size for the tracker. As you adjust the track size, the Tracker Preview is updated to show the new track size. There is no visual change in the Canvas tracker.
To adjust the Track Size without exposing its parameters, Option–drag left in the Tracker Preview area to reduce the track size; Option–drag right to increase the track size.
- Search Size: Use this slider or value slider to increase or reduce the tracker’s search area size. In Motion, you do not specify the size of a search area when setting up trackers in the Canvas. To change the default search size, use the slider or value slider. If Search Size is set to 200 percent, the tracker’s search area is twice the default search area size.
- Fail Tolerance: Use this parameter to define the amount of tolerance for error, orconfidence value, of the track. In other words, it defines at what score the tracker determines it is able to match a reference feature. When above the score, the tracker accepts the match. When below the score, the tracker rejects the match. After the match is rejected, the Fail Behavior kicks in.
- Fail Behavior: Use this pop-up menu to specify what happens if the track confidence value falls below the Fail Tolerance amount. The following options are available:
- Smart Retry: The tracker attempts to find the reference pattern in a larger search area. If the pattern cannot be found, the tracker switches to the Predict option. Smart Retry is the default fail behavior.
- Stop: The analysis stops when the tracker loses the reference pattern. You can also click the Stop button in the tracking progress dialog or press Esc to stop an analysis.
- Predict: The tracker predicts a new search area without creating keyframes until it finds a match for the reference pattern. This is excellent for tracked objects that pass behind foreground objects.
- Predict and Key: If a failure is detected, the tracker predicts the location of the keyframe based on a vector of the last two keyframes, and continues tracking in the new area.
- Don’t Predict: The tracker remains in its position and searches for subsequent matches as the clip’s frames progress. While searching for a match, the tracker does not create keyframes.
- Use Existing Keyframes: Use this option if you have manually created track position keyframes to guide the tracker. After manually adding keyframes, return to the start frame and start the tracking analysis. If the tracker has difficulty locating the track pattern, the manually created tracking keyframes are referenced to guide the tracker.
- Color: Click or Control-click the color well to set a new color for the onscreen tracker. You can also click the eyedropper and select a color in the Canvas. The default tracker color is red. When a tracker is selected, its center point is yellow and the border of its magnified inset is the color set in the color well. To adjust the individual color channels, including the tracker’s opacity, click the disclosure triangle.
- Control Points: When the Track Points behavior references another behavior, such as Analyze Motion, the Track list parameters are replaced with the Control Point pop-up menus. There is a pop-up menu for each control point on the shape. From the pop-up menus, choose the track you want to assign to a control point.
Note: If you add or delete control points to a shape after you apply the reference track, select the Track Points behavior in Inspector or Layers list to refresh the Control Point pop-up menu list.
Tip: To check the number of any control point on a shape, you can select the shape in the Layers list, choose the Edit Points tool from the toolbar, then click on a control point in the Canvas.
The Track Points HUD contains controls to load an animated object or tracking behavior into the behavior (via the Source well or the tracking behaviors pop-up menu), to specify how the destination object moves, to start the motion analysis (via the Analyze button), to reverse the direction of the track (via the Reverse checkbox), and to offset the track (via the Offset Track checkbox).
Track Parameter Behavior Controls
The Track parameter behavior allows you to track the position parameter of an object (such as a filter, shape, or particle emitter) to a reference feature of a clip, or to apply tracking data to the position parameter of an object.
The Track parameter behavior can be found in the Behaviors’ parameter subcategory in the Library, or by choosing Parameter > Track from the Add Behavior pop-up menu in the toolbar.
For a description of the Tracker Preview, Offset Track, Auto-Zoom, Auto-Zoom Mode, Look Ahead Frames, and track list parameters, as well as tracker subparameters, see Analyze Motion Controls.
For information on using the Track parameter behavior, see Track Parameter Workflow.
- Source: Drag the source object for the track to this well. The source object can be another tracking behavior or a footage object. Drag a behavior to the Source well to load that track into the Track parameter behavior. To clear a Source well, drag the item away from the well and release the mouse button.
Note: An animated object cannot be used as a source for the Track parameter behavior.
- Action pop-up menu: Choose from a list of tracking data (from other tracking behaviors) in the project.
- Transform: This pop-up menu allows you to choose how the selected position parameter moves. There are two options:
- Attach to Source: This option anchors the position of the object to the recorded track or animation source. Use Attach to Source when the source object is scaling or rotating, and you want the filter’s center to stick to a specific spot on the source object. Any animation that existed on the filter’s center before applying the track can be preserved by using the Adjust parameters (Position, Scale, and Rotation), available when Transformation is chosen from the Type pop-up menu.
Note: Although the object’s position is attached to the movement of the source object, its position can be offset from the source object.
- Mimic Source: This option allows the object to mimic the recorded track or animation source. Any animation that existed on the foreground object before applying the track can be added to the track by selecting Position, Rotation, or Scale in the Adjust parameters.
Note: As with Attach to Source, the object’s position can be offset from the source object.
- Movement: Click the Analyze button to begin the motion tracking analysis. A status window displays the tracking progress. To stop the analysis, click the Stop button in the status window or press Esc.
The start of the track is based on the current playhead position, rather than the start of the behavior in the Timeline.
- Tracker Preview: Use this preview area to see a magnified view of the tracking reference area for the selected tracker. The preview updates as you adjust the position of the tracker in the Canvas. You can also drag in the preview area to adjust the position of the tracker. When dragging in the preview area, the image moves around the red crosshairs in the preview and the tracker moves in the Canvas.
- Offset Track: If a tracker’s reference point becomes temporarily hidden or goes off the screen, use this parameter to select a different reference point that continues the same tracking path as the original reference point. For more information on offset tracking, see Tracking Obscured or Off-Frame Points Using Offset Tracking.
- Auto-Zoom Mode: Choose an option from this pop-up menu to set the display of the auto-zoomed tracker in the Canvas. There are three choices:
- Normal: Displays a normal pattern.
- Contrast: Displays the tracker pattern with contrast detection.
- Edge: Displays the tracker pattern with edge detection.
The Auto-Zoom Mode applies to trackers in the Canvas and does not appear in the Tracker Preview in the Behaviors Inspector.
Note: When None is chosen from the Auto-Zoom pop-up menu, the Auto-Zoom Mode setting has no effect.
- Look Ahead Frames: Use this slider and value slider to specify the number of “future” frames to be analyzed by the tracker. In other words, you can direct the tracker to look in a specific location for its reference point. This is useful for footage that contains fast-moving objects, because the reference point can quickly get away from the tracker. For more information on using Look Ahead Frames, see Giving Motion a Hint by Looking Ahead.
- Track list: Use this list to see the trackers in the behavior.
To disable a tracker, deselect its checkbox. A tracker that is turned off is not analyzed with the track.
When another track is referenced, the track list is replaced with a Tracker pop-up menu.
Click the disclosure triangle next to the track name to reveal additional parameters:
- Track Size: Use this slider to adjust (in pixels) the pattern search size for the tracker. As you adjust the track size, the Tracker Preview is updated to show the new track size (there is no visual change in the Canvas tracker).
To adjust the Track Size without exposing its parameters, Option–drag left in the Tracker Preview area to reduce the track size; Option–drag right to increase the track size.
- Search Size: Use this slider or value slider to increase or reduce the tracker’s search area size. In Motion, you do not specify the size of a search area when setting up your trackers in the Canvas. To change the default search size, use the slider or value slider. If Search Size is set to 200 percent, the tracker’s search area is twice the default search area size.
- Fail Tolerance: Use this parameter to define the amount of tolerance for error, or confidence value, of the track. In other words, this parameter defines at what score the tracker determines it is able to match a reference feature. When above the score, the tracker accepts the match. When below the score, the tracker rejects the match. When the match is rejected, the Fail Behavior kicks in.
- Fail Behavior: Use this pop-up menu to specify what happens if the track confidence value falls below the Fail Tolerance amount. The following options are available:
- Smart Retry: The tracker attempts to find the reference pattern in a larger search area. If the pattern cannot be found, the tracker switches to the Predict option. Smart Retry is the default fail behavior.
- Stop: The analysis stops when the tracker loses the reference pattern. You can also click the Stop button in the tracking progress dialog or press Esc to stop an analysis.
- Predict: The tracker predicts a new search area without creating keyframes until it finds a match for the reference pattern. This is excellent for tracked objects that pass behind foreground objects.
- Predict and Key: If a failure is detected, the tracker predicts the location of the keyframe based on a vector of the last two keyframes, and continues tracking in the new area.
- Don’t Predict: The tracker remains in its position and searches for subsequent matches as the clip’s frames progress. While searching for a match, the tracker does not create keyframes.
- Use Existing Keyframes: The tracker uses manually added keyframes as a guide during analysis. After you add keyframes, return to the start frame and start the tracking analysis. If the tracker cannot locate the track pattern, the manually created tracking keyframes are referenced to guide the tracker.
- Color: Click or Control-click the color well to set a color for the onscreen tracker. You can also click the eyedropper and select a color in the Canvas. The default tracker color is red. When a tracker is selected, its center point is yellow and the border of its magnified inset is the color set in the color well. To adjust individual color channels, including the tracker’s opacity, click the disclosure triangle.
- Tracker pop-up menu: When the Track parameter behavior references another behavior, such as Analyze Motion, the Track list parameters are replaced with the Tracker pop-up menu. Select the tracker you want to apply from the referenced tracking behavior to the position parameter of the affected object from this menu.
The Track parameter HUD contains controls to load a tracking behavior into the behavior (via the Source Behavior well or the tracking behaviors pop-up menu), to specify how the position parameter moves, to start the motion analysis (via the Analyze button), to reverse the direction of the track (via the Reverse checkbox), and to offset the track (via the Offset Track checkbox).