General Motion Tracking Workflow
This section is a general overview of the tracking workflow common to most Motion Tracking behaviors. The Analyze Motion behavior is used in this example.
The Analyze Motion behavior analyzes and stores tracking data from a clip but does not transform the tracked object. Analyze Motion data tracks are meant to be referenced by other tracking behaviors.
For a full description of Analyze Motion parameters, see Analyze Motion Controls.
Tracking in one pass rarely yields perfect results. For information on tracking methods and tips, see Strategies for Better Tracking.
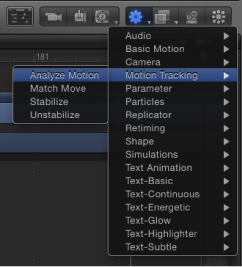
In the Layers list, Timeline, or Canvas, select the video object to track, then choose Motion Tracking > Analyze Motion from the Add Behavior pop-up menu in the toolbar.
Note: You can also select the video object, select the Analyze Motion behavior in the Library, then click the Apply button in the Library preview area. Alternatively you can drag the behavior from the Library to the video object in the Layers list, Timeline, or Canvas.
An onscreen tracker is added to the footage. By default, a single tracker appears at the center of the footage.

Play your background clip several times to determine a good reference point in the footage, then move the playhead to the frame where you want to start the track analysis.
In the Canvas, drag the tracker to the reference point you want to use.
Note: For more information on using the onscreen tracker, see Adjusting the Onscreen Trackers. For more information on selecting a tracking reference point, see Strategies for Better Tracking.
To add trackers, click the Add button in the Behaviors Inspector.
Each new tracker is added to the center of the footage.
Drag the additional trackers to the reference points you want to use.
To track a specific range of frames, adjust the start and end points of the purple tracking behavior bar in the Timeline or mini-Timeline.
Note: If you adjust the length of the tracking behavior bar, make sure to set your tracking reference points within the range of the behavior.
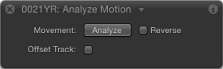
Click the Analyze button in the HUD or Behaviors Inspector.
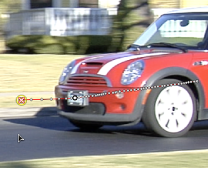
When the tracking analysis begins, a progress window opens, and track points appear on a motion path in the Canvas. The track point at the current playhead position is emphasized.
The tracking keyframes contained in the behavior appear in the Keyframe Editor. (If the Keyframe Editor is not visible, click the Show/Hide Keyframe Editor button in the lower-left corner of the Motion project window.)
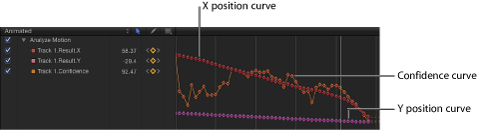
Because the Analyze Motion behavior does not transform the source object, only the tracking keyframes appear in the Keyframe Editor. When using a Match Move or Stabilize behavior, the tracking keyframes appear as well as the transform curves of the source object (for Stabilize) or destination object (for Match Move).
A confidence curve is also displayed in the Keyframe Editor. This curve provides a visual indication of the tracker’s accuracy relative to its parameter settings in the Inspector. The confidence curve is not for editing purposes.
To stop a track analysis, click the Stop button in the progress window or press Esc.
Tip: If the tracker loses its reference pattern, do not click the Stop button. Allow the analysis to continue for a few seconds. When the tracker fails, the playhead jumps to the exact frame where the track was lost.
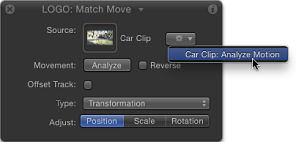
The analyzed track, contained in the Analyze Motion behavior, can now be loaded into other tracking behaviors (via an Action pop-up menu in the HUD or Inspector of the other tracking behaviors). In the image below, a track from the Analyze Motion behavior is loaded into a Match Move behavior HUD.
Note: The Stabilize behavior can only load tracks from other Stabilize behaviors.
Important: Although the Stabilize behavior’s automatic analysis mode starts from the beginning of a clip (regardless of the playhead’s position), the analysis of other tracking behaviors begins at the current playhead position for all workflows. To define a tracking region, set an Out point for the tracked clip. If you are performing a reverse track analysis, set In and Out points for your track. To set an Out point, position the playhead at the correct frame, select the clip, then choose Mark > Mark Play Range Out (or press Command-Option-O). To set an In point, position the playhead at the correct frame, select the clip, then choose Mark > Mark Play Range In (or press Command-Option-I).