Strategies for Better Tracking
Selecting a good tracking reference feature in a movie or image sequence is pivotal in achieving an accurate track. Tracking a single reference pattern with a single analysis pass rarely yields a perfect result. More often, a successful track combines automatic and manual tracking, experimenting with parameter settings, and resetting reference points at various locations in the clip.
Finding a Good Reference Pattern
The first step in selecting a good reference pattern is to play the footage several times. As you review the clip, try to locate a reference pattern that follows as many of the following rules as possible:
It contains perpendicular edges, such as dots, intersections, and corners. Lines and straight boundaries should be avoided as tracking reference patterns.
It is a high-contrast pattern.
It contains even changes in brightness or color. An example of an uneven color or brightness change is a sharp-edged shadow that passes over your reference pattern.
It appears in every frame of the clip (does not move offscreen or become obscured by other objects).
It is distinct from other patterns in the same neighborhood in the clip.
Manually Modifying Tracks
You can manually modify track points.
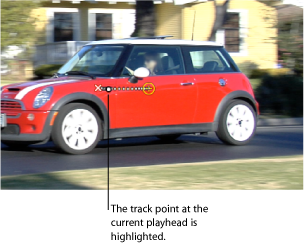
Position the playhead at the frame you want to modify.
The track point at the playhead position is highlighted.
Do one of the following:
Drag the highlighted track point in the Canvas to adjust its position.
Drag in the Tracker Preview area in the Behaviors Inspector.
For fine-tuning, you can zoom in and out of the clip using the Zoom tool.
The zoom follows the pointer, so place the pointer on the track point in the Canvas and drag right to zoom in. Drag left to zoom out of the clip. To return to normal view, choose 100% from the Zoom Level pop-up menu (above the right side of the Canvas). If you have a Multi-Touch trackpad, pinch open or closed to zoom in or out, then scroll the zoomed view using two-finger swipes.
You can also adjust a tracking curve in the Keyframe Editor. For more information on using the Keyframe Editor, see Keyframes and Curves.
When Good Tracks Go Bad
When an analysis is complete, you might need to retrack a portion of the clip. Rather than tracking over bad tracking keyframes, delete bad keyframes before retracking. If bad keyframes are not deleted, the tracker may continue to use the old reference point.
Deleting Bad Keyframes in the Keyframe Editor
You can delete bad tracking keyframes in the Keyframe Editor.
Position the playhead at the frame where you want to retrack the reference pattern.
In the Keyframe Editor, drag to select the keyframes you want to delete.
If the Keyframe Editor is not visible, click the Show/Hide Keyframe Editor button in the bottom-left corner of the Motion project window.
Control-click in the Keyframe Editor, then choose Cut from the shortcut menu (or press Delete).
In the Canvas, drag the tracker to the reference point, then click Analyze.
New track keyframes are created.
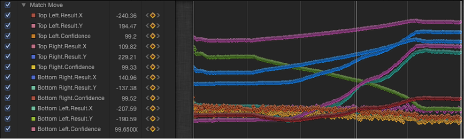
Tip: When dealing with multiple problem trackers, you can turn off the trackers you are not correcting to simplify the Keyframe Editor. Additionally, when fine-tuning tracks in the Keyframe Editor, you can simplify what appears in the graph. The following image displays all curves for a simple four-corner pin.
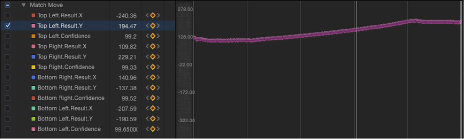
To solo a curve, Option-click the parameter’s checkbox in the Keyframe Editor’s parameter list.
Deleting Track Points in the Canvas
Bad track points can also be deleted in the Canvas. The track points in the Canvas represent keyframes in the Keyframe Editor.
During analysis, press Esc to stop the tracking.
In the toolbar, ensure that the Adjust Item tool is selected.
Ensure that a track point is active in the Canvas.
You can to zoom into the Canvas to better see the active track points. The track point at the current playhead position appears larger than other track points.
Note: If you press Delete when a track point is not selected, the entire path is deleted.
Do one of the following:
Press Delete to delete the track point at the current position of the playhead.
Move the playhead to the frame where you want to begin deleting track points, and press Delete.
Only active keyframes are deleted.
With the tracking analysis complete and the tracking behavior selected, move the playhead to the frame with the track point (or start of the track points) you want to delete.
In the toolbar, ensure that the Adjust Item tool is selected.
Ensure that a track point is active in the Canvas.
You can zoom into the Canvas to better see the active track points. The track point at the current playhead position appears larger than other track points.
Press Delete.
Each press of the key removes one track point.
Tip: The direction in which track points are deleted is determined by the Reverse checkbox in the Behavior Inspector. When reverse is turned off, each track point you delete moves the playhead towards the beginning of the clip. When it is turned on, each track point you delete moves the playhead towards the end of the clip.
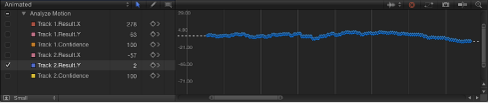
Smoothing Tracking Keyframe Curves
You can smooth a track with the Keyframe Thinning function in the Animation menu in the Keyframe Editor parameter list. Before smoothing the curve, you might want to copy the behavior (as a backup) to the Library or duplicate the behavior in the project.
In the following graph, you can see that there’s a keyframe placed at every frame, and the curve is quite jagged. The following example, shows how you can smooth this curve.
In the Keyframe Editor, click in the fifth column of the parameter to open the Animation menu, then choose Reduce Keyframes.
The Reduce Keyframes dialog appears.
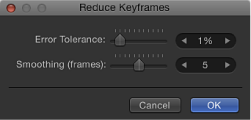
Reduce Keyframes applies a thinning algorithm to the keyframes for the parameter. This reduces the number of keyframes while attempting to maintain a similar shape to the curve. The thinning algorithm can be adjusted in two ways. Increasing the Error Tolerance results in fewer keyframes. Increasing the Smoothing (frames) makes smoother curves between keyframe values.
This example uses 5, which means that 5 track points centered on the evaluated point are used to compute the current point’s new, smoothed value. This is a standard Gaussian (bell-curve type) filter. In other words, if you leave the Smoothing value at 5, when the value of frame 12 is computed, frames 10, 11, 12, 13, and 14 are considered. If Smoothing is set to 3, the algorithm uses frames 11, 12, and 13. The larger the Smoothing value, the more points are considered (and thus more calculations done) for every point in the curve.
Set the values in the Reduce Keyframes dialog.
As you adjust the sliders or value sliders in the dialog, the curve is modified in the Keyframe Editor. There are now fewer keyframes on the curve, and the curve becomes smoother.
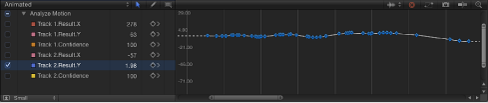
Click OK.
Averaging a Track Curve
Another smoothing option is to apply the Average parameter behavior to a track curve in the Keyframe Editor. This behavior smoothes the transition from one keyframe value to another. Averaged motion moves more fluidly.
In the parameter list of the Keyframe Editor, control-click the parameter name, then choose Average from the shortcut menu.
The track is averaged, indicated by the simplified curve that appears behind the keyframes in the Keyframe Editor.
For more information on using the Average parameter behavior, see Average.
Converting Tracks to Keyframes
Tracking data recorded or referenced by the Match Move, Stabilize, or Unstabilize behavior can be “baked” into keyframes on the transformed object. The tracking keyframes are applied to the tracked object and the behavior is deleted. You can then modify the animation curves in the Keyframe Editor.
Because the Analyze Motion behavior does not transform the image, analyzed tracks cannot be converted into keyframes. However, a Match Move or Stabilize behavior that references data from an Analyze Motion behavior can be converted into keyframes.
Select the Match Move, Stabilize, or Unstabilize behavior to convert.
Choose Object > Convert to Keyframes (or press Command-K).
A dialog appears confirming the conversion.
Click OK.
The behavior is converted into editable keyframes and the tracking behavior is deleted.
For more information on converting behaviors to keyframes, see Converting Behaviors to Keyframes. For more information on using the Keyframe Editor, see Keyframes and Curves.
Asking Motion for a Hint
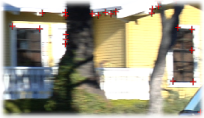
Motion can suggest good reference patterns.
Press the Option key, click a tracker in the Canvas, and hold down the mouse button.
Note: You need at least one tracker in the Canvas to display suggested tracking reference points.
The suggested reference points appear in the Canvas on the footage and in the magnified inset as small red plus signs.
When you move a tracker toward a suggested point, the tracker snaps to the point.
The suggested points are not necessarily ideal tracking reference points for the feature you want to track in the clip. Motion is merely picking locations in the current frame that meet the track point criteria, such as an area of high contrast.
Giving Motion a Hint by Looking Ahead
When using the Analyze Motion behavior, you can direct a tracker where to look in a later frame for its reference pattern. This tool is ideal for the following types of clips:
A clip that contains fast-moving features
A clip with subjects moving in a relatively straight vector (with or without obstructions)
A clip with swish pans (but you might need to reset the “look-ahead” tracker at each panning change)
Important: If your track fails and you reposition your tracker, you must also reset the look-ahead tracker in the Canvas to provide a new motion vector from the new reference point.
Apply an Analyze Motion behavior to a clip.
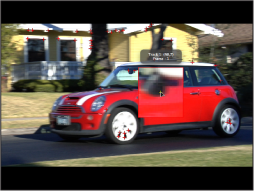
In the Canvas, position the tracker on a reference pattern.
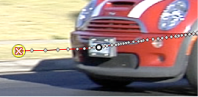
In the following image, the tracker is positioned on a reference pattern on the front bumper of the car.
In the Behaviors Inspector, use the Look Ahead Frames slider or value slider to specify how many frames you want the tracker to look ahead.
Note: The maximum default for the Look Ahead Frames slider is 10 frames. However, you can enter a larger frame amount using the adjacent value slider.
While holding down the Command key, click the tracker in the Canvas, then drag in the direction the reference pattern is moving in the clip.
As you Command-drag the track point, an inset displays a magnified view of the frame specified in the Look Ahead Frames parameter.
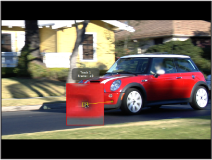
When the look-ahead tracker is positioned on the reference pattern, release the mouse button.
When you click the Analyze button, the new reference point is used as the tracking pattern.
Note: Look Ahead Frames can be used when tracking in reverse. When the Reverse checkbox is selected in the tracking behavior’s parameters and you use the Look Ahead Frames parameter, you are looking at previous frames rather than future frames. The Reverse checkbox is only available for the Analyze Motion, Track (in the Parameter behaviors category), and Track Points (in the Shape behaviors category) behaviors.
Manually Coaxing Your Track with Keyframes
When dealing with more challenging tracks, you can manually insert track position keyframes to help guide the tracker towards a reference pattern. For example, if you have a footage with significant motion blur or objects that partially obscure the tracking pattern, you can manually create tracker position keyframes to help guide the tracker.
Apply a Motion Tracking behavior to the clip, then enable Record (press A).
In the Canvas, position the tracker at the reference point you want to track.
A track position keyframe is created in the behavior (visible in the Keyframe Editor).
Navigate to the next frame where you want to create a keyframe.
Note: You can press Shift-Right Arrow key to jump forward ten frames, or press Shift-Left Arrow key to jump backward ten frames.
In the Canvas, position the tracker at the reference point you want to track.
Repeat steps 3 and 4 until you’ve completed the track.
In the Behaviors Inspector, click the disclosure triangle for the track you have manually adjusted, then choose Use Existing Keyframes from the Fail Behavior pop-up menu.
Turn off the Record button (press A).
Go to the first frame of the clip, then click the Analyze button in the behavior HUD or Inspector.
Important: Even though keyframes are created, you must analyze the footage to obtain the tracking data.
Apply a Motion Tracking behavior to the clip.
In the Canvas, position the tracker at the reference point you want to track.
Choose Object > Add Position Keyframe.
This command is available for the Analyze Motion, Match Move, Stabilize (with manual trackers), Track Points (in the Shape behaviors category), and Track (in the Parameter behaviors category) behaviors.
Note: Keyframes cannot be created for automatically stabilized footage. Use the Track Region option for adjusting automatic stabilization, or convert the stabilized footage to keyframes. For more information on the Track Region parameter, see Adjusting the Stabilize Behavior’s Track Region. For more information on converting tracking data to keyframes, see Converting Tracks to Keyframes.
Navigate to the next frame where you want to create a keyframe.
Repeat steps 2–4 until you’ve completed the track.
In the Behaviors Inspector, click the disclosure triangle for the track you have adjusted, then choose Use Existing Keyframes from the Fail Behavior pop-up menu.
Go to the first frame of the clip, then click the Analyze button in the behavior HUD or Inspector.
Note: You can also use the Tracker Preview in the Behaviors Inspector to reposition trackers in the Canvas.
Important: Even though keyframes are created, you must analyze the footage to obtain the tracking data.
Tracking Images with Perspective, Scale, or Rotational Shifts
For images with significant change in size and angle, you can try a few different strategies. First, try using a larger search area. You can increase Motion’s default tracking search size using the Search Size parameter in the Behaviors Inspector. Click the track’s disclosure triangle to display the Search Size parameter.
A second strategy is to lower the Fail Tolerance value. With a lower Fail Tolerance value, the tracker is more likely to find a false match. With a higher value, the tracker is more strict in finding a match. Click the track’s disclosure triangle to display the Fail Tolerance parameter.
Another strategy is to jump to the midpoint frame of the clip and track forward to the end frame of the clip. Then return to the midpoint frame and track backward to the beginning of the clip.
Tracking Obscured or Off-Frame Points Using Offset Tracking
In addition to experimenting with tracker parameter settings, there is a basic technique to correct track points obscured by moving offscreen or by an object passing in front of them.
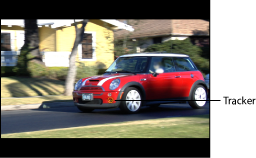
The following sequence is a simple example of a candidate for offset tracking. As the car moves forward, it passes a tree that temporarily obstructs the reference pattern.

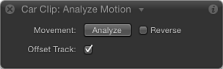
When the reference pattern becomes obscured, the Offset Track checkbox lets you move the tracker, picking a new reference pattern in a different area from the original reference pattern. The offset between the original reference pattern and the new pattern is calculated to maintain continuity in the resulting track path.
In the following example, the track is obscured by a tree, so the tracker is moved to a nearby reference pattern, and tracking continues until the original pattern reappears. Even though one region is examined, the points are saved in another region. The second tracking pattern should travel in the same direction as your original pattern.
Go to the frame where you want to begin the offset track.
When a track is lost during an analysis, Motion jumps back to the frame where the track failed. The bad track point is identified by an “x” in the Canvas.
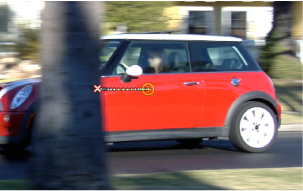
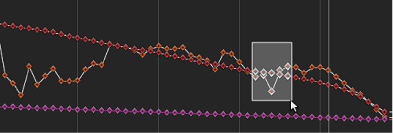
You can use the bad track point, or any point before the failed track frame, to move the tracker and select a new reference feature. In the Canvas, the track point at the current playhead position is emphasized.
Select the Offset Track checkbox in the HUD or Behaviors Inspector.
Note: The Offset Track parameter is available in the Analyze Motion, Match Move, Stabilize, Track Points, and Track Parameter behaviors. Before the parameter becomes available in the Stabilize behavior, you must add a tracker using the Add button in the Inspector.
Drag the tracker to a new, unobscured reference pattern in the Canvas.
Click Analyze to restart the motion analysis.
Motion continues to keyframe the trajectory of the original track point, based on the movement of the new offset reference pattern.
Tip: When you use Offset Track, make sure that the new reference pattern is as close to the original tracking feature as possible. Ideally, the offset feature should share the same motion as the originally tracked feature and appear on the same subject.
Note: When the pointer is positioned over a tracker in the Canvas, a tool tip displays the start frame for the tracking analysis. When you perform an offset track, the tool tip displays the frame where the offset track began (if the playhead is in the range of the offset track).
Tracking Retimed Footage
When working in a project that includes tracking and retiming tasks, use the following guidelines for more successful results:
Because the Motion tracker analyzes in a project’s frame rate, ensure that the frame rate of the footage you plan to track matches the frame rate of the project. For example, to track 24 frames-per-second (fps) footage, your project’s frame rate should be 24 fps. When the tracking analysis is completed, retime the clip using the Retiming parameters in the Media list or by using the Retiming behaviors.
Do not retime the footage before the tracking analysis.
Do not retime the footage, perform a tracking analysis, then retime the footage again. This may adversely affect your track.
Note: To track a clip after it is retimed, export the retimed clip, then import it back into your project before you perform the tracking analysis.
Troubleshooting Stabilizing Effects
If the output of a stabilize operation is unsatisfactory, there are several things you can try to improve the result.
Keeping It Real
The automatic motion analysis (analysis without trackers) used by the Stabilize behavior works best with real images. Artificial images, such as those with no texture, are not recommended for use with the Stabilize behavior’s automatic mode. Shots with very strong pans are also not recommended.
Adding Trackers to the Stabilization
If a stabilized clip has a bumpy section that is not getting smoothed, you can add trackers to noncontiguous sections of a clip.
Any stabilize data from the automatic motion analysis is overwritten by the portions of the clip analyzed using the onscreen trackers.
After the Stabilize motion analysis is complete, play the clip to determine the section you want to track.
Important: Before adding any trackers, always review the entire clip. The Stabilize behavior needs meaningful data—a large range of frames—to yield the best results.
Set an Out point for the tracker analysis: Position the playhead at the frame where you want to stop the analysis, then choose Mark > Mark Play Range Out (or press Command-Option-O).
Position the playhead at the frame where you want to start the track, then click the Add button in the Inspector.
Position the newly added tracker on the reference pattern you want to track in the Canvas, then click the Analyze button in the HUD or Inspector.
The specified play range is tracked, creating track points in the Canvas and tracking keyframes in the Keyframe Editor.
Note: When using this strategy to track multiple noncontiguous sections of the clip, use the same tracker to simplify the track and to avoid clutter in the Keyframe Editor.
This strategy is not recommended for small portions of the clip, such as using the default stabilization for 25 frames, a tracker analysis for 10 frames, and so on.
Changing the Smoothing Parameters
If you’re trying to smooth the motion in a clip, first try adjusting the smoothing parameters. These parameters include Translation Smooth, Rotation Smooth, and Scale Smooth. This can be accomplished without reanalyzing the clip.
In the Behaviors Inspector, choose Smooth from the Method pop-up menu.
The Translation Smooth, Rotation Smooth, and Scale Smooth sliders become available.
Reanalyzing at a Higher Quality
When analyzing, choose Better from the Quality pop-up menu in the Behaviors Inspector. This may take longer, but the quality of the analysis is higher.
Editing the Analysis Data
If neither of the prior solutions helps, look at the Analyze.Confidence parameter in the Keyframe Editor, then look for frames where the Confidence parameter falls to very low values. You can convert the Stabilize behavior to keyframes to create transform keyframes on the stabilized object. These keyframes can then be edited in the Keyframe Editor. Try deleting keyframes that create unusual spikes at the frames where the Confidence curve value was low.
For more information on converting behaviors to keyframes, see Converting Tracks to Keyframes.
Removing Black Borders Introduced by Stabilizing
When you use the Stabilize behavior, the resulting transformations that smooth or stabilize the shot cause moving black borders to appear around the edges of the image. Although this is necessary to achieve the desired effect, you probably don’t want these black borders to appear in the final shot.
There are a few ways to handle these borders.
Zooming the Clip
You can zoom the clip using the Borders pop-up menu in the Behaviors Inspector. The disadvantage of this method is the resulting softening of the image, depending on how much it must be enlarged.
In the Behaviors Inspector, choose Zoom from the Borders pop-up menu.
The clip is expanded to the full size of the Canvas, preventing black borders from appearing around the edges.
Scaling the Output Image to Fit the Original Frame Size
If you want to output the resulting image at the same size as the original, the quickest fix is to scale the image after the Stabilize analysis. You’ll need to enlarge the image to the point where all instances of black borders fall outside the edges of the frame. Like the Zoom option (in the Borders pop-up menu), this method softens the image.
Note: This workflow is a manual version of zooming the clip using the Zoom option from the Borders pop-up menu.
Select the clip and open the Properties Inspector.
Adjust the Scale parameter so the borders no longer appear at the edges of the clip.
Distorting the Edges
One last suggestion is to experiment with filters to stretch the edges of the image to fill gaps. For example, you can experiment with the Scrape filter to stretch the edges of the image. This solution is highly dependent on the type of image and may introduce other image artifacts that may not be acceptable.
In the following image, a large border is created when the clip is stabilized.

Next, a Scrape filter is applied to the group in which the stabilized clip resides. The left image shows the clip when the filter is applied to the group. At first, it does not appear especially helpful. In the right image, the center and rotation of the filter are adjusted, removing the black edge by stretching the right edge of the image.

Important: For this technique to have any effect, the filter must be applied to the clip’s group, not to the clip.
Note: You might need to select the Fixed Resolution checkbox in the Group Inspector to ensure that the effect of the Scrape filter is not cropped.
General Tracking Guidelines
The Motion tracker uses the source image for its tracking analysis. This means that the tracker uses the best search area, the best color, the best contrast, subpixel accuracy, and so on in the clip to generate the best possible tracking data. Common tracking strategies, such as using filter tricks, manually resizing a tracking box or search area, or specifying a subpixel sampling amount are not required.
This does not mean that you do not need work to achieve a perfect track. Use the following guidelines to help you decide what may assist you in your tracking analysis.
What will help you:
Removing interlacing (fields) from the footage before tracking. To remove the fields from footage, select the footage in the Media list of the Project pane, click the Media list, then choose an option from the Field Order pop-up menu.
Note: Interlacing can be present in clips stabilized using the automatic analysis mode in the Stabilize behavior.
Stabilizing a clip, exporting the clip, importing the clip, then stabilizing the clip again.
Sharpening or blurring a clip or an object with a filter, exporting the clip, importing the clip into the same group as the original footage, tracking the filtered clip, then using that tracking data as the source for other tracking behaviors.
Note: Other filter tricks may be helpful, such as using a filter to isolate a less-noisy color channel of a clip or an object.
Setting the View resolution to a lower setting, which may speed the tracking analysis.
What does not help you:
Applying any filter to a clip or object before tracking.
Soloing or isolating a tracked clip. This does not speed tracking analysis.
Adding multiple Stabilize behaviors. This does not help to further stabilize an analyzed clip, because the tracker analyzes the original source footage and not the analyzed clip (or a filtered clip).
Converting a track to keyframes and stabilizing again.
Selecting a tracking reference feature that does not change perspective, scale, or rotation. The Motion tracker handles changes in perspective, scale, and rotation very well.
Tracking and Groups
There are a few special considerations when tracking groups.
Corner-Pinning Groups
You can corner-pin groups using the Match Move behavior:
To corner-pin a 2D group, select the Fixed Resolution checkbox in the Group Inspector.
To corner-pin a 3D group, select the Flatten checkbox in the Group Inspector. If Flatten is not enabled for the group, the Four Corners option is not available from the Type pop-up menu in the Match Move parameters.
When you choose Four Corners from the Type pop-up menu, Four Corner is enabled in the Properties Inspector, causing the group to be rasterized. For more information on rasterization, see Groups and Rasterization.
Using either of the above techniques may still result in dynamic resizing. If you receive unwanted results, export the group, import the group, then corner-pin the object.
Parallax in 3D Groups
When match moving 3D groups that contain objects offset in Z space, parallax is simulated. Parallax is the apparent shift of an object against a distant background caused by a shift in perspective, such as a change in camera position.
To remove a parallax effect, select the Flatten checkbox for the tracked group in the Group Inspector.
Saving Tracks
As with all behaviors in Motion, you can save tracking behaviors to the Library. However, a tracking behavior must reference the tracked source object. Therefore, it may make more sense to save the group that contains the tracking behavior, as well as the source footage, to the Library.
Open the Library and select the category where you want to save the group, such as the Favorites category.
Drag the group that contains the tracking behavior and its source (tracked) footage from the Layers list or Timeline into the stack at the bottom of the Library.
The group is added to the Library category.
Open the Library and select the Favorites, Favorites Menu, or Behaviors category.
Drag the customized behavior you want to save from the Layers list, Timeline, or Inspector into the stack at the bottom of the Library.
When you save a customized item to the Library, it is saved in the /Users/username/Library/Application Support/Motion/Library/ folder.
For more information on saving behaviors to the Library, see Saving and Sharing Custom Behaviors.
Open the Library and select the category that contains the group.
Do one of the following:
To nest the group in an existing group, drag it to the existing group in the Layers list.
To create a group, drag it to an empty area in the lower portion of the Layers list.
The group is added to the project.
Open the Library and select the Favorites, Favorites Menu, or Behaviors category.
Drag the behavior to the clip in the Layers list, Timeline, or Canvas.
Add an Analyze Motion, Match Move, Stabilize, or Unstabilize behavior.
In the tracking behavior’s HUD or Inspector, choose a track from the tracking behaviors pop-up menu.
The track is applied to the tracking behavior.
Note: In a Stabilize behavior, only tracks from other Stabilize behaviors can be chosen from the tracking behaviors pop-up menu.