Stabilize Workflow
This section provides an overview of the Stabilize tracking behavior, used to smooth shaky motion in a movie or image sequence. For a full description of Stabilize parameters, see Stabilize Controls.
With the Stabilize behavior, there are three ways to analyze a clip:
Use the default advanced motion analysis technique that evaluates the entire frame of a clip at once to extract movement data without onscreen trackers.
Use onscreen trackers that analyze a reference pattern (a small group of pixels) in the Canvas. These are the same trackers used by the Match Move and Analyze Motion behaviors.
Use a combination of the advanced motion analysis and onscreen trackers.
Important: For information on using onscreen trackers with the Stabilize behavior, see Adding Trackers to the Stabilization.
After the motion analysis is complete, you can apply it in either of two ways. The clip can be smoothed, eliminating unwanted jitter while maintaining the general motion of the camera, or the clip can be locked, stabilizing the subject. The smoothing can affect translation, rotation, or scale, making it more flexible for some operations than the other tracking behaviors.
The Stabilize behavior is primarily useful for removing unwanted trembling from less-than-stable crane or jib arm moves, eliminating teetering from handheld walking shots, or reducing vibrations in automotive shots.
Note: Motion blur present in the image remains, even though the subject in the shot is smoothed or locked.
Apply a Stabilize behavior to the clip you want to stabilize.
Note: Unlike other behavior workflows, the Stabilize behavior’s automatic mode analyzes the entire clip from its first frame, rather than from the current playhead position.
Set the options for the analysis:
Choose an option from the Method pop-up menu in the HUD or Behaviors Inspector:
Choose Stabilize to lock down an image, removing problems such as camera shake.
Choose Smooth to smooth camera movement in the clip.
Choose an option from the Borders pop-up menu:
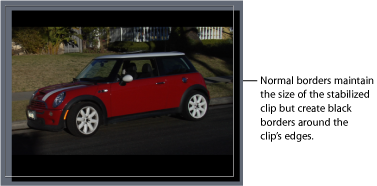
Choose Normal to maintain the size of the stabilized footage. Resulting transformations made to the stabilized image may cause moving black borders to appear around the edges of the clip.
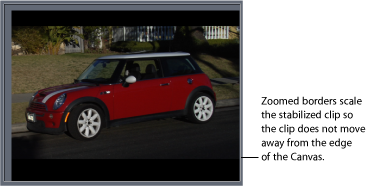
Choose Zoom to expand the clip to the full size of the Canvas. This prevents black borders from appearing around the edges of the stabilized clip.
Note: For suggestions on correcting the black borders, see Removing Black Borders Introduced by Stabilizing.
Choose an option from the Direction pop-up menu:
Choose Horizontal and Vertical to apply the stabilize transformation to the X and Y dimensions.
Choose Horizontal to apply the stabilize transformation to the X dimension.
Choose Vertical to apply the stabilize transformation to the Y dimension.
Enable or disable the Adjust options:
Turn on Position to apply the analyzed position data to the clip. (The X and Y position changes in the footage are smoothed or stabilized.) To stabilize the X and Y position of the shot and leave scale or rotation changes intact, turn on Position and turn off Scale and Rotation.
Turn on Scale to apply any analyzed scale data to the clip. (Scale changes in the footage are smoothed or stabilized.) To stabilize or smooth changes in scale and leave position or rotation changes intact, turn on Scale and turn off Position and Rotation.
Turn on Rotation to apply analyzed rotation data to the clip. (Changes in the rotation of the footage are smoothed or stabilized.) To stabilize or smooth changes in rotation in the shot and leave position or scale changes intact, turn on Rotation and turn off Position and Scale.
For the smoothest result, turn on all three Adjust options (Position, Scale, and Rotation).
Note: The Scale option is not related to the Zoom option in the Borders pop-up menu.
Note: You can change the Method, Borders, Direction, and Adjust parameters before or after the clip is analyzed.
Click the Analyze button in the HUD or Behaviors Inspector.
Note: The clip is stabilized according to defined parameters. Unlike Motion trackers, the default Stabilize analysis does not create keyframes in the Keyframe Editor. However, the stabilized object’s transformation can be converted to keyframes. For more information, see Converting Tracks to Keyframes. When correlation trackers are added to and analyzed with the Stabilize behavior, keyframes are created.
For more information on correcting problems associated with stabilization, see Troubleshooting Stabilizing Effects.
Adjusting the Stabilize Behavior’s Track Region
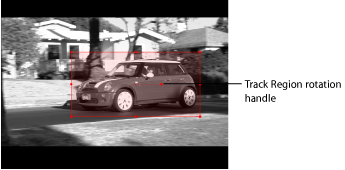
When stabilizing a clip, you can use the Track Region parameter to define an area to be analyzed (isolating the stabilization to a limited area of the analyzed source). During analysis, the area outside the region is ignored. Use this option for faster processing of a clip.
In the Stabilize parameters (in the Behaviors Inspector), select the Track Region checkbox.
A transparent red overlay appears in the Canvas.
Do one of the following:
Drag in the region to change its position.
Drag a handle to resize the region. The corner handles simultaneously resize width and height; the top and bottom center handles resize height; the left and right center handles resize width.
Press Option while dragging a handle to resize the region from its center.
Drag the rotation handle in the center of the region to change the angle of the region.
After defining the track region, click the Analyze button in the Behaviors Inspector.
Because analysis takes place in the defined track region, the clip is analyzed more quickly.