Using Masks to Create Transparency
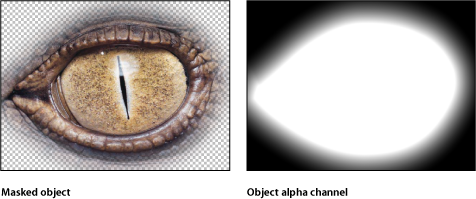
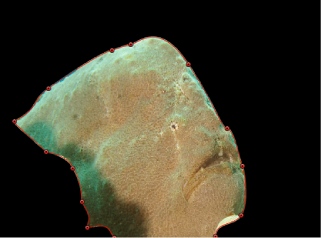
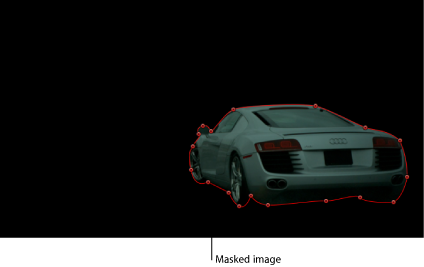
When you create a mask to define transparency in a layer, you’re drawing a shape to use as that layer’s alpha channel. Because a layer’s alpha channel is a grayscale channel, masks are grayscale objects, where white defines solid areas, progressively darker levels of gray define decreasingly opaque areas, and black defines areas of complete transparency. If you choose View > Channels > Alpha to set the Canvas to display the alpha channel only, you can see the grayscale alpha channel directly.
You can apply masks to layers that already have an alpha channel, to add to, subtract from, intersect, or replace the layer’s original alpha channel.
Masking a Layer or Group
Use the mask tools to create different shapes with which to mask a layer or group. There are five mask tools available that are analogous to the five shape drawing tools covered earlier in this chapter:
Rectangle Mask
Circle Mask
Freehand Mask (used like the Paint Stroke tool)
Bezier Mask
B-Spline Mask
Note: You can also use an Image Mask to mask a layer. For more information, see Applying Image Masks to a Layer.
Important: A mask cannot be applied to a nonflattened 3D group. (To flatten a 3D group, select the Flatten checkbox in the Group Inspector.) A mask can be applied to a layer in a 3D group. To add a mask to a layer that has been manipulated in 3D space, use the Isolate button. Masks cannot be manipulated in 3D space. For example, the Position parameter for a mask only includes the X and Y position parameters, but not the Z position parameter; the Rotation parameter only includes Z, but not X or Y. For more information, see Masking Objects in a 3D Project.
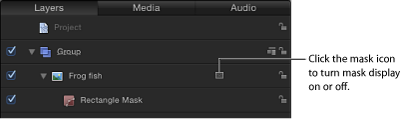
Drawing and editing masks using these tools works identically to drawing and editing shapes. The main difference is that while drawing a shape creates a new layer in your project, masks must be drawn on top of another layer in your project. After you draw a mask, it is nested in the specific layer or group for which it was created, in the Layers list and Timeline. When a mask is attached to a layer, a mask icon appears to the right of the name of the layer. Turn the mask display on or off by clicking this icon.
Note: Masks created for one layer can be copied or moved to other layers.
Important: When a mask is applied to a 2D or flattened 3D group, the group is rasterized. For more information, see Groups and Rasterization.
Select a layer in the Canvas or Layers list.
Choose a mask drawing tool from the pop-up menu in the toolbar (the Rectangle Mask tool, the Circle Mask tool, the Freehand Mask tool, the Bezier Mask tool, or the B-Spline Mask tool).

Note: If you haven’t selected a layer, the mask tools are not available.
Begin drawing the shape to mask the layer.
For more information about how to draw and edit shapes, see Shape and Mask Drawing Tools.
When you’re done, you can finish the mask by doing one of the following:
Click the first point to close the mask.
Press C to close the mask, joining the first point you created to the last.
Double-click to close the mask, joining the first point you created to the last.
Press Return to close the mask, joining the first point you created to the last.
When using the Freehand Mask tool, join the end of the mask to the target circle at the beginning of the mask. If you don’t reach the beginning of the mask, the mask shape is closed when you lift the stylus or release the mouse button.
Note: Unlike standard shapes, masks are always closed.
After you’ve finished drawing the mask, its effect is immediate, and the mask you created appears nested underneath the layer to which it’s applied in the Layers list and Timeline.
You can create multiple masks for a single layer. To add masks, select the object again, then follow the above procedure. By default, all new masks are set to the Add blend mode. You can change the Mask Blend Mode parameter in the Inspector to combine masks for different effects. For more information about using multiple masks together, see Combining Multiple Masks.
Masking Objects in a 3D Project
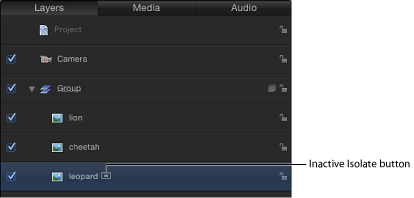
When working in a 3D project, you might want to mask a layer after it is transformed or the camera is rotated. You can immediately switch a transformed object into a “work view” using the Isolate button in the Layers list or Timeline, or the Isolate command in the Object menu. After you add a camera to a project, the Isolate option becomes available for any layer, group, or camera in the project.
Note: Masks can be applied to the layers in a 3D group, but not the 3D group itself (unless you’ve activated the Flatten checkbox in the Group Inspector). For more information about the Flatten checkbox, see Mask Parameters.
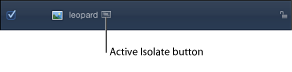
In the 3D project, select the layer to mask.
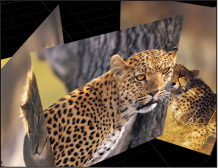
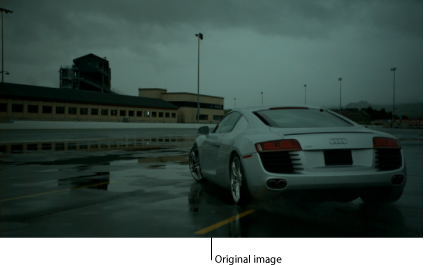
In this example, the center leopard image is the layer to be masked.
The Isolate button appears to the right of the layer name in the Layers list.
Note: A project must contain a camera before you can access the Isolate option.
Click the Isolate button or choose Object > Isolate.
Note: You can also Control-click the layer or group and choose Isolate from the shortcut menu.
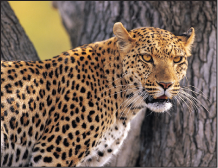
The layer is switched into “work view,” allowing you to mask the layer at its original orientation.
To return to your previous view (the view before you isolated the layer), click the Isolate button again.
Note: Clicking a camera’s Isolate button activates that camera’s view.
Combining Multiple Masks
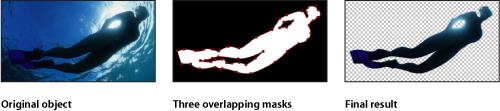
Often, you may find that it is impossible to create the mask shape you need using only a single mask. For example, when masking something that has a hole in it, you need at least two masks—one set to Add to mask the overall object, and a second one set to Subtract to cut the necessary hole in the middle of it. In the following example, the only way to mask the space between the diver’s arms and legs is to create three overlapping masks set to Subtract.
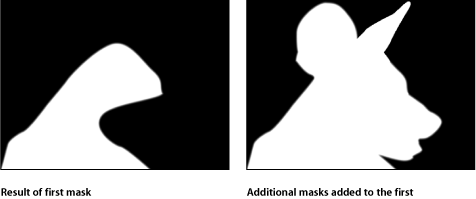
Other times, you may find that it’s more convenient to mask a complex object using multiple masks. This is frequently the case when rotoscoping an object and animating the masks. In this example, the dog’s head is masked with four masks set to Add—one for the head, one for each ear, and a separate mask for the mouth. This makes it easier to make adjustments later on, especially when animating a mask to do rotoscoping.

Whatever the reason, you can easily combine multiple masks for any object by adjusting each mask’s Mask Blend Mode parameter in the Inspector to create any combination.

Each mask’s blend mode determines whether the mask adds to, subtracts from, or replaces a layer’s previously existing alpha channel. Additionally, blend modes affect how masks interact with one another. Ultimately, every mask applied to a layer combines according to the specified blend modes to create that layer’s final alpha channel. Mask Blend Modes can be changed at any time.
Blend mode operations are also determined by the order in which each mask appears in the Layers list, particularly with the Replace and Intersect modes. For example, a mask set to the Intersect mode masks out all other regions of a layer that do not overlap it. A mask set to Intersect affects all masks nested underneath it. Masks added above it are unaffected by this behavior.
Masks That Add and Subtract
New masks default to the Add blend mode, allowing you to add to an existing alpha channel. After you draw the first mask, you might need to use additional masks set to Add or Subtract to refine it.
Masks set to Add create white areas in the alpha channel, making those parts of the object opaque. This can be useful when masking several unconnected subjects in a single image.
Note: To display the rest of a masked layer so you can trace it to create a second mask, turn off the first mask in the Layers list or Timeline. The outline of the first mask remains visible, even though it’s no longer affecting the layer’s transparency.
Predictably, masks set to Subtract have the opposite effect, creating black areas in the layer’s alpha channel and making those parts of the object transparent. This is useful for cutting holes in an object.

Intersecting Masks
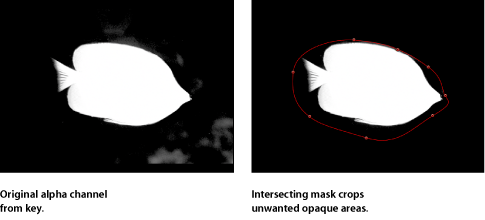
In many instances, you may find you want to cut out parts of an object, while leaving the rest of the object alone. Using a mask set to Intersect is a good way to do this.
For example, if you import a TIFF file with an alpha channel and you want to cut out part of it without losing alpha information, you must use the Intersect blend mode. This is also true for layers with keying filters applied.
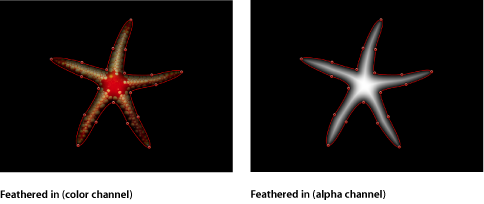
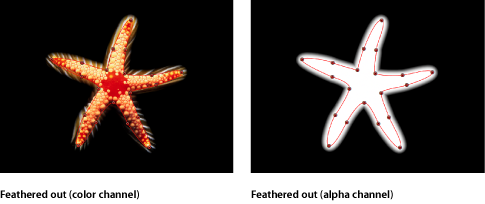
Feathering Masks
One of the easiest ways to adjust a mask is to feather its edges. Feathering a mask by a few pixels can make the masked object blend more seamlessly with a background. Feathering a mask by larger amounts allows you to create progressively softer edges for various design purposes.
You can feather mask edges outward or inward. The direction in which you feather a mask is dictated by the subject you’re masking. When rotoscoping a subject, a combination of inward and outward feathered masks may be necessary for the best results.
Select a mask.
Open the Mask Inspector.
Do one of the following:
Drag the Feather value slider to the right for a positive value to feather the mask outward.
Drag the Feather value slider to the left for a negative value to feather the mask inward.
Applying Filters to Masks
As with shapes, you can apply filters to masks, which remain editable even after the application. It’s an extremely powerful way to further manipulate the alpha channel created by a mask.
For example, you can apply the Crystallize filter to a mask to stylize its edges. This results in jagged edges that resemble facets of crystal around the edges.
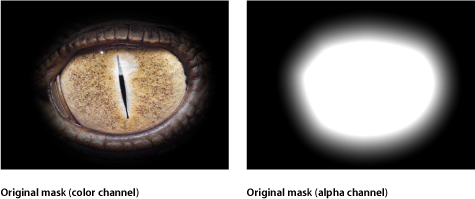
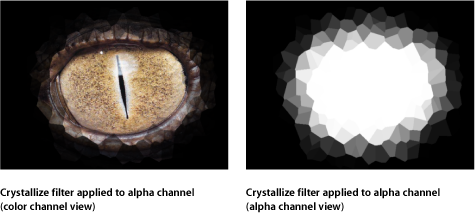
When applying filters to masks, it’s useful to bear in mind that masks are just grayscale images. In the example above, the Crystallize filter creates patterns in the grayscale mask image, which results in a rippled translucent pattern.
Drag a filter from the Library onto a mask in the Layers list or Timeline.
Select a mask in the Layers list or Timeline, then choose a filter from the Add Filter pop-up menu in the toolbar.

The filter appears nested underneath the mask layer to which it’s applied.
Applying Behaviors to Masks
You can apply behaviors to masks. When you apply a behavior to a mask, the mask is animated like any other layer. However, because the mask only affects the transparency in a layer, and not the position, rotation, or scale of the layer, the result is similar to that of a “traveling matte,” where the mask moves in the layer it is applied to, hiding and showing different areas of the image as it moves.
Drag a behavior from the Library onto a mask in the Layers list or Timeline.
Select a mask in the Layers list or Timeline, then choose a behavior from the Add Behavior pop-up menu in the toolbar.
The behavior appears nested underneath the mask to which it’s applied.
Keyframing a Mask’s Shape for Animation and Rotoscoping
You can keyframe a mask’s animation parameter to change its shape over time. This can serve many purposes. For example, you can animate a subtractive mask to change the shape of a hole in a foreground object, allowing other layers in the background to show through.
A more conventional use of animated masks is to rotoscope a foreground subject. Rotoscoping is the process of manually tracing a foreground subject to isolate it from the background. The end result is similar to a blue screen or green screen effect. Why would you bother? In a wide variety of situations, keying is impractical or impossible if the shot wasn’t well planned. Even for shots where keying is possible, manual rotoscoping is often necessary to create garbage or holdout mattes to improve the effect. (For more information on creating garbage and holdout mattes or masks using masks, see Using Masks to Aid Keying Effects.)
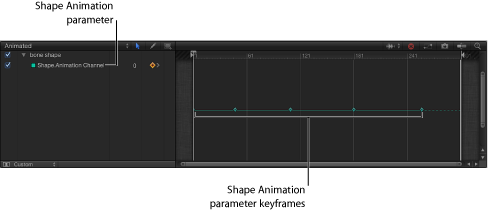
All mask animation is stored in the Shape Animation parameter. It’s worth noting that animated masks trigger the same motion blur as any other keyframed parameter in Motion. For example, if you animate a layer’s position so it moves really fast, the layer is blurred when you enable motion blur. If you animate a layer’s mask so it also moves fast, the edges of the mask are blurred as well. This is important because an animated mask’s blur should ideally match any blur present in the foreground subject.
Choose View > Resolution > Full to ensure that you are viewing the Canvas at full resolution.
Important: If the Canvas resolution is not set to full, the outlines of objects and images may shift slightly. As a result, masks created to trace a subject at less than full resolution may not be accurate.
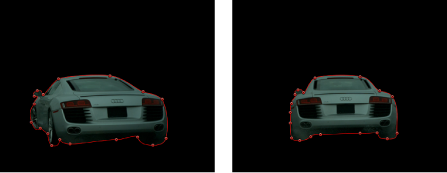
Move to the first frame where the mask animation should begin, then draw a mask that accurately isolates the subject.
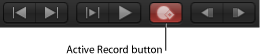
When you’re finished drawing the first mask, click the Record button in the transport controls (or press A).
Move to the first frame of the Timeline where you want to change the shape of the mask, then make any necessary changes to its control points.
In this example, the best place to start when rotoscoping the dolphin is the frame where all the fins are showing.
Note: For some tips on rotoscoping, see Rotoscoping Tips.
When rotoscoping a moving subject, it’s a good idea to play through the clip and examine its direction and speed to get a sense of how the mask must be animated. You may find it helpful to place markers indicating frames where the subject or camera stops, changes direction, or changes speed, because these are likely candidates for your first pass of keyframed mask changes.
By noting these changes, you can attempt to reduce the amount of keyframing by making your first keyframed mask shape adjustments at these major changes in speed and direction. Because animated masks are interpolated to change from one keyframed shape to another, you can let Motion do some of your work for you.
Note: If the mask is deselected, you must select it in the Layers list so its control points become visible in the Canvas. Make sure that the Show/Hide Masks button is selected in the Layers list so masks are visible.
Continue moving the playhead and making changes.
One imprecise rule of thumb is to move to the frame that’s halfway between any two keyframed mask shapes and make new adjustments. Continue keyframing shape changes at the halfway point between every two keyframes until the mask accurately follows the motion of the subject. For irregularly shaped objects or objects with complex motion, don’t be surprised if you need to add a large number of keyframes. Nobody ever said that rotoscoping was fast!
Every time you move the playhead to a new frame and make a change to the mask’s shape, a keyframe is created in that shape’s Shape Animation parameter. If you move the playhead directly on top of a previously existing keyframe, you change the mask’s shape at that point without creating a keyframe.
Note: You can also transform masks as you would any other layer. If you move, rotate, scale, or change the anchor point for a mask while animation recording is enabled, you add keyframes to additional channels in the Keyframe Editor.
When you’ve finished animating the mask, disable Record (press A).
You can also create, delete, and edit the timing of a mask’s Shape Animation keyframes in the Keyframe Editor. For simplicity, each change you make to a mask is recorded as a single keyframe, no matter how many control points you edited. The Shape Animation parameter only allows keyframes set to Constant—you cannot use any other form of keyframe interpolation.
The process used to animate both masks and shapes is identical. To see an example of shape animation, see Animating Shapes. For more information on keyframing in general, see Keyframes and Curves.