Using Masks to Aid Keying Effects
Keying is rarely a one-step process. Although adding a keying filter is the first step, there is usually additional work that must be done to create a good key that retains detail around the edge of your subject. You can use the mask tools and alpha channel filters presented in this section to turn a decent key into a great one. For more information about using Motion’s keying filters see Keying.
Important: When using masks with keying, apply any masks after applying the keyer.
Garbage Masks
The second step in many keying shots is to create a garbage mask to crop out unwanted objects in the shot that can’t be keyed, such as the edge of a blue screen stage, lighting rigs, or tape that appears in the background.
You can also use a garbage mask to conceal parts of the background too difficult to key without the loss of foreground detail.
Select a keyed layer and use a mask tool to draw a mask around the foreground subject.
Note: The garbage mask must be animated if the subject is moving.
By default, the mask is set to Add, and crops out everything outside the mask, while leaving the transparent areas in the mask alone.

For more information about using Motion’s keying filters, see Keying.
Holdout Masks
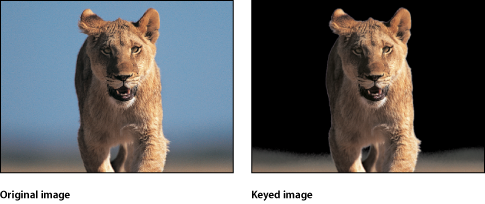
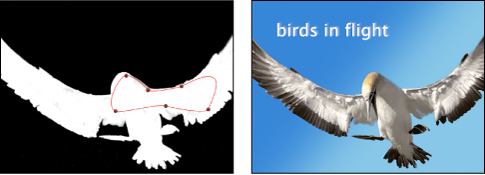
Sometimes, while pulling a key, you lose part of the image you’re trying to keep. This can happen when the color of the subject’s clothing is too close to the color of the background being keyed out, or when you need to use keying values that are too aggressive. In this example, small parts of the bird’s head and wings are getting removed with the key, rather than just the blue sky.
The following images show an example of a key that must be manually masked. The top image is the original shot to be keyed, and the bottom image is the keyed shot. The bird image key leaves black spots or “dirt” on the key. If left uncorrected, the background image would show through the bird in these areas.

In these cases, you can duplicate the original layer, mask the part of the subject that’s being incorrectly keyed, and composite it over the keyed version to fill it back in.
Note: The Spill Suppressor filter can modify the color of the foreground subject as well. If you’re using the Spill Suppressor filter on the keyed layer, you may have to apply the same filter to the holdout mask layer to make sure the color matches. For more information on the Spill Suppressor filter, see Keying.
Key and mask the foreground subject.
For more information about using Motion’s keying filters, see Keying.
Duplicate the keyed layer, then move it so it appears above the original layer in the Layers list or Timeline.
Mask the area of the foreground that is incorrectly keyed.
Make sure that the mask is entirely within the subject being keyed.
Note: The holdout mask must be animated if the subject is moving.
On the newly duplicated layer, delete the original keying filters.
If you’ve used a Spill Suppressor filter, don’t delete it, because it’s probably changing the color of the subject.
Feather the edge of the holdout mask you’ve just created, to make sure that it blends in with the object you initially keyed.
In the following image, the mask on the bird creates a clean key by removing the “dirt” left by the original key.
As an optional step, you can nest the originally keyed layer and the holdout matte you just created inside a dedicated group so you can manipulate the entire subject as a single object.
Applying Multiple Keys to a Single Subject
In some instances, it may be difficult to key an entire subject with a single keying filter while retaining fine details. For example, uneven lighting or background color might mean that the best settings to key a subject’s hair may not work elsewhere. In such cases, you can use masks to isolate different parts of a subject, and then apply different keying settings to each area.
Create a group and place the layer you’re keying in the new group.
Duplicate the layer you’re keying until you have a separate duplicate for each part of the image you want to key separately.
Use a mask tool to mask each part of the subject in the duplicate layers.
Make sure the duplicate layers overlap, so there are no gaps in the foreground.
Note: You might need to animate the overlapping masks if the foreground subject is moving.
Apply the relevant keying filter to the isolated parts of the subject, the adjust each filter’s settings.
Eventually, you may find you can achieve an optimal key for each part of the subject. Furthermore, with all duplicates nested in a single group, you can continue to manipulate the subject as a single object.