About Templates
A Final Cut template is a special type of Motion project: After it is saved in Motion, the template appears in one of the Final Cut Pro X media browsers, where it can be applied to an editing project like any other effect, title, generator, or transition that ships with Final Cut Pro.
There are four types of Final Cut templates:
- Final Cut Effect: Use this template to create a custom stylized effect that can be applied to edits and clips in the Final Cut Pro Timeline. An effect can subtly or dramatically shape the character of your editing project. A sepia-tone color correction might make an audience think of days gone by, while a radiant glow might suggest an otherworldly setting. After you save the template in Motion, the effect appears in the Effects Browser in Final Cut Pro.
- Final Cut Transition: Use this template to create a custom transition that can be applied to clips in the Final Cut Pro Timeline. A transition artfully connects the edit point between two clips. One scene might dissolve into the next in a cloud of smoke, or one setting might displace another on a turning page. After you save the template in Motion, the transition appears in the Transitions Browser in Final Cut Pro.
- Final Cut Title: Use this template to create a custom text animation that can be added to a Final Cut Pro sequence. Text might flare in or out in a fiery glow, or fall into place from offscreen. After you the save the template in Motion, the title effect appears in the Titles Browser in Final Cut Pro.
- Final Cut Generator: Use this template to create generalized graphical content that can be added to a Final Cut Pro project. A Final Cut Generator is nearly identical to any other Motion project—it can include text, shapes, replicators, camera moves and lighting, generators, and so on. It can be static or animated. After you the save the template in Motion, the generator appears in the Generators Browser in Final Cut Pro.
Important: Because you cannot change template types after you open a project, determine what kind of template you want to build before creating a Motion project.
Note: A standard Motion project can also be published as a generator in Final Cut Pro X. For more information, see Publishing a Standard Motion Project as a Final Cut Pro X Template.
Like all Motion projects, Final Cut Pro templates can have 2D and 3D groups, as well as animation created with behaviors or keyframes. For more information on working in 3D, see 3D Compositing. For more information on animation in templates, see Animation Guidelines.
Publishing Parameter Controls from Motion to Final Cut Pro X
When you create a template in Motion, you can limit or lock specific parameters to prevent Final Cut Pro X users from modifying crucial elements in the resulting effect. For example, you might want to prohibit a staff editor from changing the intensity of a glow effect to be applied to a clip in Final Cut Pro. At the same time, you might want to allow her to modify the color of the glow. You set these end-user constraints by choosing which adjustable parameter controls to publish. Published parameters appear in the Final Cut Pro Inspector, where they can be edited and animated.
When creating templates in Motion, you have the following publishing options:
You can publish no parameters, making the effect a nonmodifiable preset with no adjustable controls in the Final Cut Pro Inspector.
You can publish specific parameters, giving users limited control over modifications made in the Final Cut Pro Inspector.
You can publish rig widgets, which map multiple parameters to a few pop-up menus, sliders, or checkboxes. Rigs simplify parameters by combining them into a single control in the Final Cut Pro Inspector. Rigs can also be used to limit the adjustable range of a parameter in Final Cut Pro. For more information on using and publishing rig controls, see Using Rigs.
For a step-through example of creating a Final Cut Effect that includes a rig, see Advanced Example: Creating an SLR Effect Template Using Rigging.
For more information on publishing template parameters, see Publishing Parameters in Templates.
Note: Some parameters in Motion cannot be published to Final Cut Pro.
How Templates Work
Creating a template begins in the Motion Project Browser, where you select one of four template types—Final Cut Effect, Final Cut Transition, Final Cut Title, or Final Cut Generator—then click open. The new Motion project that opens contains graphical placeholders—target layers where you apply Motion behaviors, filters, and other effects that combine to create an effect for Final Cut Pro X. (Placeholders, which appear in the Canvas as downward arrow graphics, are similar to drop zones in standard Motion projects.) You can drag an image or video clip into a placeholder layer to preview the effect you’re building, but those images do not appear in the Final Cut Pro project. This is because effect, transition, and title templates are intended to modify footage in the Final Cut Pro Timeline, not images and footage in Motion.
Even though images in the placeholder layers do not appear in the resulting Final Cut Pro effect, any new layers you add to a template (shapes, paint strokes, images, and so on) and their applied effects (lighting, camera moves, filters, for example) are visible in the Final Cut Pro project. These layers, which appear composited over the clip the effect is applied to, cannot be separated from the effect. For this reason, it is ill-advised to add image layers to effect, transition, and title templates.
However, in generator templates there are no image restrictions. Because generator templates deliver image content (not just special effects) to Final Cut Pro, images, clips, and applied effects are propagated to the Final Cut Pro project and appear in the Viewer when applied.
Note: Although you can drag a video clip into a placeholder layer for preview purposes, the clip’s duration can interfere with timing built into the template. For that reason, it’s better to use still images in templates when you need to preview an effect. Additionally, complex Motion layer effects such as particle emitters and replicators are not recommended for use in any template types, because they might negatively affect Final Cut Pro performance.
When you save a template in Motion, the effect is exported to the relevant Final Cut Pro media browser (the Effects Browser, Titles Browser, Transitions Browser, or Generators Browser). When the template is added to the Timeline or applied to a clip in the Timeline, an on/off activation checkbox and published parameter controls appear in the Final Cut Pro Inspector.
The following sections describe each template type.
Final Cut Effect Template
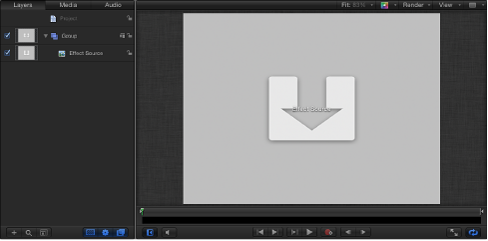
The Final Cut Effect template contains one placeholder layer: Effect Source. Drag filters and behaviors to the placeholder layer (the downward arrow graphic in the Canvas) to create custom effects. Drag an image to the placeholder layer to preview the effect. When you save the template in Motion, the template is automatically exported to the Final Cut Pro Effects Browser.
In Final Cut Pro, apply the effect to a clip in the Timeline. (Images or clips used in the Motion placeholder layer appear in the Effects Browser icon, but are not applied to the clip in the Final Cut Pro Timeline.) The duration of the effect is determined by the length of the Final Cut Pro clip it is applied to.
You can use template markers to control the timing of the sections of an effect template. For more information, see Working with Markers in Templates.
You cannot delete the Effect Source placeholder from an effect template. Nor can you create additional Effect Source placeholders. Although you can add more image layers to an effect template (and have them appear in the applied effect in Final Cut Pro), it’s not recommended. This template was designed for a single purpose: to apply one custom visual effect to a Final Cut Pro clip.
Final Cut Transition Template
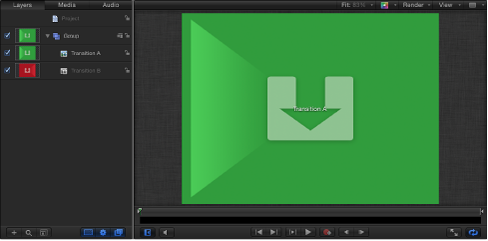
The Final Cut Transition template contains two placeholder layers: Transition A and Transition B. Filters and behaviors added to Transition A affect the first clip in a Final Cut Pro transition. Filters and behaviors added to Transition B affect the second clip in the transition. Drag an image to each placeholder to preview the transition. When you save the template in Motion, the new transition is automatically exported to the Final Cut Pro Transitions Browser.
In Final Cut Pro, apply the transition to an edit point in the Timeline. (Images or clips in the Motion placeholder layer appear in the Transitions Browser icon, but are not applied to the clip in the Final Cut Pro Timeline.) The duration of the transition is determined by the project settings in the Editing pane of Final Cut Pro Preferences. When creating the transition in Motion, you can set the template to override the default transition duration in Final Cut Pro. The transition also has adjustable In and Out points in the Final Cut Pro project.
You can add drop zones to a transition template to add a background element in the transition. For more information, see Creating a Transition Background.
You cannot delete the Transition A and Transition B placeholders from a transition template. Nor can you create additional Transition placeholders. Although you can add more image layers to a transition template (and have them appear in the applied effect in Final Cut Pro), it’s not recommended. This template was designed for a single purpose: to apply one custom transition to the edit point between two Final Cut Pro clips.
Final Cut Title Template
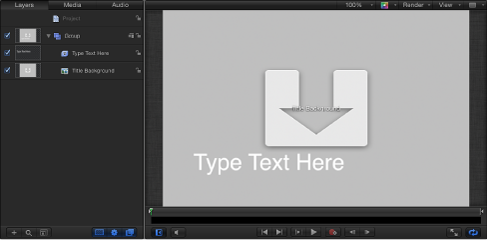
The Final Cut Title template contains a text layer (Type Text Here) and a placeholder layer (Title Background). Modify the text, as necessary. Animate the text using behaviors or keyframes, and add text layers and text effects, if needed. Filters and behaviors applied to the Title Background placeholder modify the clip that the title effect is applied to in Final Cut Pro. Drag an image to the Title Background layer to preview the effect. (The preview image does not appear in Final Cut Pro.) Or, if you don’t want to modify the clip in Final Cut Pro, delete the Title Background placeholder.
When you save the template in Motion, the new title effect is automatically exported to the Final Cut Pro Titles Browser. There are two ways to apply a title effect in Final Cut Pro:
Drag the title effect above a clip (or clips) in the Timeline to the frame. When you release the mouse button, the title is anchored to the clip, and the clip is used as the background. The title can span multiple clips in the Timeline. The clips populate the title background placeholder, so underlying clips assume any transforms, filters, and so on that were applied to the placeholder in Motion.
Add the title effect to the main Timeline as a clip. If the title effect contains a Title Background placeholder, the placeholder is ignored, and a background clip cannot be specified.
If the title effect is added as a clip to the main Timeline in Final Cut Pro X, you can use a standard drop zone to specify a background source clip. For more information, see Creating a Title Background.
When added to the Final Cut Pro Timeline, the duration of the title effect is the same as the template created in Motion. The title effect has adjustable In and Out points in the Final Cut Pro project.
To create a template that allows you to use the background in the ways discussed above, you can publish a rigged checkbox that turns the drop zone on or off in the main Timeline. Alternatively, you can create two versions of the title template, one that uses a standard drop zone as a background and one that uses the default Title Background placeholder. For more information on rigging, see Using Rigs. For more information on publishing, see Publishing Parameters in Templates.
Final Cut Generator Template
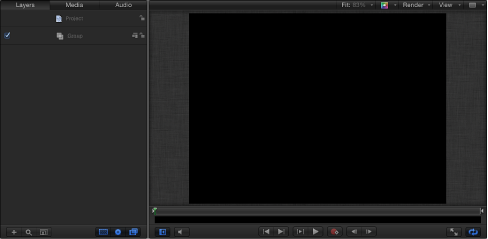
The Final Cut Generator template contains no placeholder layers. In fact, the generator template is nearly identical to any other Motion project. Add image layers and effects to create a composition just as you would in a standard Motion project.
When you save the template in Motion, the generator effect is automatically exported to the Final Cut Pro Generators Browser. There are two ways to apply a generator effect in Final Cut Pro:
Drag the generator above a clip (or clips) in the Timeline to the frame, compositing the generator over the clip. The generator can span multiple clips in the Timeline.
Add the generator to the main Timeline as a clip.
When added to the Final Cut Pro Timeline, the duration of the generator is the same as the template created Motion. The generator has adjustable In and Out points in the Final Cut Pro project.
Standard drop zones can be added to Final Cut Generator template. For more information about drop zones, see Drop Zones.
Note: A standard Motion project can also be published as a generator in Final Cut Pro. For more information, see Publishing a Standard Motion Project as a Final Cut Pro X Template.