Working with Markers in Templates
Markers are visual reference points you add to the Timeline to identify specific frames. There are seven types of markers. The first type, known as Standard, is designed for use in Motion and has no effect if saved in a Final Cut template. The Standard marker type can be added to an object (an object marker) or to the overall project (a project marker). The remaining marker types, known as template markers, are designed to control the timing of templates in Final Cut Pro X. To apply a template marker, you must first apply a standard project marker, then change the marker type in the Edit Marker dialog.
For more information on using working with markers in the Timeline, see Adding Markers.
When building a template, you typically don’t know the duration of the clips it will be applied to in Final Cut Pro. Template markers let you control the timing of a template after it is applied in Final Cut Pro by designating regions in the Timeline to be played, ignored, or looped to match the duration of the target clip. You can also designate a specific frame to be used as the template’s thumbnail in the Final Cut Pro Effects, Transitions, or Titles Browser.
Template markers fall into four categories: Build In, Build Out, Loop, and Poster Frame. Build In markers instruct Final Cut Pro to play an intro animation in specific instances. Build Out markers instruct Final Cut Pro to play an outro animation in specific instances. Loop markers indicate where the template should begin looping playback. Poster Frame markers determine the frame of a template to be used as the thumbnail for the template in the Final Cut Pro Effects, Transitions, or Titles Browser.
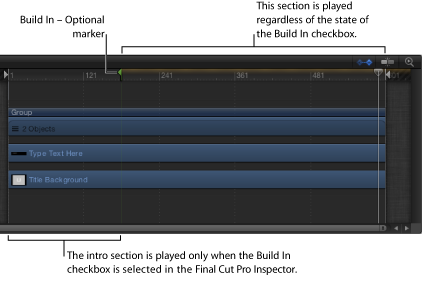
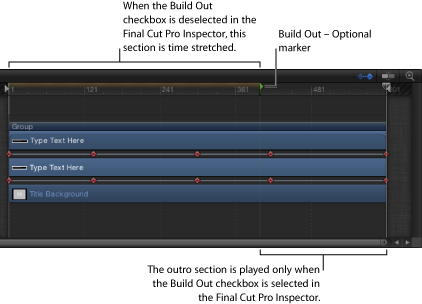
Build In markers designate the end point of an intro section of a template, and instruct Final Cut Pro to play that section at the same speed as the original template (as created in Motion), regardless of the duration of the clip in the Final Cut Pro Timeline. Build Out markers designate the start of an outro section of a template, and instruct Final Cut Pro to play that section at the same speed as the original template (as created in Motion), regardless of the duration of the clip in the Final Cut Pro Timeline.
You can also specify a build-in or build-out section as optional. When you add the optional Build In or Build Out marker, a corresponding checkbox is added to the Publishing pane of the Project Inspector in Motion. When you apply a template to a project, the checkbox also appears in the Final Cut Pro Inspector. Deselect the checkbox to disable the build-in or build-out portion of the effect.
When you add Build In, Build Out, or Loop template markers to a Motion project, the Timeline ruler displays a gold glow over the affected region.
If no Build In or Build Out markers are present, the entire template is time-stretched to correspond to the duration of the clip when applied in Final Cut Pro. If Build In or Build Out markers are present, only the portion of the Motion project between the marker-defined intro or outro section is time-stretched; the marker-defined region retains its original timing. When creating templates, use template markers to control which portions of the effect, title, transition, or generator are time-stretched and which portion are left alone.
Note: Transition templates assume a default duration in Final Cut Pro (determined in Final Cut Pro Preferences). This duration can conflict with the effects of these marker types. For example, you might specify that the intro animation of a transition lasts for 45 frames, while the default duration in Final Cut Pro is set to 30 frames for the entire transition. To override the Final Cut Pro default duration, select the Override FCP Duration checkbox in the Project Properties Inspector of Motion. For more information, see Creating a Transition for Final Cut Pro X.
The marker types include:
- Standard: The default marker for use in Motion. This marker has no effect on templates in Final Cut Pro.
- Build In – Mandatory: Indicates the last frame of an intro section. Frames between the beginning of the project and the Build In – Mandatory marker play for the duration specified in the Motion project.
This intro is always played, regardless of where the template is placed in the Final Cut Pro Timeline.
- Build In – Optional: Sets the last frame of an intro section. When a Build-In Optional marker is added to a template, a Build In checkbox is published (added to the Published Parameters list in the Publishing pane of the Project Inspector). After the template is added to a Final Cut Project, the Build In checkbox appears in the Inspector.
When the Build In checkbox is selected in the Final Cut Pro Inspector, frames between the beginning of the project and the Build In – Optional marker play at the duration specified in the Motion project. When the checkbox is deselected, frames before the marker are not played.
- Build Out – Mandatory: Sets the first frame of an outro section. Frames between the Build Out – Mandatory marker and the end of the project play for the duration specified in the Motion project.
This outro is always played, regardless of where the template is placed in the Final Cut Pro Timeline.
- Build Out – Optional: Sets the first frame of an outro section. When a Build Out – Optional marker is added to a template, a Build Out checkbox is published (added to the Published Parameters list in the Publishing pane of the Project Inspector). After the template is added to a Final Cut Project, the Build In checkbox appears in the Inspector.
When the Build Out checkbox is selected in the Final Cut Pro Inspector, frames between the Build Out – Optional marker and the end of the project play at the duration specified in the Motion project. When the checkbox is deselected, frames before the marker are time-stretched and frames after the marker are not played.
- Project Loop End: Sets the last frame of the section to be included when the template is used in Final Cut Pro. When playback reaches this frame, the project plays from the beginning of the project or from the Build In marker, if present. Frames beyond the Project Loop End marker are never played.
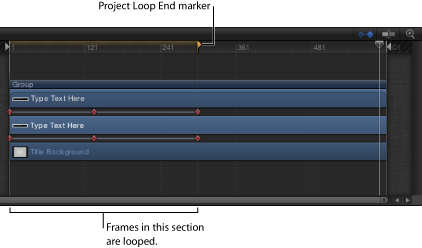
Setting a marker type to Project Loop End changes any marker set to a Build Out type back to Standard. Similarly, if a Project Loop End marker exists, adding an Outro marker resets the loop marker back to Standard.
Tip: Adding a loop marker to the second frame in a template signals that the effect is time-invariant—the first frame of the project loops forever. This can be useful for generators that do not contain animation, such as a solid color generator, or for filters that are not animated by default, such as a color correction filter.
Note: Templates with applied Time filters (Echo, Scrub, Strobe, Trails, or WideTime) should not use Loop markers, because unexpected timing results can occur.
- Poster Frame: Sets the frame to be used as the template’s thumbnail in the Final Cut Pro Effects, Transitions, or Titles Browser.
Adding Template Markers
To create a template-specific marker (Build In, Build Out, Project Loop End, or Poster Frame), you must first add a project marker to a Motion project, then change its type in the Edit Marker dialog.
Position the playhead on the frame where you want the marker to appear.
Do one of the following:
Press Shift-M.
Ensure that no objects in the project are selected, then choose Mark > Markers > Add Marker.
Ensure that no objects in the project are selected, then press M or the Tilde key (`).
Ensure that no objects in the project are selected, Control-click the Timeline ruler, then choose Add Marker from the shortcut menu.
A green marker appears in the Timeline ruler, and a green vertical line appears in the mini-Timeline.
Drag the marker to a position in the Timeline ruler.
When you drag the marker, the current frame is displayed above the pointer.
Do one of the following:
Position the playhead over the marker, then choose Mark > Markers > Edit Marker.
Double-click the marker.
Control-click the marker, then choose Edit Marker from the shortcut menu.
In the Edit Marker dialog, choose a marker type from the Type pop-up menu.
The Build In and Build Out markers appear as small green arrows in the Timeline ruler. The Project Loop Out marker appears as a small orange arrow. At the top of the ruler, the area specified as the intro, outro, or loop section displays a gold glow.
For more information on the Edit Marker dialog, see Adding Markers.