Understanding the Basic Scoring Stages
This section provides an overview of how you would approach the creation of a musical score in Logic Pro.
Stage 1: Getting Notes into the Score
There are basically three ways you can do this:
Real-time recording from your MIDI keyboard. (See Entering Notes and Symbols Using Real-Time Recording.)
Step recording, using either your MIDI keyboard or the Caps Lock keyboard. (See Entering Notes and Symbols Using Step Input.)
Manual entry with the computer keyboard or mouse. (See Entering Notes and Symbols Using Mouse Input.)
The Score Editor displays the contents of MIDI regions, which act as containers for note (and other) events. You need to create, and select, a MIDI region in the Arrange area if you want to work in the Score Editor.
Note: Double-click the background of the Score Editor (with the Pointer tool) if you want to see the regions of all MIDI tracks (software and external MIDI) as staffs.
Stage 2: Using Display Settings to Create Readable Notation
Logic Pro interprets MIDI regions for the score display, using a variety of user-defined methods.
Note events are represented as crotchets, quavers, and so on. Spaces between notes are represented as rests. Sustain pedal data can also be represented in your score.
Your goal should be to retain the feel of real-time recordings (if this is how you added note data to Logic Pro), while still rendering a score that is readable by other musicians.
If you like the sound of playback, but not the way the score looks, you can usually obtain the preferred results by changing a few settings in the Display Parameter box and the overall Score project settings. (See Transcribing MIDI Recordings.)
- Display Parameter box: The parameters of the Display Parameter box mainly affect the rhythmic display of selected MIDI regions. They only apply to the score display, and do not affect the playback of MIDI regions. They can be different for each region. Some of these (region-based) parameters can be overridden for individual notes, by using note attributes.
- Project settings: You can set general display options that affect the whole project in the Score project settings window. (See Score Settings.) These options include spacing between notes, page margins, line thickness, display of instrument names, bar and page numbers, and more.
Important: Score display parameters have absolutely no effect on MIDI playback, just on the way MIDI data is shown in the Score Editor. This separate notation display system allows you to adjust the look of the notation, without changing the original MIDI region data (and therefore, the performance).
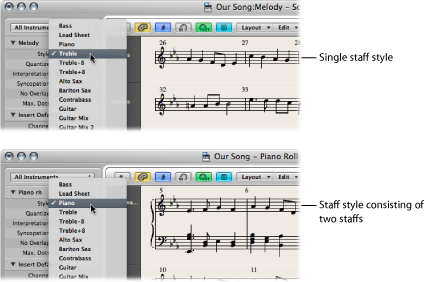
You can further control the display by selecting or creating staff styles, text styles, and score sets, that best fit your music.
Staff styles exist for most common single and multi-staff types, and can be chosen from the Display Parameter box’s Style menu. These include Piano, Guitar, Horn in Eb, Organ, and even Drum styles. Choose the one that best represents the instrument part as notation. If none of the existing styles is appropriate, you can easily create your own. (See Working with Staff Styles.)
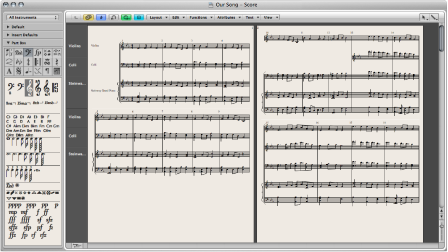
Score sets allow you to determine which instruments are displayed (and printed) in a score. You can include as many (or few) of the existing track instruments into a score set as you like. (See Using Score Sets to Create Scores and Parts.) This makes it easy to create separate sheet music for the violinists, or French horn players, for example.
Text styles are used to control several different text elements of your score, such as the title, lyrics, copyright information, instrument names, and so on. Each of these text elements can be assigned a font style, size, and more within the overall text style. (See Working with Standard Text.)
Stage 3: Editing Note Events
Even with all of the display options available when working in the Score Editor, you may need to adjust the appearance of some notes. You can do this using the functions in the Note Attributes menu. These commands let you adjust individual note events, allowing enharmonic shifts, accidentals, ties, beaming, and much more.
This function can also be used on multiple selected notes, which is useful on those rare occasions when the display settings don’t deliver acceptable results.
Stage 4: Inputting Events, Symbols, and Text
Few scores consist solely of note (and rest) events.
The Part box contains a number of symbols (pedal markings, slurs, and so on) that can be inserted into the score by dragging them into position with the mouse. The Part box also contains all types of note events, clefs, bar line markers, and more. Again, these can easily be added by dragging and dropping. (See Working with the Part Box.)
Rests are usually displayed automatically in Logic Pro, and don’t need to be inserted manually, but can be, if needed, from the Part box. (See Creating and Inserting Rests in the Score Editor.)
The entry of lyrics, title, and other text elements is also done via the Part box, or with the Text tool. (See Working with Standard Text.)
Stage 5: Editing the Whole Score
Once you’ve recorded or inserted all (or most) of the notes and symbols into your score, and edited individual elements, the next step is to polish the score’s layout.
This process typically includes using tools to reposition staffs, and changing the Score project settings to adjust the number of bars per line, set page margins, and more. All project layout options are discussed in Score Settings.
Layout work is done in Page Score view, which displays as many facing pages as possible (depending on the size of the Score Editor window and current zoom level).
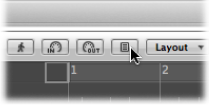
Click the Page View button (to the left of the Layout menu button).
Tip: You should use Linear Score view for editing, as screen redraws are much faster, especially on slower computers. Page Score view should only be used for layout work, in preparation for printing. Further details on Page Score view can be found in Customizing the Score Editor’s Appearance.
Stage 6: Printing a Score
The last step is printing your score. The printed result always corresponds to what you see in the Score Editor window. (Page Score view must be turned on.)
Choose File > Print (or use the corresponding key command, default assignment: Command-P).
The Print dialog opens.
Choose printing options (including printing to PDF), and click the Print button.
Before printing, you may want to turn on Print view, which shows the page margins onscreen.
Choose View > Page Display Options > Print View (only accessible when Page Score view is active).
More information can be found in Printing the Score.