Preparing the Score Layout for Printing
This section outlines a number of changes you can make to the overall score layout. These primarily involve display customizations, and use of the Score project settings or preferences. For full details, see Score Settings and Score Preferences in Logic Pro.
Understanding the Page Display Options
You should use Page Score view for layout work when preparing for printing. In Page Score view, Logic Pro automatically displays as many facing pages as possible, depending on the size of the Score Editor window and current zoom level.
Choose View > Page View in the Score Editor (or use the corresponding key command).
Click the Page View button in the Score Editor’s upper-left corner.
You should use Linear Score view for editing, as screen redraws are much faster, especially on slower computers.
You can jump directly to any page using the View > Go to Page menu item (or corresponding key command), when working in Page Score view. The playhead is automatically set to the beginning of the selected page, unless the sequencer is running when you choose the command. In this situation, Catch mode is turned off.
The View > Page Display Options menu item offers a number of additional settings that are useful for printing or layout tasks.
- Print View: Print view shows the score as it will be printed. Print view can only be turned on when Page Score view is active.
- Show Margins: Displays page margins onscreen. These are not printed.
- Show Pages in Pairs: Shows facing pages. This setting depends on the zoom settings and score scale.
- Show Page Rulers: Displays a horizontal and vertical ruler (in centimeters or inches) that makes precise layout tasks easier.
Note: The yellow area on the screen represents the printable area (which also depends on the printer being used), not the actual sheet of paper. The grayish-yellow area surrounding the page—in Print view—shows how the page will actually be printed.
Setting Line Breaks
You can set line breaks individually for each score set, and also for each of the extracted parts. Logic Pro saves breaks with the project file.
The automatic line break calculations are based on the Spacing and Maximum Bars/Line settings in the Global Score project settings. The Maximum Bars/Line project setting determines the maximum number of bars Logic Pro will allow in one staff or staff system. You can override the automatic line break with the Layout tool (when in Page Score view). You can also create a line break by inserting the Link Break symbol in any view mode, using the standard insert methods.
For example, you can set Maximum Bars/Line to 6, and still move additional bars into a line with the Layout tool. Any subsequent lines will contain no more than six bars. The full number of bars set here is only displayed if the spacing settings are low enough to allow the proper display of that many bars.
Note: If you drag more bars into a line than would be displayed when employing the automatic line break function, overlapping notes and symbols may result.
In Page Score view, grab the bar with the Layout tool and drag it down (the pointer changes to a hand with a downward-pointing thumb), then release the mouse button.
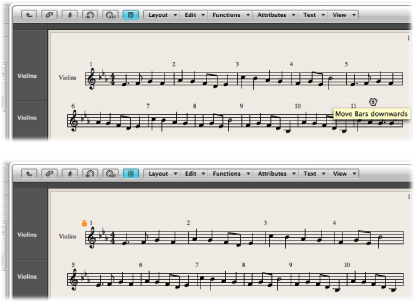
The bar is moved to the next staff system, and the remaining bars in the line are distributed evenly over the entire width of the page.
You can also move the first bars of a staff upward into the preceding staff, by dragging them up with the Layout tool.
When you move a bar with the Layout tool, all manually edited line breaks in subsequent lines are deleted, and the (automatic) line breaks are recalculated from that line downward. If you want to prevent this behavior, perhaps because you only want to change one detail and keep the other staffs as they were, hold down the Option key while moving the bars with the Layout tool. Line breaks edited in this way only affect the two (directly concerned) staff systems. All other staff systems are unchanged.
Setting Page Breaks
You can set page breaks individually for each score set, and also for each of the extracted parts. Logic Pro saves breaks with the project file.
You can use the Page Break symbols to insert a page break. This technique moves all bars that follow the page break insertion point to the following page. All preceding, and following, bars are automatically adjusted in accordance with the Score project settings (discussed in the Setting Line Breaks section). All staffs in the score are affected.
Editing Local Margins
You can move the left and right margin of each individual staff system with the Layout tool, so that they do not align horizontally with the page margins. Like manual line breaks, these local margins are also saved as part of the current score set, allowing different settings for each score set.
Turn on the following settings in the Score Editor’s View menu:
Page View
Page Display Options > Print View
Page Display Options > Show Margins
Click-hold (with the Layout tool) a little inside the beginning or end of the staff, and drag to the left or right.
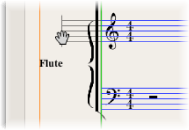
During this process, Left/Right Staff Margin appears in the help tag.
Note: When altering margins, Logic Pro automatically adapts the number of bars per line (unless you have manually adjusted line breaks beforehand). If the line is shortened, bars may be moved down to the next line, depending on the Spacing parameters in the Global pane of the Score project settings. (See Global Score Settings.)
Double-click at its end (or beginning) with the Layout tool.
Choose Layout > Reset Line Layout.
Changing the Margin and Header Values (Page Print View)
You can change the Margin and Header Space project settings directly in Page Print view.
Choose the following settings in the Score Editor’s View menu:
Page View
Page Display Options > Print View
Page Display Options > Show Margins
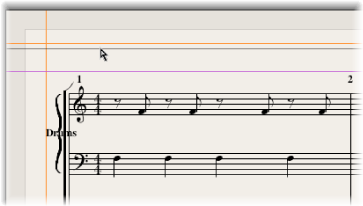
Set the margin values by dragging the orange lines.
Set the header space value by dragging the purple line.
Only the setting (score or part) that is currently displayed is affected.
Using External Symbol Fonts for Display and Printout
You can use the Sonata font from Adobe, the Jazzfont, and the Swingfont (not included with Logic Pro), instead of the internal Logic Pro score font, for display and printout of notes and symbols. The external font must be properly installed on your system. Choose Logic Pro > Preferences > Score > “Use external symbol font (if available),” then choose the font you want to use from the corresponding pop-up menu.
Printing the Score
The printout of scores created in Logic Pro is identical to the Score Editor’s Page Score view display. The following items are not printed, but are visible onscreen:
The dashed lines that represent page and header margins, and borders between staff systems
Mouse pointer and playhead
Colors (page margins, staff lines of selected MIDI regions)
Hidden time signature changes
Hidden note heads (displayed in gray on the screen) and their ties
Hidden bar lines (displayed as grayed-out lines on the screen)
Hidden N-Tuplet numbers
Choose the appropriate paper size and format in the File > Page Setup window.
Make sure that the Score Editor (containing the intended Print view) is the active window.
Start printing by choosing File > Print (or using the corresponding key command, default assignment: Command-P).
A dialog, which may vary slightly from printer to printer, is shown. Choose from the available options, such as which page numbers you want to print, the number of copies, or click the PDF button to “print to” (Save as) a PDF file.
Make your selections, then click the Print button.
You should work at high zoom levels when doing layout work that requires precision, such as positioning symbols and text elements.
It’s very easy to switch back and forth between a normal and enlarged view of the display, by using the Zoom tool (shortcut: drag to select while holding down Control, to enlarge the selected area).