Score Settings
There are eight panes of score-related project settings. You can switch between these and other project settings by using the tabs at the top of the Project Settings window.

These settings affect the whole project (in all score sets). They are saved with the project file, allowing each project to have different settings.
Choose File > Project Settings > Score (or use the Open Score Project Settings key command).
Click the Settings button in the Arrange toolbar, then choose Score from the pop-up menu.
Global Score Settings
The Global Score project settings define global formatting options such as page margins, spacing between notes, bars per line, and more.
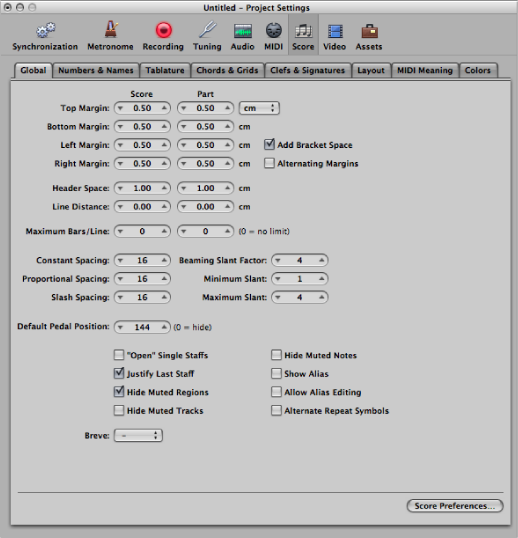
Distance values can be displayed in inches or centimeters in the Global Score settings pane.
Choose cm or inch from the pop-up menu at the top of the Global Score settings pane.
Settings that affect the general page layout (margins, for example) can be set independently for the full score or just a part or it, indicated by the two input boxes. This allows you to print out single voices with a page layout that differs from the full score. (See Creating Separate Layouts for Full Score and Parts.)
The following describes the global Score settings in detail.
- Top, Bottom, Left, and Right Margin fields: These values show the margin distances to the outer border of the printable area on the page. A “Top Margin 0.0 inches” value means that printing will start as close to the top of the paper as the selected printer driver will allow. This also means that the size of the printable area can vary between printers, although the difference should be minimal.
Margins are only visible in Page Print view, where they are displayed as orange lines on the screen. (These lines are not printed.) It is also possible to change them directly in the score, by dragging them with the Pointer or Layout tool.
- Alternating Margins checkbox: If selected, the left and right page margin settings are swapped on every second page. This can be useful if a score is going to be bound as a book: the inner margin usually needs to be a little bigger than the outer one. It’s possible that the opposite might be preferable, in cases where extra space is needed for remarks that may be added to the score at a later date.
- Header Space field: Defines the height reserved for headers, between the top margin of the first page and the top margin of the first staff on the page (as per the assigned staff style).
Note: Text objects inserted directly into this area automatically become global text elements (see Working with Global Text), and are displayed as headers in all score sets (full scores and parts).
This value can also be changed directly in the score, by dragging the purple line above the first staff.
- Maximum Bars/Line field: This parameter can be useful when using small spacing values (see below), to prevent too many bars from being displayed on one line. The number set here limits the number of bars that can be displayed per line.
Note: This setting can be overridden when using the Layout tool to change line breaks. (See Setting Line Breaks.)
- Constant Spacing and Proportional Spacing fields: These parameters determine the amount of horizontal distance between notes.
Constant Spacing affects the distance from note to note, regardless of rhythmic value.
Proportional Spacing takes the note durations into consideration.
If you only use Proportional Spacing (and set Constant to 0), every bar receives (more or less) the same amount of (horizontal) space. A whole note uses as much space as four quarter notes. In the opposite situation (high constant value, proportional value set to 0), the distance from one note to the next is always the same, regardless of note duration. A half note takes the same amount of space as an eighth note. Other factors, such as accidentals, ties, and so on, are also considered for note distance calculations.
The settings you use depend on both your personal preference and the style of the piece. You should aim for a good balance between these two parameters, so try different combinations when working on the final score layout.
- Slash Spacing field: This is the distance parameter for slashes (used in staff styles that display beat slashes instead of automatic rests). This is especially important when inserting notes into staffs that display slashes. For example, musical styles such as funk use a lot of sixteenth notes, so you are likely to choose a higher slash distance than you would for music that doesn’t go beyond eighth notes. This way, the proper relationships between notes and passages (containing only slashes and chord symbols) can be maintained.
- Beaming Slant Factor, Minimum Slant, and Maximum Slant fields: These three parameters affect the slant angle of beams. As with the Spacing parameters, these parameters work together. Appropriate settings need to be found by trying different combinations. The final settings will vary, depending on the style of the music and on personal preference.
- Beaming Slant Factor: Determines the general amount of beam slanting, in relation to the intervals of the notes connected by beams.
- Minimum Slant: Determines the minimum interval of notes that causes beams to be slanted.
- Maximum Slant: Determines the maximum beaming slant angle.
These parameters work relatively to a particular scoring situation, which is why no explicit settings can be given. Again, it is essential to try different combinations when working on the final layout of a piece.
- Default Pedal Position field: This determines the vertical position of automatic pedal symbols (those created when you use the MIDI sustain pedal during a real-time recording). If this parameter is set to zero, recorded MIDI sustain pedal events are hidden in the score. Pedal marks that you manually insert from the Part box are not affected by this parameter.
- Show Alias checkbox: Switches the display of aliases in the score on or off. (See Working with Aliases in the Score Editor.)
- Allow Alias Editing checkbox: Switches alias editing on or off. (See Working with Aliases in the Score Editor.)
Numbers & Names Settings
These settings affect the automatic display of page numbers, bar numbers, and instrument names in the score.
Note: For each of these options, you can set the font, size, and face by clicking the Choose button.
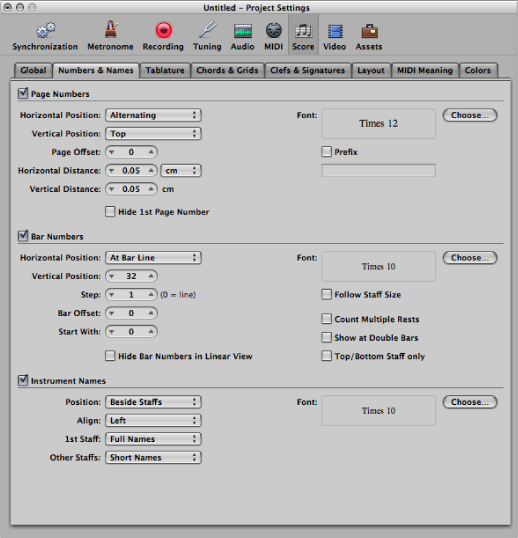
- Page Offset field: This value is added to each actual page number, for display purposes. This can be useful when writing a piece consisting of several parts, which are saved as separate project files. To retain continuous page numbers throughout the score, you can set this parameter to the number of pages contained in all preceding parts (project files).
- Prefix checkbox: Allows you to enter text which will be displayed with every page number.
For example, if you use the prefix Page, the word Page, followed by a space and the actual page number, is displayed on each page. This means that page three will display Page 3. If you want the page number in the middle of the prefix, you need to use the # symbol as a variable for the page number. For example, “- pg.# -” on the second page prints as “- pg.2 -.”
You can also use the following text symbols to include automatically generated text in the prefix:
“\ i” for the score set name
“\ n” for the project (file) name
“\ s” for the name of the currently shown display level, which can be the MIDI region or folder name (or even the project name, on the highest level)
“\ d” for the current date (at the time of printout)
- Show at Double Bars checkbox: Displays bar numbers at every double bar line and repeat sign, independent of the chosen Step setting. For example, if Step is set to 0 (and Double Bars is activated) bar numbers are displayed at the beginning of each staff line, and above or below all double bar lines and repeat signs.
Tablature Settings
Guitar tablature is an alternative method of notating music for fretted string instruments—especially for guitar and electric bass—but also for other fretted instruments, with four to six strings (or courses of strings).
In this system, the horizontal lines represent the strings of the instrument. Notes are always written on the line/string at which they are played. The fret numbers are shown instead of regular note heads.
Logic Pro automatically converts notes into tablature, if a staff style containing a Clef parameter set to one of these tuning sets, is used. The exact characteristics of these tuning sets are determined in the Guitar Tablature pane.
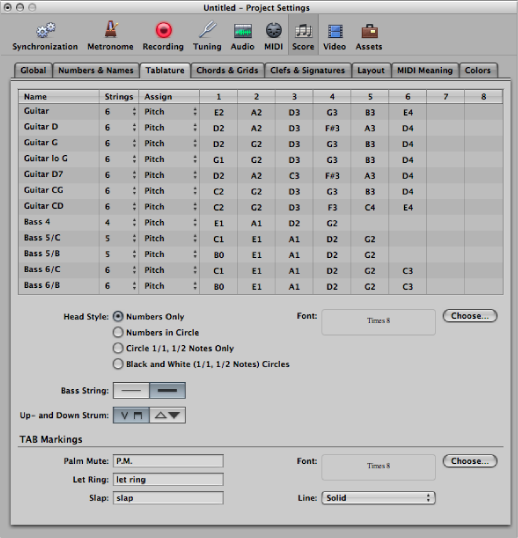
Twelve different tuning sets can be defined. Each of them corresponds to one line in this pane. The regular guitar and bass tunings are already included as defaults (first line and last five lines), as are some of the more common guitar tunings.
- Assign pop-up menu: Select the method for automatically assigning notes to strings (see Determining the Assign Method).
Determining the Assign Method
As most notes can be played at different positions (frets) on different strings, the Assign parameter performs an essential role. In most cases, the MIDI channels of the individual notes determine the string assignment.
Note: The MIDI channel parameter of an individual note has no impact on MIDI playback. The playback channel is determined in the track instrument’s Parameter box in the Arrange window.
Click in the Assign column (for the corresponding Tuning Set), and choose from the following string assignment options:
Logic Pro assigns each note to the string on which it is playable, at the lowest possible position. In order to influence the string assignment, there is a rule (in Pitch mode only) that a note’s fret position cannot be lower than its MIDI channel.
This method is generally used when notes are recorded from a MIDI keyboard:
An A3 (on MIDI channel 1) is displayed on the second fret of the G string. If you want the note to be displayed at a higher position (to correctly display the proper fingering of a passage), you need to set its channel to 3 or higher. This means that the fret position cannot be lower than 3, so the note will be displayed at the D string’s seventh fret.
If the channel is between 8 and 12, the A3 is assigned to the A string on the 12th fret, and to the low E string (17th fret) for channels 13 to 16.
If you want to force even higher positions, you need to use one of the other assignment modes.
In this mode, the number of the string (1 to 6, counted from the lowest string) corresponds to the MIDI channel. Channels 7 to 16 are assigned to the highest string.
Like Channel, but counted from the highest string (1) to the lowest (6 and above). This way of numbering the strings is generally used in traditional guitar literature.
Note: As most Guitar-to-MIDI Converters send notes (played on different strings) on different MIDI channels, the Channel and Inv. Channel modes are suitable if you’re using a MIDI guitar to record MIDI regions. The tablature notation is displayed exactly as the music was played during recording.
These modes should be used when recording and notating electric bass parts with Guitar-to-MIDI Converters.
“−1” is designed for five-string bass (with an additional high B string).
“−2” is designed for four-string bass.
The principle is the same as Inv. Channel mode, but the number of the MIDI channel is reduced by 1 or 2, in order to properly convert the channels for bass string assignment.
The string assignment for a four-string bass will be 3 to 6, and 2 to 6 (counted from highest to lowest string in both cases) for a five-string bass, just as with guitar strings that sound one octave higher. Notes on channel 1 will be assigned to the highest string.
Further Information on Tablature Notation
In all of these Assign modes, notes below the lowest string are not displayed at all.
A further point to note is that notes can generally only be assigned to strings on which they are actually playable (F2 can only be played on the lowest string of a guitar, so the channel assignment is completely ignored in this case).
You can create a two-staff style that displays the MIDI region twice: once using regular music notation, and once as tablature. The indicated split point can be ignored in this situation. A default style for this (named Guitar Mix) is found in the Logic Pro default project.
You cannot insert clef changes in tablature staffs. If you want to change between tablature and regular notation in the same staff, you need to cut the MIDI region, and assign the specific staff styles to the resulting regions.
Guitar tablature relates to a regular treble clef. If you use the octave-transposing treble clef (Treble8) for guitar notation (as done in most guitar music), you need to set the tablature’s Transpose parameter to +12 in the Staff Style window.
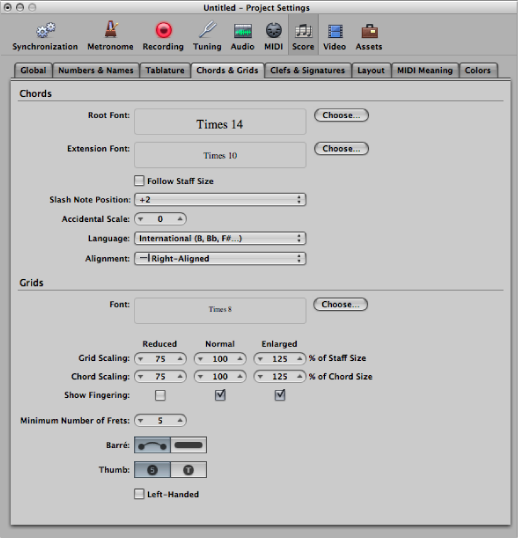
Chords & Grids Settings
These are general display options for chords and chord grids.
Clefs & Signatures Settings
These are general display options for clefs, key signatures, and time signatures.
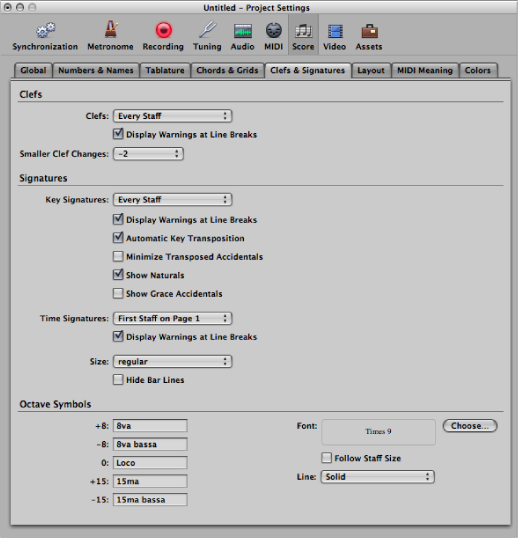
- Automatic Key Transposition checkbox: This setting enables the automatic transposition of key signatures in transposing staff styles. It is usually selected. An exception is for the notation of atonal music. If unselected, all sharps and flats are displayed directly with the notes.
Note: There is a similar option in the Staff Style window (Key parameter), which allows you to turn off the key signature for individual staff styles, or even for individual staffs in multistaff styles.
- Minimize Transposed Accidentals checkbox: This allows the use of enharmonically changed key signatures, if this results in a signature with fewer accidentals. For example, if a piece is written in B major (5 sharps), the Bb instruments are notated in Db major (5 flats) instead of C# major (7 sharps).
Note: Logic Pro does not display key signatures with more than seven flats or sharps, whether or not this option is activated.
- Size pop-up menu: Alters the appearance of the meter (often much larger, for conducting purposes) on the staff. It is expressed as regular and percentage values. Single systems will show both numbers (4/4, for example) on the system. Double systems will show the upper number on the upper system, and the lower number on the lower system.
- Hide Bar Lines checkbox: Allows you to hide all bar lines, which can be useful for educational material, gregorian plain chant notation, and other special situations.
Note: Only automatically displayed bar lines are hidden, so it’s still possible to insert bar lines from the Part box, including the regular bar line, which will be displayed and printed.
Layout Settings
The Layout pane is where you can define a number of display settings for the whole project, such as staff line thickness, stem length, distance between notes and ties, or notes and dots, and so on.
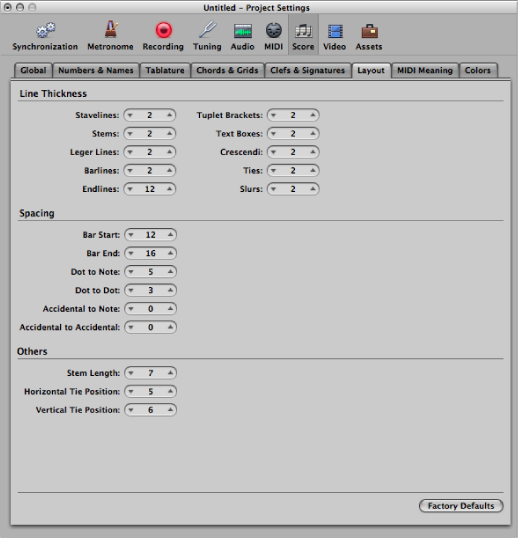
- Line Thickness parameters: This group of parameters determines the line thickness of the following objects: staff lines, stems, ledger lines, bar lines, repeat and end lines, tuplet brackets, text boxes (for boxed text styles), crescendi/decrescendi (also affects line objects and arrows), ties, and slurs.
Note: If you have a high-resolution printer, try to use smaller line thickness settings (2, or maybe even 1). Smaller staff lines, in particular, look much better. The other parameter settings are more a matter of personal preference. These changes are only visible at high zoom levels on the screen. To really judge the results, try some printouts with different settings. The Slur and Tie Thickness parameters are affected by the Scale parameter in score sets, and the Size parameter in staff styles.
- Bar Start Spacing and Bar End Spacing fields: Changes the relative distance between the first and last note of a bar, and the preceding or subsequent bar line. Keep in mind that changing the default settings of these parameters only makes sense if rather extreme values have been chosen for the general Spacing parameters in the Global Score project settings pane.
- Accidental to Note Distance field: Allows you to globally alter the horizontal distance of accidentals from the corresponding note heads. The default setting should only be changed if very small values are used for the Spacing parameters, which results in a tiny distance between notes. This global setting can also be combined with the Accidental Distance parameter of individual notes, in the Note Attributes window.
MIDI Meaning Settings
The settings in the MIDI Meaning pane determine if, and to what extent, the insertion of the listed symbols affect the MIDI playback of notes (that these symbols are attached to).
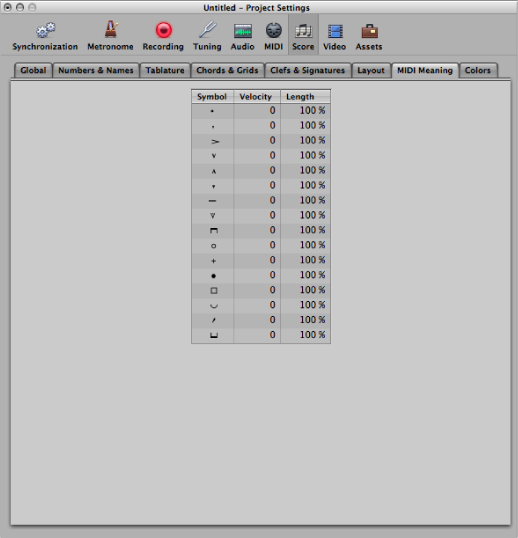
The above symbols change the MIDI output of all notes they are attached to. Two parameters can be determined for each symbol: velocity and length.
The MIDI Meaning functions are most useful when you’re inserting notes with the mouse. This makes it possible to work as if writing music on paper.
First, you write/insert the notes. They will all have the same velocity, and identical rhythmic note values will have exactly the same length.
Accents and phrasing marks are then attached to some of the notes, which changes the velocity and (playback) length of these notes.
This makes playback sound much more realistic and alive.
The default settings in the MIDI Meaning pane (in new projects) are 0 for velocity, and 100% (no change) for length. If you don’t change these values, the symbols remain purely graphical, and do not affect MIDI playback.
If you record your regions in real time (from a keyboard), it’s better to leave these settings at the defaults, as the notes probably already sound the way you want them to.
Important: If you do use MIDI Meaning, you need to adjust the settings before you begin to insert accents and so on. This is because the settings have no influence on accents and phrasing marks that have already been inserted.
Once set, the velocity and length of notes will be changed as soon as you attach one of these symbols to a note. When you delete the symbol, note velocity and length are reset to their initial values.
Color Settings
The Colors pane determines the color palette for the currently active project.

The color palettes are used by different color modes. (See Choosing a Color Mode.) Clicking any color opens the standard Colors window, allowing that particular color to be changed.
Colors are saved with the project, and can be different for each project.
There are three palettes, and some additional options in this pane.
- User Palette Color buttons: These colors can be freely edited and named. Click any color to open the standard Colors window and change that particular color. Double-click the text entry boxes to edit the names. These names are displayed as color options in different color selection menus (staff styles, note attributes).