
First, upload your macOS app to Apple to be notarized. If the upload fails, view the upload logs to find the problem. For example, you must enable hardened runtime (macOS) before you upload the app. Otherwise, check the notarization status and when the status is “Ready to distribute”, export the app for distribution.
Important: You must be running Xcode 10.0 and later on macOS 10.13.6 and later to upload your app to be notarized. Also, only the Account Holder that belongs to either the Apple Developer Program or the Apple Developer Enterprise Program is allowed to create Developer ID certificates.

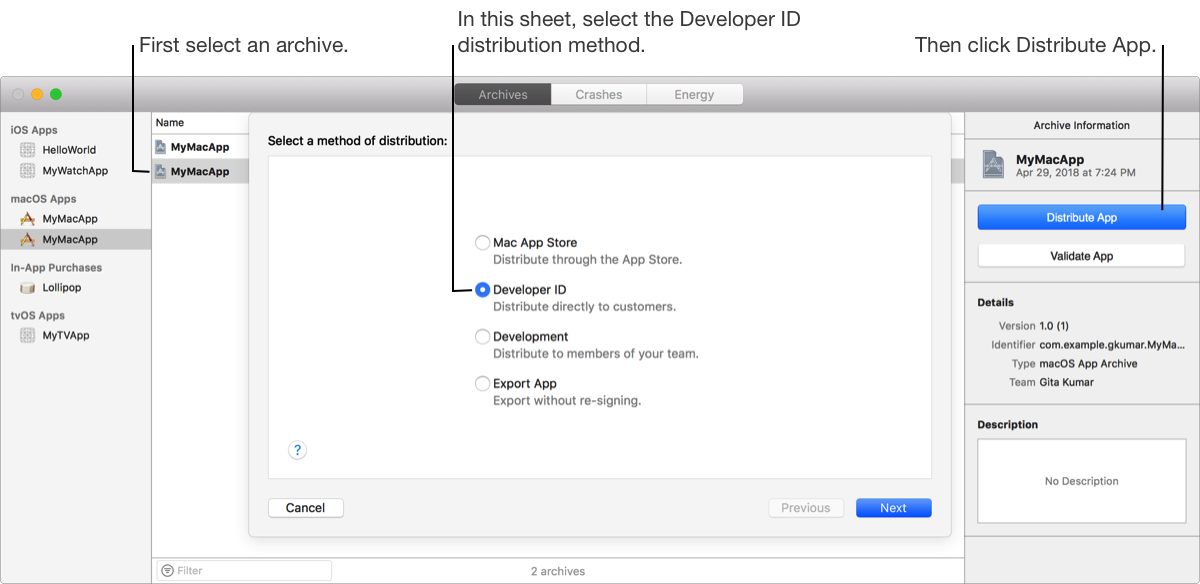
In the Archives organizer, select the archive you want to notarize, then click Distribute App.
Note: If the Distribute App button is disabled, verify that the archive contains a single top-level app.
In the sheet that appears, select Developer ID as the type of distribution method, then click Next.
Select Upload to notarize the app, then click Next.
Alternatively, select Export on this sheet to sign the app with a Developer ID certificate without notarizing it.
In the sheet that appears, choose a signing option, then click Next.
To learn about the signing options, go to Distribution signing options.
If you select "Automatically manage signing”, Xcode creates a Developer ID Application certificate and if necessary, a distribution provisioning profile for you. You can also create Developer ID signing certificates using Accounts preferences.
If you select “Manually manage signing”, go to Manually manage distribution signing for alternate steps.
If you are missing a required distribution certificate, follow the instructions in the next sheet to create it.
To delete or create a certificate, click Manage Certificates and go to Manage distribution certificates. For example, if you are missing a Developer ID certificate, choose Developer ID Application from the Add button (+) menu in the lower-left corner.
Review the signing certificate and entitlements, then click Upload.
Click Close.
After the archive is uploaded, the status changes to Processing.
In the Archives organizer, select the archive.
In the inspector, click Show Status Log.
In the sheet that appears, view the details.
If necessary, click the disclosure triangle next to “Upload failed” to see the errors that occurred.
Click Done.
After you upload an archive to be notarized, you can check the status of the archive in multiple locations in the Archives organizer:
In the archive list, the status appears in the Status column.
In the inspector, the status appears under Developer ID along with the upload date and time.
The possible statuses are:
Processing: The upload is successful and the app is being processed.
Upload failed: The upload failed. To see the errors, go to View the upload logs.
Ready to distribute: The processing is complete and you can now export the notarized app.
Rejected: The archive is invalid or failed security checks.
In the Archives organizer, select the archive.
In the inspector, click Export Notarized App under Developer ID.
If the button is disabled, the app is not notarized yet.
In the sheet that appears, select a location for the files, then click Export.
After your app is notarized, Xcode attaches a ticket to the app that allows it to launch offline. You can use the stapler command-line tool to check the ticket:
xcrun stapler validate [app bundle path]Note: To use command-line tools in a beta version of Xcode, run xcode-select --switch [path to Xcode] first.