
Use asset catalogs to organize and manage the different asset types used by your app, such as images, sprites, textures, stickers, and data. An asset catalog can contain multiple types of assets and the assets can be grouped into folders. Most types of assets are a set of files that can have multiple variations to support different device characteristics. For example, an image set can contain different files in any supported image format for the 2x and 3x images used for an iPhone and for an iPad.
Creating your project from a template includes an asset catalog containing empty entries for an icon, including an App Store icon which is required to submit your app to the App Store.
In the Project navigator, select an asset catalog (a file with a .xcassets file extension) and the asset catalog appears in the editor area. The image sets and folders appear in the outline view on the left and the assets for the selected set appear in the detail area on the right. The inspector for the selected set or asset appears in the inspector area.
For apps targeting iOS 9 and later, the asset catalog can be used to edit on-demand resource tags and attributes used in slicing.
You can share asset catalogs across multiple projects in the same workspace.
Important: If you distribute your app through the App Store, you must provide a specific icon used to represent your app on the App Store. Go to Add an App Store icon. For iOS 11.0 apps and later, the app icon is required to be in an asset catalog.
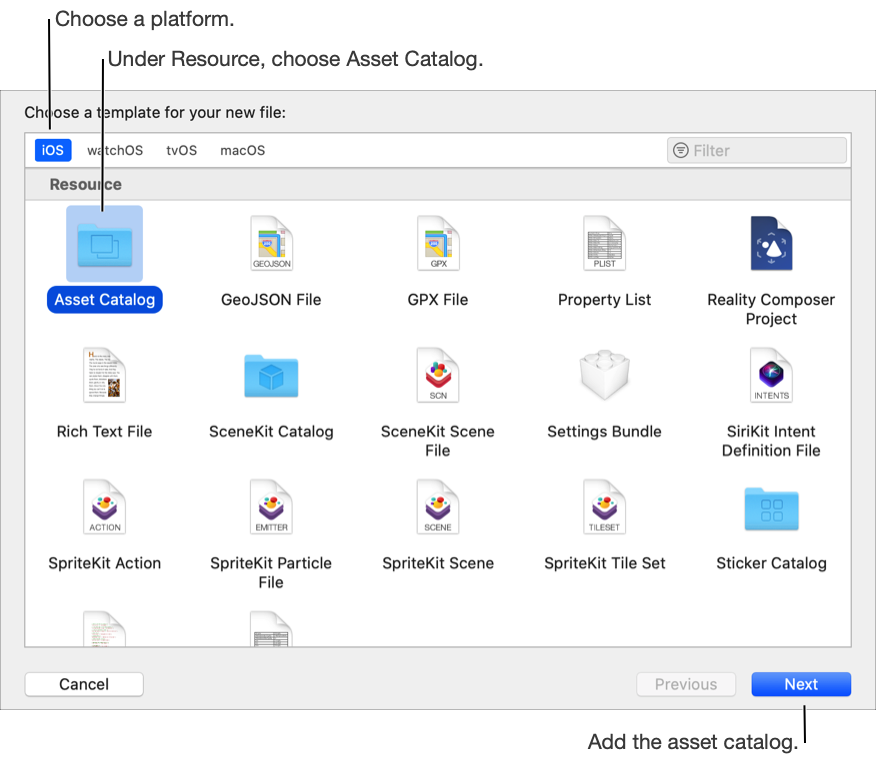
Add a new file from a template and in the sheet under Resource, select Asset Catalog and click Next. The new asset catalog will appear in the Project navigator and open in the editor area.
In the Project navigator, select the project and in the project editor, select the target.
Choose the target from the Project/Targets pop-up menu or in the Targets section of the outline view if it appears.
In the “App Icons…” section of the General pane, choose the app icon set from the App Icons Source pop-up menu.
If you create your project from a template, the default asset catalog contains the required app icon image set.
Click the arrow button next to the pop-up menu.
The associated asset catalog opens in the editor area. The app icon set is selected in the outline view, and wells for the different variations appear in the detail area. Follow the Human Interface Guidelines when creating the app icon.
For tvOS apps, open the App Icon & Top Shelf Image folder to reveal the different app icon and launch image sets. For watchOS apps, there’s a separate asset catalog containing an AppIcon image set for the iOS app and the WatchKit app targets.
In the Finder, drag variations of the app icon to the wells in the detail area that match their resolutions.
Alternatively, select the asset catalog containing the app icon set in the Project navigator and drag variations to the wells. You can also add app icons by selecting an asset catalog, and then choosing Editor > Add Assets > Import.
In the Project navigator, select the asset catalog.
In the Finder, drag a file in a supported image format to the outline view.
A new image set appears in the outline view and the asset appears in a well in the detail area.
Drag other variations of the image to the wells in the detail area that match their resolutions.
To create other types of image sets:
Create an empty image set: Choose New Image Set from the Add button (+) or from the Editor > Add Assets menu.
Create an app icon set: Choose App Icons & Launch Images > New [OS] App Icon from the Add button (+) or from the Editor > Add Assets menu. For an iOS app, choose New iOS App Icon and for a tvOS app, choose New tvOS App Icon and Top Shelf Image.
Create an iOS or tvOS launch screen image set: Choose App Icons & Launch Images > New [OS] Launch Image from the Add button (+) or from the Editor > Add Assets menu. For an iOS app, you can also change the default launch screen source to an image set.
Create a custom symbol image set: Choose New Symbol Image Set from the Add button (+) or from the Editor > Add Assets menu, then drag the SVG file into the Symbol SVG well of the Symbol set in the detail area. To learn more, go to Creating Custom Symbol Images for Your App.
You can create a color that is device-specific or the same on all devices. You give the color set a name and it appears in the color menu in Interface Builder.
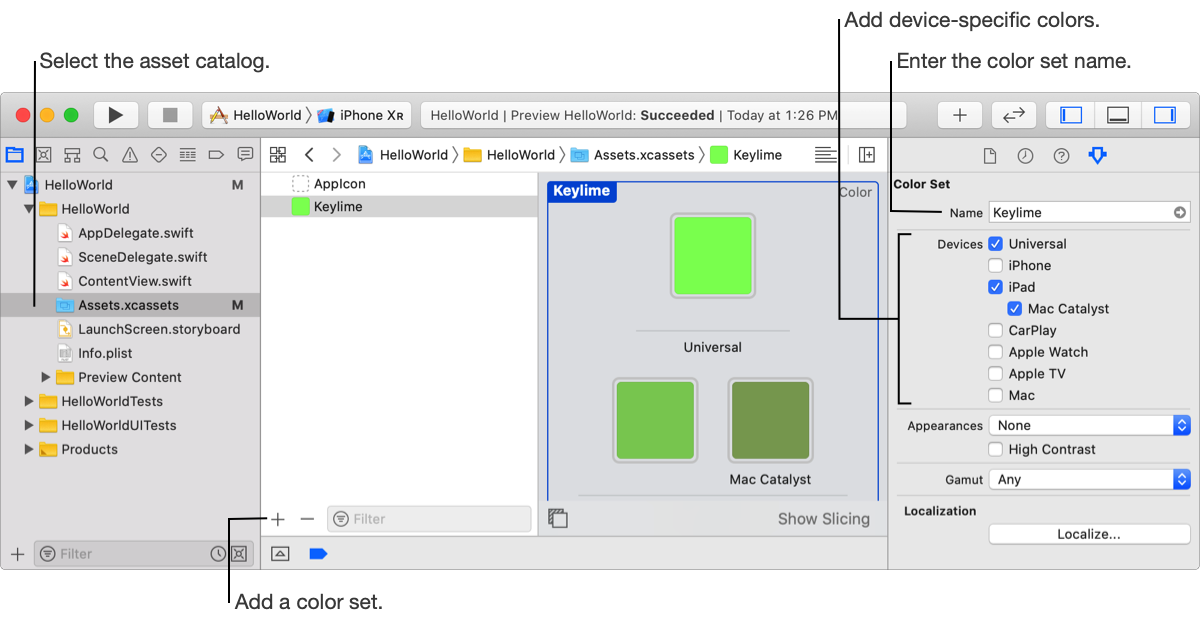
In the Project navigator, select the asset catalog.
Choose New Color Set from the Add button (+) menu at the bottom of the outline view, or choose Editor > Add Assets > New Color Set.
A color set appears selected in the outline view and a Universal color well appears in the detail area.
In the inspector, enter a name for the color set in the text field.
Under Devices, select the devices you want to create a variation of the color for.
The Universal color is used as the default color.
For each device, select the color well in the detail area and set its color in the inspector using the controls under Color.
The color set appears in the color menu and the Color library (![]() ) when laying out the user interface. In Interface Builder, it appears under Named Colors in the menu.
) when laying out the user interface. In Interface Builder, it appears under Named Colors in the menu.
In the Project navigator, select the asset catalog.
Drag a data file from the Finder to the outline view.
A new data set appears in the outline view containing the data file.
Drag other variations of the data file from the Finder to the appropriate well in the detail area.
Alternatively, to create an empty data set, choose New Data Set from the Add button (+) menu at the bottom of the outline view, or choose Editor > Add Assets > Import.
In the Project navigator, select the asset catalog.
In the outline view, select the assets you want to add to a folder.
Click the Add button (+) at the bottom of the outline and choose "New Folder from Selection" from the pop-up menu.
The new folder containing the selected items appears in the outline view.
Alternatively, at the bottom of the outline view, choose New Folder from the pop-up menu and drag the assets to the folder.
To add an AR image or object asset, create an AR resource group first. To learn more about AR assets, go to ARReferenceImage and ARReferenceObject.
In the Project navigator, select the asset catalog.
Click the Add button (+) at the bottom of the outline and choose "New AR Resource Group" from the pop-up menu.
The new folder appears in the outline view.
To add an AR object to the selected folder, choose “New AR Reference Object” from the Add button (+) pop-up menu.
To add an AR image to the selected folder, choose “New AR Reference Image” from the Add button (+) pop-up menu.
Drag the AR files from the Finder to the appropriate wells in the detail area.
In the Attributes inspector, optionally, enter a name for the image or object that appears as the name property at runtime.