Timeline Layers List
The Timeline layers list mirrors the Layers list in the Project pane and displays your project objects (groups, layers, filters, behaviors, masks, and so on) and their stacking order. Keyframes applied to an object can also be displayed. In the Timeline layers list, you can reorder objects. This change is immediately reflected in the Layers list in the Project pane. You can also lock tracks to prevent further editing of those tracks and disable entire tracks to omit them from view in the Canvas.
Naming Objects in the Timeline Layers List
You can rename any object in Motion. This can be helpful if you use more than one version of an asset, using multiple cameras, lights, or rigs, or if you want to organize elements in named groups. Masks, shapes, particles, and other content you generate in Motion are created with generic names. Renaming them allows you to better manage and keep track of them while you work.
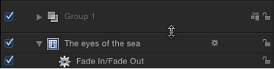
In the Timeline layers list, double-click the name of the object.
Enter a new name in the editable text field.
Press Return or Tab.
Although Motion allows you to rename objects you import from your disk, changing the object’s name in the Timeline layers list does not modify the name of the file on disk. This allows you to use one source clip multiple times and name each instance uniquely inside Motion.
Enabling Timeline Tracks
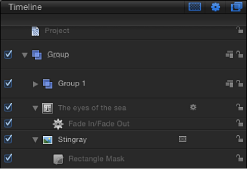
To the left of each track in the Timeline layers list is an activation checkbox that turns that track on and off. When a track is turned off (disabled), it is ignored in the Canvas. Not only can you turn video or audio on and off, you can also disable or enable effects such as masks, filters, and behaviors.
Click the checkbox at the left edge of the track you want to control.
When the box is checked, visibility is on, and when the box is unchecked, visibility is off. Additionally, when a track is disabled, the entire track is dimmed in the Timeline.
Collapsing and Expanding Groups and Layers
Motion allows you to collapse and expand different parts of the Timeline layers list to show more or less data to accommodate different working styles. Layers with applied masks, filters, and other objects can be collapsed to hide those effects bars. Furthermore, whole groups can be collapsed to hide all objects contained in them.
When a layer or group is collapsed in this manner, it still appears in the Canvas window. Unlike enabling or disabling tracks, collapsing and expanding the Timeline layers list is only an organizational tool to help manage the view of the Timeline.
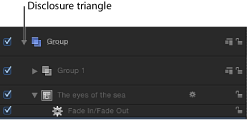
Click the disclosure triangle to the left of the layer or group name. If no disclosure triangle is present, that object cannot be collapsed or expanded any further.
Locking Timeline Tracks
Occasionally, you might want to prevent changes to an item. The lock icon at the right edge of the Timeline layers list allows you to lock an object and prevent any changes from affecting that object. An object that is locked in the Timeline also appears locked in the Layers list in the Project pane.
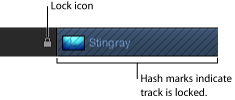
When an item is locked, the colored bar in the track area appears with a hash-mark pattern.
Locked tracks still appear in the Canvas and are included in your final output. Although you cannot make changes to a locked object, you can still copy or duplicate that object or change the object’s layer order.
Click the lock icon at the right edge of the Timeline layers list.
Audio-Video Links
Ordinarily, objects that contain both audio and video are linked so they remain in sync. This link is represented by an icon in the Timeline layers list.

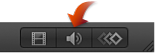
Note: To display the Audio Timeline, click the Show/Hide Audio Timeline button, located in the lower-right corner of the Motion project window.
Objects that are linked are always edited together in the Timeline. Operations such as cut, copy, paste, and split affect both audio and video. However, if you ever want to break that relationship so you can move or edit the audio or video without the other tagging along, you can disable that link and move either object freely. Beware that this might result in your audio and video playing out of sync.
Click the link icon to the right of the object name for the video or audio element.
A red slash appears over the link for all linked layers.

Move, trim, or slip the audio or video bar.

The link icon also appears in the Layers list and the Audio list of the Project pane.
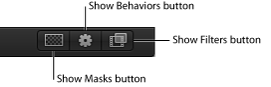
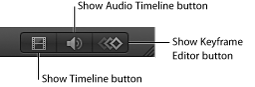
Timeline View Options
Various controls affect the view of the Timeline. The first three appear in the upper-right corner of the Timeline layers list.
The second three appear in the lower-right corner of the Motion project window.
Audio tracks and keyframes appear in separate partitions in the Timeline. When they are visible, you can resize the partitions by dragging the divider bars between them.
Note: Press F6 to hide (or show) the Timing pane, regardless of whether the Timeline, Audio Timeline, or Keyframe Editor is displayed.
Zooming in the Timeline
You can zoom in and out in the Timeline using the zoom/scroll control or the zoom slider. (If you use a Multi-Touch trackpad, you can pinch open to zoom in and pinch closed to zoom out.) Each method lets you zoom in and out of the Timeline horizontally, showing more or less time in the track area. As you zoom in, you can see greater detail, which lets you place objects with greater precision.
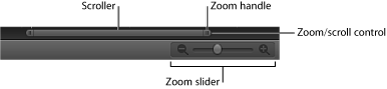
The zoom/scroll control, located at the bottom of the Timeline, is a scroll bar containing a scroller control with zoom handles on either end. The width of the zoom/scroll control represents the entire duration of your project. Drag the scroller left or right to navigate the track area. Drag a zoom handle on either end of the scroller to change the zoom scale of the track area.
The zoom slider, located in the bottom-right corner of the Motion project window, zooms in and out of the track area at the position of the playhead. Drag left to zoom out. Drag right to zoom in.
Drag the zoom handle at either end of the scroller, inward to zoom in, or outward to zoom out.
If you hold down the Shift key while dragging a zoom handle, the Timeline is zoomed from the center of the visible area.
Drag the zoom slider left to zoom out or right to zoom in.
Note: To fit the Timeline in its window, press Shift-Z.
Adjusting the Height of Timeline Tracks
You can adjust the height of the tracks displayed in the track area. Audio and object tracks can be resized separately. However, some tracks, including filters and behaviors, cannot be resized.
Drag a row separator between two layers in the Timeline layers list up or down to modify the vertical size of the tracks.
Choose a new size from the pop-up menu at the bottom of the Timeline layers list. Options include Mini, Small, Medium, and Large.
Customizing the Track Display
Motion offers several different ways to display object bars in the track area of the Timeline. You can display just the name of the object, which reduces the height of the track, allowing you to see many tracks at once. You can choose to show the name of the object plus a thumbnail image, which provides quick visual feedback about the content of the object. Or you can display a track as a filmstrip, a series of sequential thumbnails that provide visual feedback about the content of an object over time.
Choose Motion > Preferences (or press Command-Comma) to display the Preferences window.
Click the Appearance icon.
In the Timeline section, choose an item from the Timebar Display pop-up menu.
Choices include Name, Name Plus Thumbnail, and Filmstrip.
Click the close box to close the Preferences window.
The object bars are displayed according to your choice.