2D and 3D Group Intersection
The 3D group type adds a level of flexibility to your projects, but also creates complex interactions between group types.
Groups can be 2D or 3D, and you can change a group’s type at any time.
In the Layers list or Timeline, select the group to change, then do one of the following:
Choose Object > 3D Group (or press Control-D).
Click the 2D/3D icon in the right side of the Layers list.

From the Type pop-up menu in the Group Inspector, choose 2D or 3D.
Root-Level Behavior
At the root level of the project, 2D groups behave differently than when they are nested inside 3D groups. (For more information about root-level groups, see Relative Coordinates.) 2D groups at the root level are locked to the camera, even if the camera is animated. 2D groups at the top of the Layers list are rendered in the foreground, and 2D groups at the bottom of the Layers list are rendered in the background. Adjacent root-level 3D groups can intersect based on depth order.
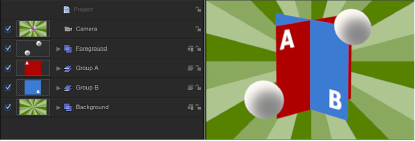
In the example above, the two gray balls in the 2D “Foreground” layer are composited on top of the rest of the scene. The 2D “Background” layer is composited beneath the rest of the scene. “Group A” and “Group B” intersect because they are 3D groups, but neither of them can intersect with the 2D root-level groups.
2D and 3D Group Interaction
Although 2D and 3D groups share a lot of common properties, there are distinct differences in how they and their children behave and interact with other objects in a project. 2D and 3D groups can be parents or children of each other; there are no restrictions on mixing group types.
Important: Some operations, as well as the application of some filters or a mask, cause a group to be rasterized. When a group is rasterized, it is converted into a bitmap image. Rasterization affects 2D and 3D groups in different ways. For more information, see Groups and Rasterization.
Group Inspector
In the Inspector, the Group pane appears when a group is the selected object. The Group pane contains the Type parameter, a pop-up menu that allows you to switch a group between 2D and 3D mode. A 2D group has different available parameters than a 3D group.
When the Type parameter is set to 3D, the Flatten and Layer Order parameters become available. When the Flatten checkbox is selected, the elements in the 3D group are flattened into a two-dimensional plane. When the Layer Order checkbox is selected, the group’s children are sorted by their order in the Layers list rather than depth order (position along the Z axis). For more information, see Layer Order and Depth Order.
When the Type parameter is set to 2D, Fixed Resolution parameters become available, allowing you to manually define the size of a group. By default, Fixed Resolution is disabled and the size of the group is determined by the layers in that group. For more information, see Fixing the Size of a Group.
Note: When selected, Fixed Resolution crops the group to the size specified in the Fixed Width and Fixed Height parameters, around the anchor point of the group.
2D Group Properties
A 2D group has the following properties:
Its children are composited in layer order.
Filters are applied to the group in local space—that is, flat to the image.
When lights are used, the group is lit as a single object; its children are not lit individually.
Note: 2D groups at the root level are not affected by lights.
Because it is flat, a 2D group has Crop, Drop Shadow, and Four Corner parameters.
It can have a fixed resolution.
3D Group Properties
A 3D group has the following properties:
Its children are composited in depth order (according to their position along the Z axis).
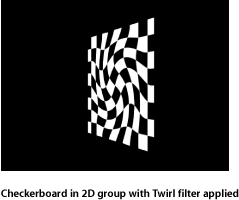
Filters are applied to the group in view space. In other words, the filter affects the group as if it was applied to the lens of the camera viewing the group.

When lights are used, the group’s children are lit individually.
Only a 3D group with the Flatten parameter enabled has the Crop, Drop Shadow, and Four Corner parameters.