Working with Instruments
This section describes the use of software instruments and external MIDI sound generators.
Both software and external MIDI instrument tracks are handled in an almost identical fashion. In fact, the MIDI regions on tracks routed to either type of channel strip (software instrument or External MIDI) can be used interchangeably.
You can also completely reassign a track routed to an external MIDI synthesizer to one using software instruments, or copy the data of an external MIDI track to a software instrument track, resulting in layered playback of the part through both instruments.
Software instruments use instrument channel strips. MIDI instruments use External MIDI channel strips.
ReWire instruments are handled through auxiliary channel strips. The setup and use of ReWire instruments is described in Working with ReWire Applications.
Tip: Many of the setup and routing tasks described in this section can be done once, and saved with a template. This means that all of these preliminary tasks can be bypassed the next time you load the template, so you can concentrate on creating music. For details, see Saving a Project as a Template.
Setting Up External MIDI Instruments
There are several ways that you can set up and use external MIDI keyboards and modules with Logic Pro. The best way to illustrate these is with working examples.
Click the New Tracks button (the plus sign above the track list) in the Arrange window.
In the New Tracks dialog, choose the External MIDI option, then click the Create button.
Note: The Open Library checkbox in the New Tracks dialog is selected by default. Leave it selected, as the Library tab (that automatically opens) is very helpful during this procedure.
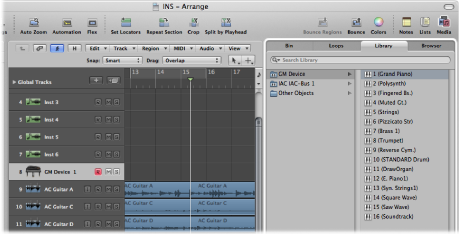
A new track is created in the track list, assigned to GM Device 1. The Library tab shows a list of your MIDI ports and other objects, the GM Device among them.
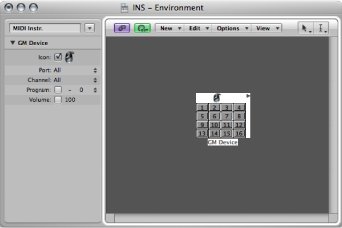
When you create a new External MIDI track in a project, Logic Pro automatically generates a new External MIDI multi-instrument object. This is placed on the MIDI Instr. layer of the Environment window.
Choose Window > Environment (or use the Open Environment key command, default assignment: Command-8) to look at this object.
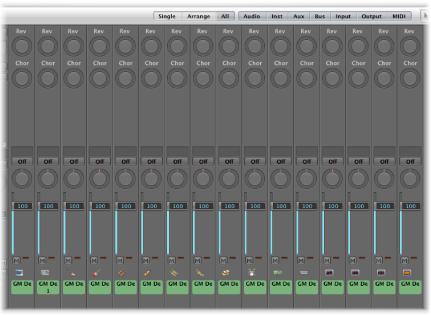
Another thing that happens in the background is the automatic creation of Mixer channel strips for each of the multi-instrument sub-channels. Click the Mixer button at the bottom of the Arrange window, and click the All button in the Mixer’s menu bar. You’ll see 16 channel strips, assigned to GM Device 1 to 16 (plus a couple of others for audio channel strips).
Click GM Device in the left column of the Library tab. Sixteen entries appear in the right column: 1 (Grand Piano), 2 (Polysynth), and so on.

Click the disclosure triangle to the left of the GM Device 1 entry in the Inspector to open the Track Parameter box, if not already open.

There are two parameters of particular note here: Port and Channel. (See Setting External MIDI Channel Strip Parameters.)
Choose All from the Port pop-up menu.
All of your MIDI interface Out ports are listed; for example, Port 1 (Unitor 8), Port 2 (Unitor 8), MIDI1 (mLan Network). If you choose a specific Port—Port 1 (Unitor 8), for example—the GM Device multi-instrument object is routed to this specific MIDI port. This mirrors the port listing shown in the left column of the Library tab.
Note that the Channel parameter is set to 1. Create a few new External MIDI tracks by following steps 1 and 2. These new tracks are called GM Device 2, GM Device 3, GM Device 4, and so on. Click each of these tracks in the track list, and keep an eye on the Channel parameter in the Track Parameter box of the Inspector. Each of these tracks is routed to a sub-channel of the GM Device multi-instrument object. The selection of each track is mirrored by the 16 sub-channel entries shown in the right column of the Library tab.
When creating more than one new External MIDI track, Logic Pro does not create a new multi-instrument object for each one. Rather, it assigns each subsequent track to sub-channels of the GM Device multi-instrument object. You can create up to 16 tracks that are assigned on a one-to-one basis with each sub-channel of a multi-instrument object.
If you need more channels for more external MIDI synthesizers and modules, you have a couple of options. The easiest way is to use the Library tab to reassign newly created tracks to particular MIDI ports and channels.
Click the New Tracks button (the plus sign above the track list) in the Arrange window.
In the New Tracks dialog, enter a value greater than “1” in the Number field, choose the External MIDI option, then click the Create button.
Select one of the new tracks, then choose a Port and sub-channel entry in the Library tab.
If you choose a sub-channel of the GM Device, you reassign the selected track to this sub-channel.
If you choose a sub-channel of a different MIDI Port, the track is reassigned accordingly (Unitor 8 Port 5, sub-channel 4, for example). Take a look at the new multi-instrument object (Unitor 8 Port 5) in the Environment.
Note: The first time you do this for each port or sub-channel, a new multi-instrument object is created in the Environment (along with corresponding Mixer channel strips). Once objects have been created for all ports, the reassignment of tracks to ports or channels does not create new objects.
An alternative to using the Library tab for multi-instrument object creation is the Environment.
Choose Window > Environment (or use the Open Environment key command, default assignment: Command-8).
If it does not default to the MIDI Instr. layer, click the down arrow to the left of the Link button, then choose the MIDI Instr. entry.
Choose New > Multi-Instrument from the local menu bar.
The newly created multi-instrument object is called (Multi Instr.). You can rename it later (usually after your synthesizer name: JV5080, Microwave, and so on).
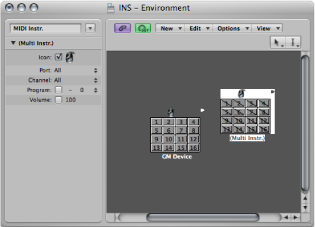
Note: There are diagonal lines running through each of the 16 sub-channel boxes. The Port and Channel parameters are shown to the left of the Environment window.
Click the Port pop-up menu, then choose a new MIDI Out port for the Multi Instr. object. Make sure that this port is different from the one used by the GM Device object.
Activate each sub-channel by clicking each sub-channel box. As you do, the diagonal line disappears from each.
Click the Mixer button at the bottom of the Arrange window, and you’ll see 16 new (Multi Instr.) channel strips.
Tip: Once an object has been created in the Environment (using any of the methods described), you can Control-click (or right-click) track names in the track list. Choose a port and sub-channel from the Reassign Track menu to quickly reassign tracks.
Setting Parameters for Instrument Channel Strips
When you choose a track that is assigned to either a MIDI or software instrument channel strip, the Inspector’s Track Parameter box displays the parameters outlined in this section.

Changes to these parameters affect the entire channel strip, and all tracks routed to the channel strip are affected. This is an important distinction to make, as some parameters, such as transposition, are available as both a track and region parameter. To put this into context, imagine a project with six tracks routed to the EXS24 mkII (with a drum kit loaded) on instrument channel strip 1. You want to transpose the snare drum part (played by regions on track 2) by two semitones. This will trigger a different snare drum sample.
If you use the Region Parameter box Transposition parameter for all regions on track 2, things will go according to plan.
If you use the Track Parameter box Transposition parameter, the entire EXS24 mkII drum kit (instrument channel strip 1) will be affected. This will result in all regions on the six tracks being played back by other drum samples.
Common Instrument Parameters
The following parameters are available for both software instrument and MIDI instrument channel strips.
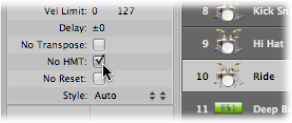
- Icon: The icon used by the instrument can be changed to suit your tastes or needs. Click the icon, then choose another from the menu. A default icon is used for all internal Logic Pro instruments when inserted, so you can instantly recognize an EXS24 mkII or ES1 track.
- Transposition: The Transposition parameter allows you to define the number of semitones that all note events are transposed by, on output. Negative values transpose downward.
- Velocity: The Velocity parameter allows you to increase or decrease the note on velocities of all note events by an amount between –99 and 99.
- Key Limit: The two note values of the Key Limit parameter define a pitch range. All notes outside this range are ignored by the instrument.
- Vel Limit: The two values of the Vel Limit parameter define a velocity range. All notes with a velocity that falls outside this range will not be played by the instrument.
- Delay: The Delay parameter allows you to compensate for any differences in reaction time between your various MIDI devices, or to create offsets between channel strips. The parameter contains a pop-up menu with the following two settings, common to both software instrument and MIDI instrument channel strips:
- Delay in Ticks: Sets the instrument delay in ticks, with a range between –99 and +99.
- Delay in Milliseconds: Allows the user to set tempo independent delays (or pre-delays) in steps of 0.1 milliseconds, with a range between –200 ms and +200 ms.
Note: If you want to create rhythmic delay effects on individual parts, use the Region Parameter box Delay. This allows for longer delay times, and does not affect the channel strip playback timing.
- No Transpose: Turn on the No Transpose parameter to protect all MIDI regions (on any tracks routed to this channel strip) from transposition. In other words, the Region Parameter box Transpose parameter is ignored. This is very useful for instruments assigned to drum or other multi-timbral samples, as transposition will change the sounds (rather than merely the pitches) of these instruments.
- No Reset: Turn on the No Reset parameter to prevent reset messages from being sent to this channel strip. This can be useful if controllers are being used for nonmusical purposes, such as mixer automation. The Logic Pro > Preferences > MIDI > Reset Messages pane determines what reset messages are normally sent, but these messages are not sent to No Reset instruments.
- Style : Whenever a MIDI region is created on one of the tracks routed to a given channel strip, it is assigned the staff style set in the Style pop-up menu. If Auto is chosen, Logic Pro picks an appropriate style based on the pitch range of the notes in the region.
Tip: You can change a MIDI region’s staff style at any time in the Display Parameter box of the Score Editor.
Setting Software Instrument Channel Strip Parameters
The following parameters are specific to software instrument channel strips.
- MIDI Channel: This parameter sets the MIDI channel strip used by the software instrument.
- Freeze Mode: The Freeze Mode parameter allows you to define the point at which the signal on the selected channel strip object is frozen: before the signal is fed into the first effect plug-in (Source Only) or the entire signal including all effect plug-ins (Pre Fader).
Setting External MIDI Channel Strip Parameters
The following parameters are specific to External MIDI channel strips.
- Port: Defines the physical MIDI output that data is sent to. Your MIDI sound module is connected to this MIDI output connector.
- Channel: Defines the channel used for MIDI output by the instrument track, allowing your “real” instrument to receive the data.
You can also alter the MIDI channel of an external MIDI instrument part by choosing another sub-channel of the current multi-instrument.
A sub-channel is one of 16 possible MIDI channels or parts that can be played by a multi-instrument object. It goes without saying that the external MIDI synthesizer (represented by the multi-instrument object) needs to be capable of playing on more than one MIDI channel for sub-channel selection to be useful.
You can’t actually change the receive channel of a sub-channel in the multi-timbral synthesizer. This is only possible in a few models (and is not particularly useful when using Logic Pro, at any rate).
If the MIDI channel is set to All, you can edit the parameters of the whole multi-instrument object. This is a useful feature for globally changing the MIDI port (Port A, B, and so on), for example.
- Program, Volume, and Pan: Transmit program changes, volume controller (CC #7), and pan controller (CC #10) information. If the respective box is unselected, the default value of the MIDI device itself is used.
A program change (a preset or patch number in your MIDI module) can be selected on the right, via a pop-up menu. When dealing with multi-instrument sub-channels, sounds can be selected from a pop-up menu by name.
As an alternative, you can double-click the track name (GM Device 1, for example). This opens the Multi-Instrument window.
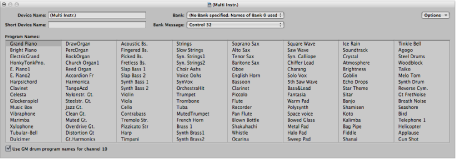
Click the name of the sound (synthesizer patch) that you want to use. Click the close button at the top-left corner to close the window, or press Command-W. For further details about this window, including customization of patch names, see The Multi-Instrument Window.
To the right of the program number is an extra parameter that is used for Bank Select. If your sound source receives Bank Select messages (MIDI controller #0 or #32—check your synth manual for format details), you can switch between different banks, each containing a maximum of 128 sounds.
For information on other instrument parameters, see Standard Instrument Objects.
- Delay > Auto Compensated Delay Offset: This is the same as the Delay > Delay in Milliseconds setting, except that the current plug-in latency compensation plus the audio hardware output delay is added to the MIDI data transmission. This setting is ideal when the outputs of classic MIDI sound sources are mixed with Logic Pro’s outputs using an external mixing desk. Using the Auto Compensated Delay Offset setting makes sure that audio from Logic Pro and audio from the MIDI-controlled external hardware appears on the external mixing desk at the same time. When this setting is chosen, the parameter label changes from “Delay” to “Auto Delay.”
Inserting Program Change, Volume, and Pan as MIDI Events
The MIDI > Insert Instrument MIDI Settings as Events command allows you to insert the program change, volume, and pan settings (from the Track Parameter box in the Inspector) as actual MIDI events into one or more selected MIDI regions. The events are placed a quarter note before the beginning of the relevant MIDI regions. Only the activated (selected) settings in the Track Parameter box(es) are added as events. If any events of the same kind already exist in the region(s), they are overwritten.
The values of the Program, Volume, and Pan parameters are not updated every time such control change events are played back. These parameters are initial values—when you load a project, or choose the MIDI > Insert Instrument MIDI Settings as Events command—before you begin to record mixer automation data.
Processing External MIDI Instruments with Effects
You can route external MIDI sound generators through the Logic Pro Mixer, allowing you to process them with Logic Pro effects. This is achieved through use of the External Instrument plug-in. Ideally, you use a multi-input and output audio interface, to avoid constant repatching of devices.
Connect the output (or output pair) of your MIDI module with an input (pair) on your audio interface.
Note: These can be either analog or digital connections if your audio interface and effects unit are equipped with either, or both.
Create a software instrument track.
Click the Instrument slot of the software instrument channel strip, then choose External Instrument from the pop-up menu.
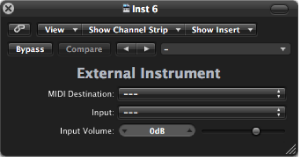
Choose a multi-instrument sub-channel from the MIDI Destination pop-up menu.
Choose the input (of your audio interface) that the MIDI sound generator is connected to from the Input pop-up menu.
Adjust the Input Volume, if necessary.
Insert the effects in the Insert slots of the channel strip.
As the track is routed to an instrument channel strip (which is being used for an external MIDI sound module), it behaves just like a standard software instrument track, which means that you can record and play back MIDI regions on it—with the following benefits:
You can take advantage of the sounds and synthesis engine of your MIDI module, with no overhead on your system processor (apart from the effects used on the channel strip).
You can use insert effects, obviously, but can also use Send effects by routing the instrument channel strip to aux channel strips.
You can bounce your external MIDI instrument parts—with or without effects—to an audio file, in real time. This makes the creation of a mix, inclusive of all internal and external devices and tracks, a one-step process.
Note: You cannot use the Freeze function on such tracks, nor can you perform an offline bounce.
Playing Software Instruments
Software instrument plug-ins respond to MIDI note messages, whereas effect plug-ins do not.
The output signal of a software instrument is fed into the input (the Instrument slot) of the instrument channel strip, where it can be processed via inserted effect plug-ins, or sent to busses.
Logic Pro supports up to 255 discrete instrument channel strips. The number of software instruments that you can run simultaneously depends on the computer-processing resources available.
After an instrument plug-in is inserted, the instrument channel strip can be driven by a recorded MIDI region, or direct MIDI input—playing your MIDI keyboard, in other words.
Understanding Live Mode
Live mode instruments need to stay in Live mode while the audio engine is running (when Logic Pro is in playback or record mode), because switching a software instrument track out of Live mode creates a gap (or noise) in the audio stream. Obviously, this is unacceptable.
Software instruments that are live (ready for playing) require considerably more processing power than those that are merely playing back existing regions. If selecting a software instrument track automatically activates Live mode, switching between multiple instrument tracks would compound the problem, possibly resulting in system overloads.
The Record button of selected software instrument tracks gives visual feedback of the current state of a software instrument:
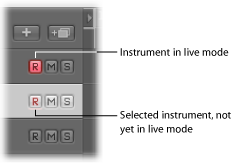
Switching Instruments to Software Instrument Live Mode
When you select a software instrument track, it does not immediately switch into Live or Performance mode. You must send a MIDI event before Live mode is activated, but this takes around 100 milliseconds to engage, which is more than enough time to destroy the timing of your first played note.
If you require perfect timing for the first played note, you need to send silent MIDI events in advance; press the sustain pedal, or make a small move of the pitch bender or modulation wheel, for example. This will turn on Live mode.
Saving Software Instrument Processing Resources
The Bounce function allows the entire instrument track to be recorded as an audio file. This bounced audio file can then be used (as an audio region) on a standard audio track, allowing you to reassign the available processing power for further software instrument tracks. For more details, see Bouncing Your Project.
You can also make use of the Freeze function to capture the output of a software instrument track, again saving processing power. For details, see Freezing Tracks in the Arrange Area.
Tuning Software Instruments
The File > Project Settings > Tuning > Software Instrument Pitch parameter remotely controls the main tuning parameter for all software instruments (the ES1 or EXS24 mkII, for example) by ±50 cents.
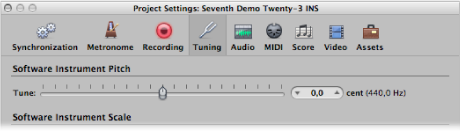
By default, it is set to concert pitch A at 440 Hz. Simply drag the slider to the value you want. As you do, the cent and Hz values update.
Note: Some Audio Units instruments do not recognize this remote command.
Logic Pro allows all software instruments to be globally tuned to different tempered scales, including Hermode Tuning. (See What Is Hermode Tuning?) However, there may be occasions when you want individual software instruments to be exempt from this global tuning system.
Open Tuning project settings by doing one of the following:
Choose File > Project Settings > Tuning (or use the Open Tuning Project Settings key command).
Click the Settings button in the Arrange toolbar, then choose Tuning from the pop-up menu.
Click the Hermode Tuning (HMT) button.
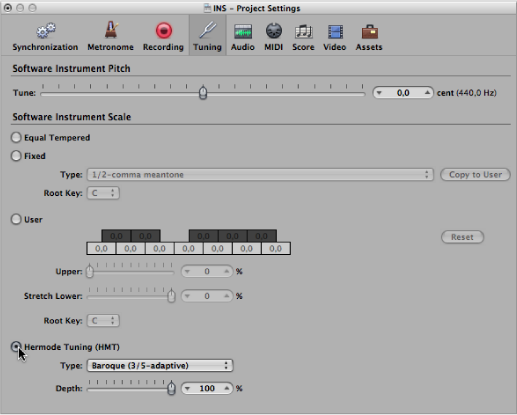
A No HMT checkbox appears in the Track Parameter box of all instrument channel strips.
Select this checkbox to prevent the selected software instrument track from following the global Hermode Tuning scale.
This feature is ideal for an EXS drum kit that you don’t want tuned like your melodic software instrument parts, for example.