Working with ReWire Applications
Logic Pro acts as a host for ReWire applications such as Propellerhead Reason.
Important: Start Logic Pro first, then start your ReWire application(s).
When these applications are open alongside Logic Pro, synchronized audio information is routed out of them into aux channel strips in the Logic Pro Mixer, where it can be combined with other tracks, run through effects, and bounced to new audio files.
In essence, the output of these ReWire programs is handled in much the same way as you handle internal Logic Pro audio data. Synchronization is automatic, so you don’t really need to do much to ReWire the applications, beyond setting up aux channel strips, if desired.
In addition to routing the outputs of ReWire applications into Logic Pro, you can also directly play, record, and play back the software instruments available in these programs. Propellerhead Reason, for example, is the software equivalent of a rack of synthesizers and samplers.
You can directly play each synthesizer in the Reason rack, and can record these parts as MIDI regions on Logic Pro tracks, much as you would with Logic Pro’s internal, or external MIDI, instruments.
Select an External MIDI track in the Arrange area.
Double-click the ReWire application name in the Library tab (Reason, for example).
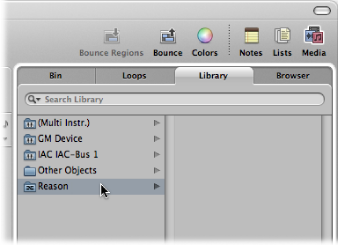
The ReWire application opens, and a list of all available ReWire instruments appears in the Library.
Click an instrument track in the Library.
Click the Mixer button at the bottom of the Arrange window.
Choose Options > Create New Auxiliary Channel Strips in the Mixer’s local menu bar.
Create as many aux channel strips as required, with the appropriate Format, Input, and Output settings. For this example, create a stereo channel strip, routed to Input/Outputs 1–2.
Choose the ReWire channel in the Input menu of the aux channel strip.
Individual RW Channel entries are available in the Channel menu. These can be assigned individually, to allow each ReWire channel to be routed to a particular aux channel strip in the Logic Pro Mixer. This provides extended mixing and processing options.
Open Audio preferences by doing one of the following:
Choose Logic Pro > Preferences > Audio (or use the Open Audio Preferences key command).
Click the Preferences button in the Arrange toolbar, and choose Audio from the pop-up menu.
In the Devices pane, choose one of the following from the ReWire Behavior pop-up menu:
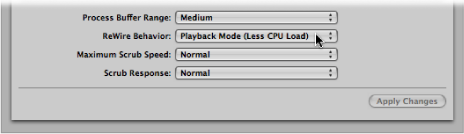
- Playback Mode (Less CPU Load): Use this mode when streaming channels via ReWire. This setting requires less processing power, and should be used when playing back tracks in ReWire applications.
- Live Mode (Higher CPU Load): Use this mode when you want to play a ReWire instrument (an instrument running in an external ReWire application) in real time. This setting requires more system resources, but reduces latency, ensuring that the ReWire instrument is playable.