
Use Interface Builder to visually lay out your app's user interface. To edit the user interface, select a user interface file in the Project navigator (![]() ), and the file opens in Interface Builder in the editor area. All projects created from a template contain a
), and the file opens in Interface Builder in the editor area. All projects created from a template contain a Main.storyboard file that contains the user interface for your app. For watchOS apps, the file is called Interface.storyboard. For iOS apps, there’s also a LaunchScreen.storyboard file for the view that is displayed while the app is launching. A storyboard (.storyboard) file contains a set of view controllers and their views. To open Interface Builder in a separate window, Control-click the user interface file in the Project navigator, then choose Open in New Window from the pop-up menu.
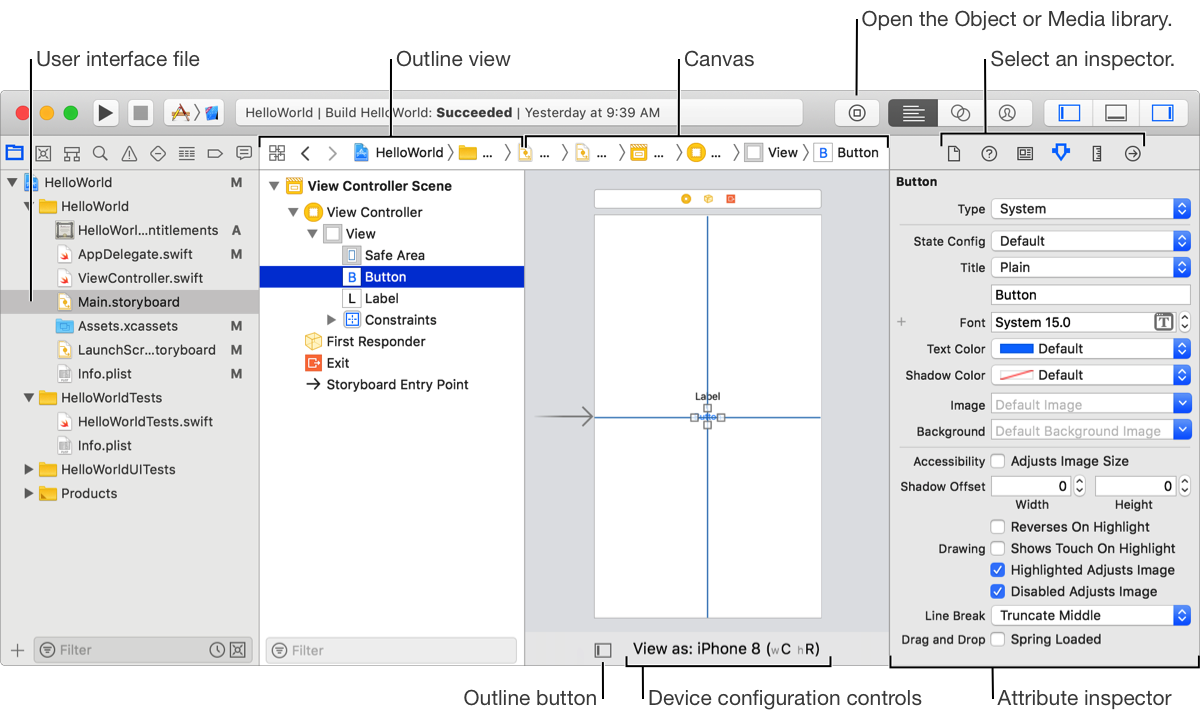
The canvas shows your user interface as it appears on a device. The first time you open a storyboard file, the layout appears in a default device configuration that you can change later using the “View as” controls below the canvas.
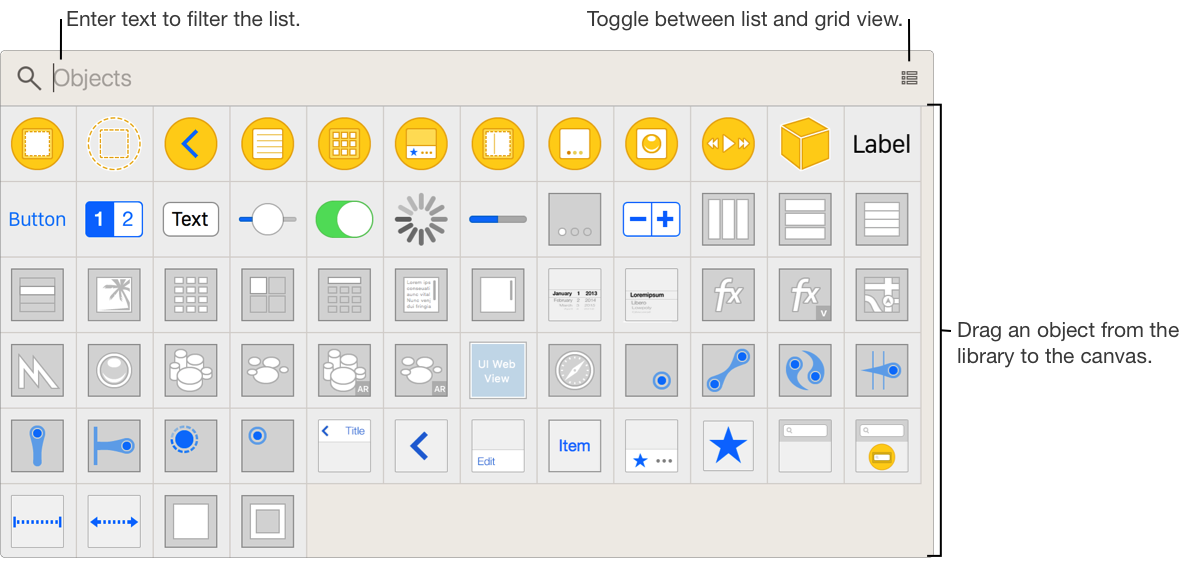
The library contains resources that you can add to your project or files. To add an object to the user interface, click the Object library (![]() ) button in the toolbar, then drag the resource from the library to the canvas. To view the objects in a list or a grid, toggle the icon in the upper-right corner of the library (the list view shows descriptions of the resources). To filter the objects, enter text in the filter bar at the top of the library. For example, to find a button, enter
) button in the toolbar, then drag the resource from the library to the canvas. To view the objects in a list or a grid, toggle the icon in the upper-right corner of the library (the list view shows descriptions of the resources). To filter the objects, enter text in the filter bar at the top of the library. For example, to find a button, enter button in the filter bar.
Drag all of the objects you want in your user interface to the canvas. Reposition the objects by dragging them to where you want, using the gridlines to help align and center the objects. To change text (for example, to edit the title of a button), double-click the object, then enter the text.
Similarly, use the Media library to add system audio and image files to objects. To open the Media library, click and hold the Object library button in the toolbar, then choose Show Media Library from the pop-up menu.
In the inspector area (![]() ), the File inspector (
), the File inspector (![]() ) and Quick Help inspector (
) and Quick Help inspector (![]() ) are available throughout your project and display information depending on what you select in the navigator and editor areas. The other inspectors are specific to what you select on the canvas. To edit the attributes of an object, select the object on the canvas and click the Attributes inspector (
) are available throughout your project and display information depending on what you select in the navigator and editor areas. The other inspectors are specific to what you select on the canvas. To edit the attributes of an object, select the object on the canvas and click the Attributes inspector (![]() ). To get information about the size and position of a view, click the Size inspector (
). To get information about the size and position of a view, click the Size inspector (![]() ).
).
To view the user interface on different device types, click the “View as” button below the canvas and select a device. To further configure the device, select an orientation, adaptation (iPad devices), or interface style (Apple TV devices). For macOS apps, select an appearance.

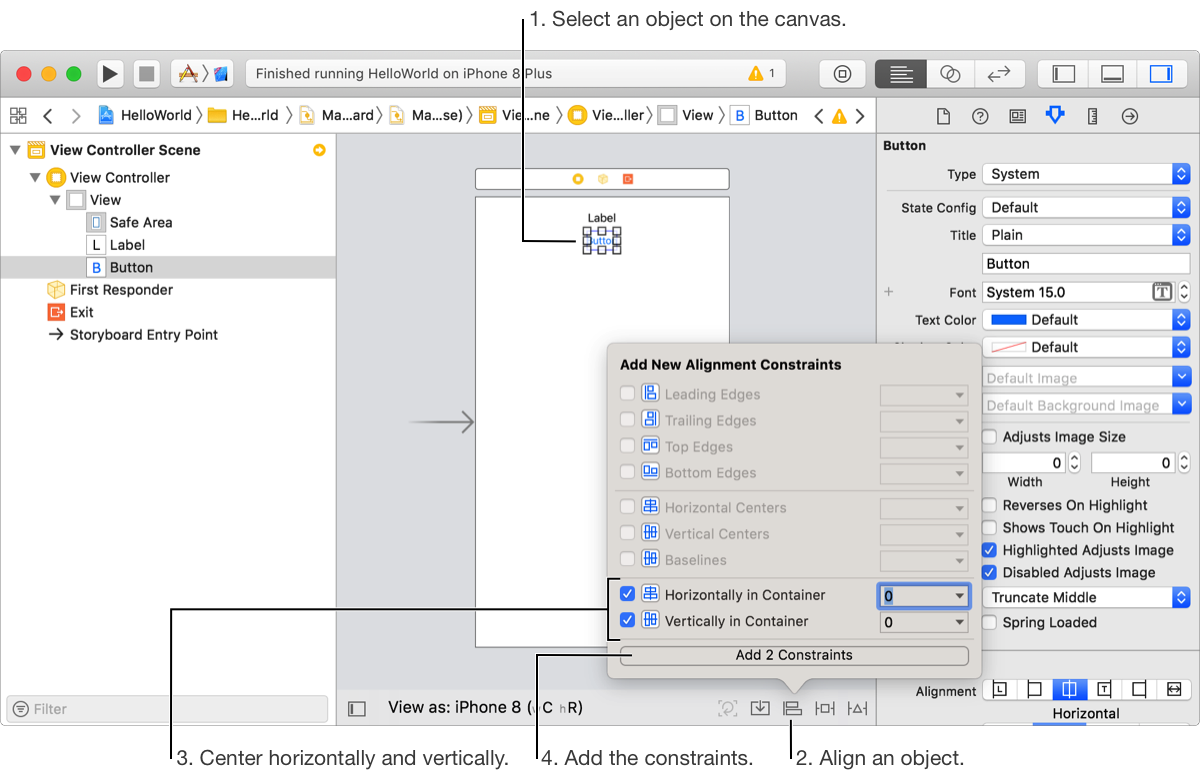
If the objects in the canvas don’t appear in the location you expect, use Auto Layout constraints to set rules for how the objects should scale and reposition. To center an object in a view, select the object and in the lower-right corner of the canvas, click the align icon (![]() ). To place the object in the center of the view, select Horizontally in Container and Vertically in Container, and click Add 2 Constraints in the align tool popover.
). To place the object in the center of the view, select Horizontally in Container and Vertically in Container, and click Add 2 Constraints in the align tool popover.
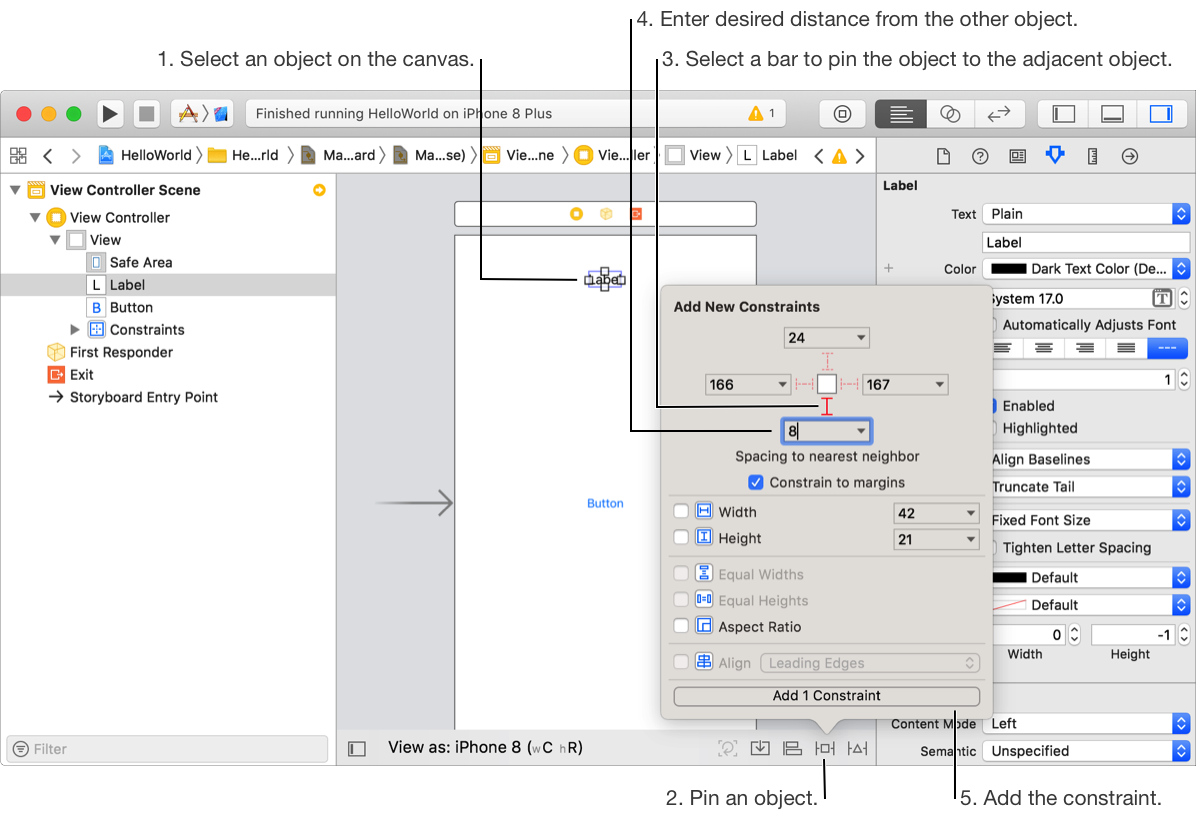
Similarly, set the position of other objects, and optionally, set the position relative to an adjacent object. To pin the bottom of a label to the top of a button, select the label and click the Add New Constraints icon (![]() ). In the add new constraints tool popover, select the dashed red line below the box, enter the distance below, and click Add 1 Constraint. Continue adding constraints until no more Auto Layout warnings appear in the activity view in the toolbar. To check the constraints, change the device configuration below the canvas or run the app in Simulator again.
). In the add new constraints tool popover, select the dashed red line below the box, enter the distance below, and click Add 1 Constraint. Continue adding constraints until no more Auto Layout warnings appear in the activity view in the toolbar. To check the constraints, change the device configuration below the canvas or run the app in Simulator again.
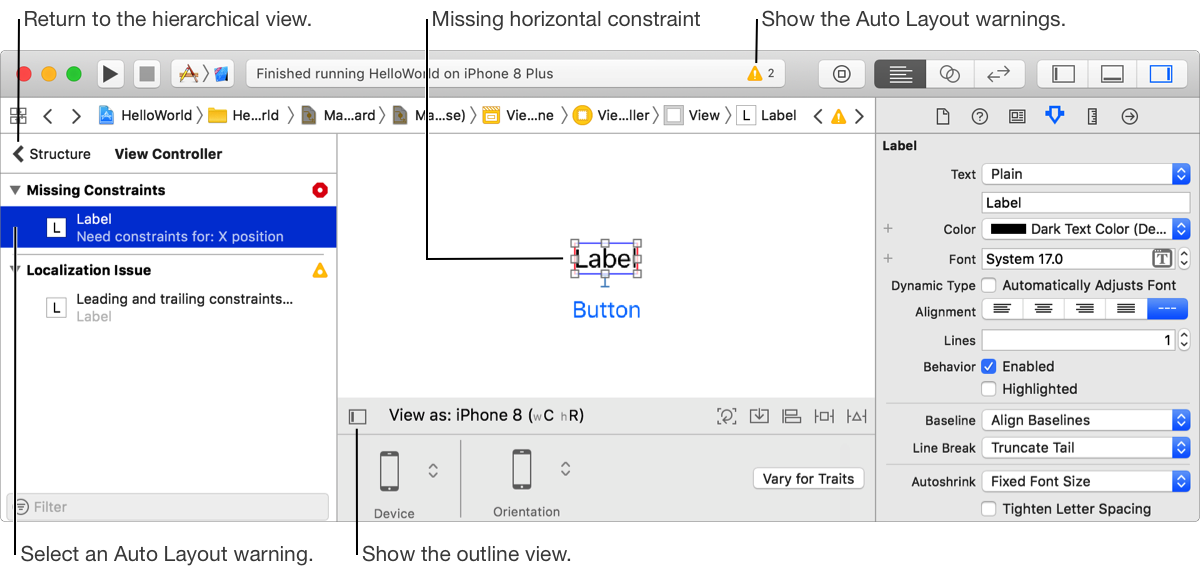
The outline view provides a hierarchical view of your objects in the user interface file. If the outline view is collapsed, click the toggle (![]() ) below the canvas to expand it. You should be able to see the objects you added to the canvas under View Controller Scene. The outline view also shows Auto Layout and localization issues. Click the red arrow to see the details of what went wrong, and then click an issue to highlight the associated view. Alternatively, click the warnings in the activity view in the toolbar.
) below the canvas to expand it. You should be able to see the objects you added to the canvas under View Controller Scene. The outline view also shows Auto Layout and localization issues. Click the red arrow to see the details of what went wrong, and then click an issue to highlight the associated view. Alternatively, click the warnings in the activity view in the toolbar.
Every scene in a storyboard references a view controller class that contains the code that manipulates the view. If you have multiple scenes in the storyboard, first select the scene in the outline view, then click the Identity inspector (![]() ) to get the associated view controller class. The class name appears under Custom Class in the inspector. To open the source file, click the arrow that appears in the Class text field.
) to get the associated view controller class. The class name appears under Custom Class in the inspector. To open the source file, click the arrow that appears in the Class text field.
To connect objects on the canvas to your code, open the assistant editor. If necessary, open the implementation file for the view controller in the assistant editor. In the jump bar at the top of the assistant editor, choose Automatic followed by the class implementation filename—for example, ViewController.swift.
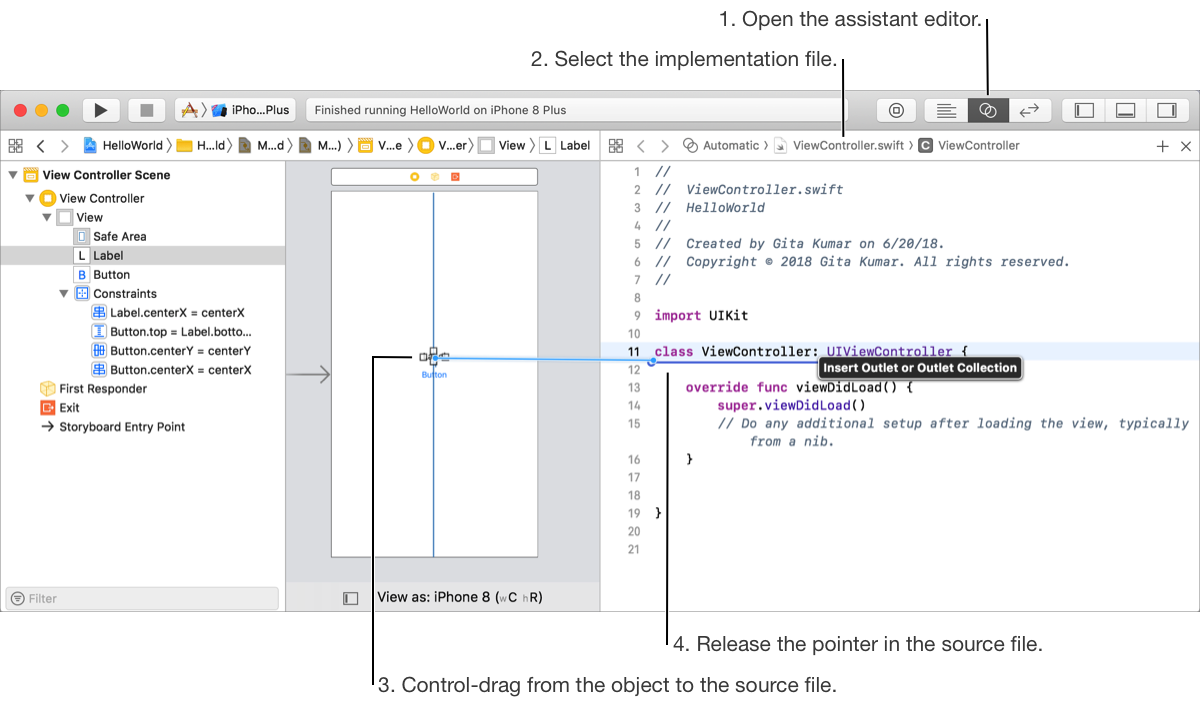
Add an outlet if you want to reference an interface object in your code—for example, change its value at runtime. To create an outlet, Control-drag from the object on the canvas to the code in the assistant editor where property declarations are allowed. In the popover that appears, enter the property name and click Connect.
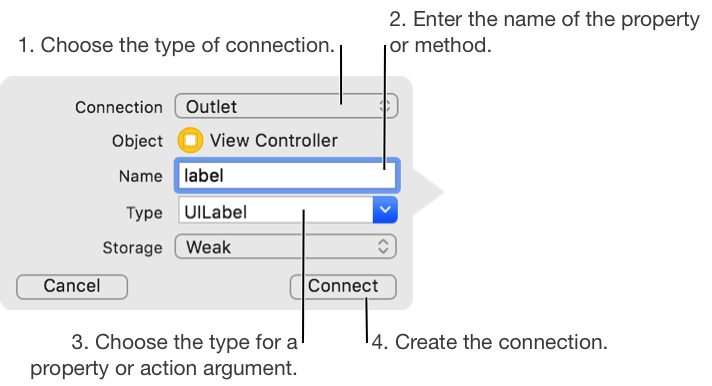
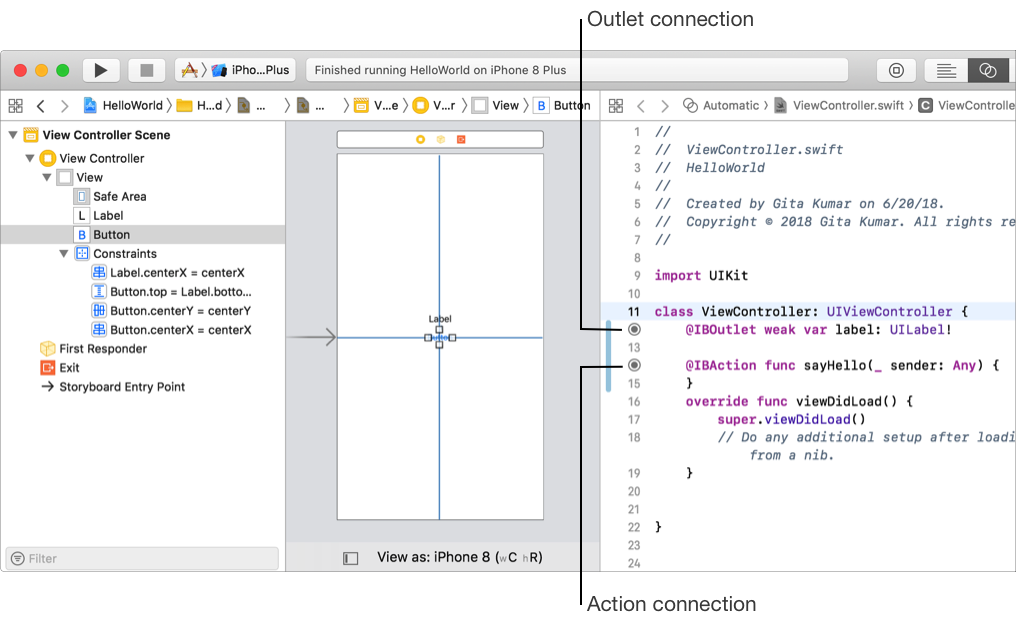
To add an action method that’s called when the user interacts with a control (for example, taps a button, enters text, or moves a slider), Control-drag from the control to the method implementation section of the implementation file. In the popover that appears, choose Action from the Connection pop-up menu, enter the method name, and click Connect (optionally, specify the types and the event that invokes the action). You can enter the code for the action method now, or enter it later using the source editor. To highlight the object in the canvas for a connection, hover the pointer over the dot in the gutter of the assistant editor.
To view and edit the connections for an object, select the object and open the Connections inspector (![]() ).
).
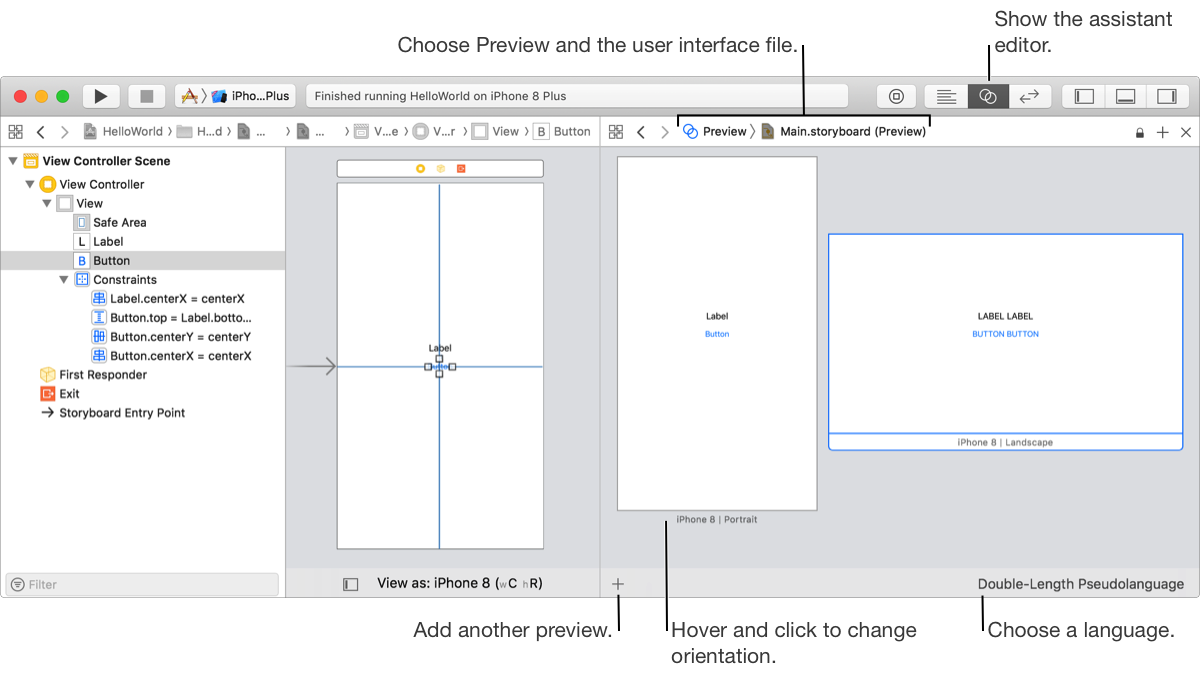
In the assistant editor, you can view a live preview of the user interface as you create it. From the assistant editor jump bar, choose a user interface file from the Preview menu. For example, choose Main.storyboard (Preview), and the assistant editor shows the layout of the first view your users see. For iOS apps, use the control at the bottom of the preview to switch between portrait and landscape modes. If you add localization to your app, you can select a language from the pop-up menu in the lower-right corner. If you don’t have localization yet but want to see how your layout handles different string lengths, choose Double-Length Pseudolanguage from the language menu. To preview multiple device configurations, click the Add button (+) under the assistant editor, then choose another device. For macOS apps, add previews for both Dark Appearance and Light Appearance (go to Support dark mode (macOS)).
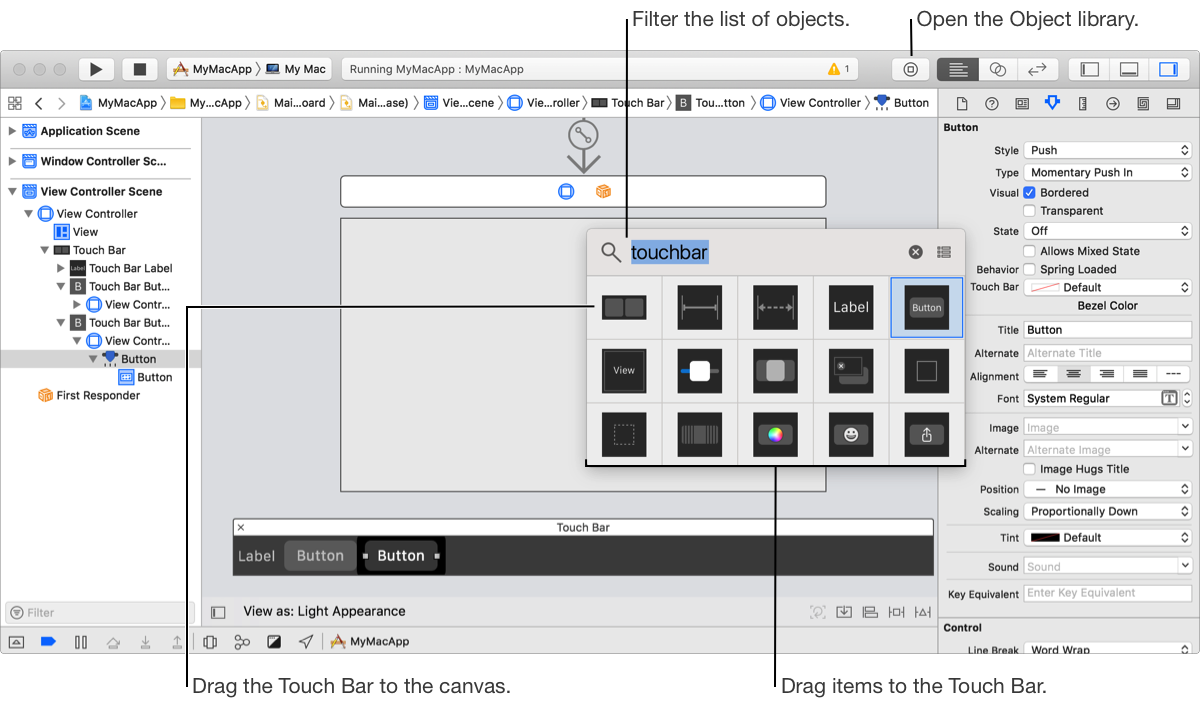
For macOS apps, add items to the Touch Bar. Drag an NSTouchBar object from the Object library to a window or custom view. Then drag NSTouchBarItem objects to the Touch Bar and connect the items to your code. Test the items using a real Touch Bar on a Mac or if you don’t have one, using the Touch Bar simulator. To open the simulator, choose Window > Show Touch Bar.
Next Step: Write your code.