
The Timeline is where you control all timing aspects of a project. You can set the frames where objects begin and end, align multiple effects so they occur simultaneously, control object duration, and even perform common trim operations to edit the objects as you would in a nonlinear video-editing application. The Timeline is located under the timing toolbar, in the Timing pane.
The Timeline consists of three areas:
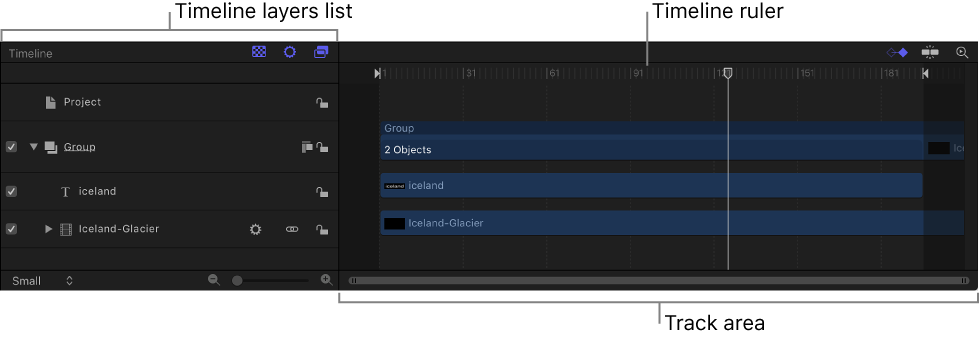
Timeline layers list: On the left side of the Timing pane, this area displays a hierarchical list of objects (layers, groups, and effects objects) in your project, mirroring the contents of the Layers list in the Project pane. You can add media to your project by dragging it into the Timeline layers list.
Timeline track area: On the right side of the Timing pane, this area displays colored bars (timebars) that correspond to the object names in the Timeline layers list; the length of each timebar represents the duration of each object over the course of your project. You can adjust timing and synchronization by edit by moving, trimming, or slipping timebars in the track area
Timeline ruler: Above the track area, this numbered strip measures the timing of objects in frames. Here, you can drag the playhead to navigate through your project as well as perform various timing tasks.
In addition to the Timeline, the Timing pane contains two related partitions that can be shown or hidden: the Audio Timeline and the Keyframe Editor.
Display of the Timing pane is controlled by three buttons in timing toolbar: the Show/Hide Timeline button, Show/Hide Audio Timeline button, and Show/Hide Keyframe Editor button.

A mini-Timeline, located at the bottom of the canvas, provides controls to perform quick edits such as moving, trimming, and slipping without opening the Timing pane. For more information, see Edit in the mini-Timeline.

Tip: You can show the Timeline on a second display, providing a larger workspace for manipulating the timing of objects. For more information, see View the canvas or Timing pane on a second display.