Creating Illustrations Using Multiple Shapes
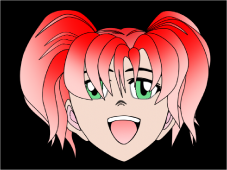
You can use groups of shapes to create more detailed shapes and even complete illustrations. For example, the following illustration was created using nested groups of Bezier shapes.
It’s not necessary to create every part of an illustration with a single shape. Most of the time it is easier, and sometimes essential, to use multiple overlapping shapes to create different parts of an illustration.
For example, the face in the illustration above uses a gradient, but the eyes are a different solid color. This is only possible using two shapes.
Organizing Objects Used in Multi-Shape Illustrations
You can arrange related layers in a project into groups. When you create illustrations using multiple shapes, it is helpful to take advantage of the organizational tools in Motion by grouping shape layers together. In the example above, the objects that make up the illustration are grouped by category: The shapes that comprise the face are contained in the “face” group, the shapes that form the right eye are contained in the “right eye” group, and so on.
Each group can in turn be nested inside a larger enveloping group that can be used to transform or animate the entire illustration.
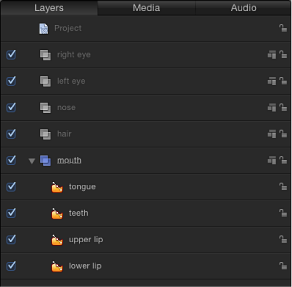
In each group, you can use the Bring and Send commands in the Object menu to reorder objects, controlling which layers are in front of others. By nesting layers that belong together in the same group, you gain the ability to control the ordering of each shape group relative to one another. For example, spiky locks of hair should cascade over anime eyes, and not the other way around.
For more information on controlling group and layer hierarchies, see Reorganizing in the Layers List. For more information on using the Bring and Send commands, see Arrangement Commands in the Object Menu.
Locking Layers and Shapes While Editing Illustrations
You can lock layers and shapes that are behind the shapes you’re drawing and editing in the foreground to avoid accidentally selecting and modifying the wrong one. Layers and shapes can be locked and unlocked. To lock a layer or shape, use the lock icons in the Layers list or Timeline.
Using Object Alignment
While arranging groups of shapes to create more complex illustrations, you can use the Alignment commands in the Object menu. For more information on using object alignment, see Using Object Alignment Commands.